
I still remember the first time I sat at a sunlit table with a lump of air dry clay and no agenda. There was a quiet thrill in the cool, slightly tacky texture beneath my fingers and in how small experiments became little keepsakes.
Beginner Air Dry Clay Crafts felt like permission to play without pressure, and those early attempts kept me coming back.
Over a few weekends I tried simple shapes, tiny ornaments, and mismatched beads, learning how the clay responds to touch and time. Beginner Air Dry Clay Crafts turned quick afternoons into a pleasant habit that left the house sprinkled with small, handmade surprises.
Tiny pinch pot: a cozy tabletop vessel
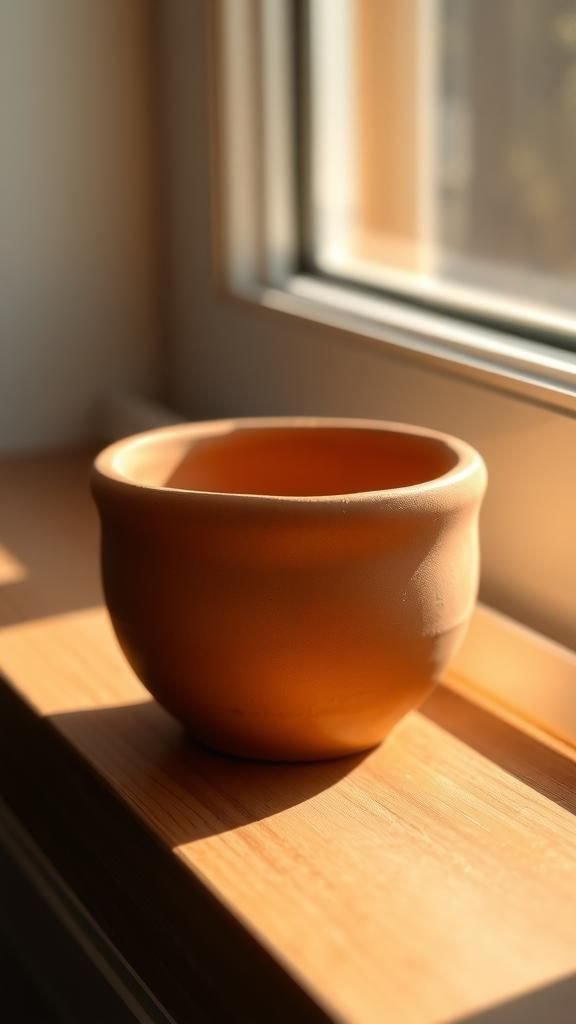
My first pinch pot came out lopsided but beloved, still sitting on a windowsill. The clay had a faint earthy scent and a pleasantly cool weight while I worked.
There was satisfaction in the gentle indentation growing into a shallow bowl, edges soft under a fingertip. After drying, the surface kept little textural fingerprints that felt like a memory.
Glazes are optional and add a soft sheen, but I often like the natural matte finish that catches morning light. This small piece became a resting place for rings and loose coins.
Steps
- Soften a small ball of clay by pressing it gently until it is pliable.
- Create an indentation in the center and widen it by pressing around the inside with a thumb.
- Smooth the rim with a damp fingertip to even out thin spots.
- Let the piece air dry undisturbed until fully hard, then lightly sand any rough edges and finish with a sealant if desired.
Handmade clay beads for a casual necklace

Making beads felt like playing with edible dough, the clay rolled smooth under my palms and warmed slightly from contact. There was a comforting rhythm in shaping tiny spheres and noticing how uniformity emerged with repetition.
I enjoyed the contrast between the raw, matte clay and the glossy finish after a light coating. Stringing them later created a necklace that caught light in quiet ways, each bead carrying a small variance in size and texture.
They became little reminders of slow mornings and gentle focus.
Steps
- Roll small pieces of clay into even spheres by rolling between the palms.
- Pierce each sphere with a thin tool to create a hole for threading.
- Allow the beads to dry completely on a soft surface to preserve shape.
- Thread the beads onto a cord and secure with a knot or clasp.
Impressed leaf pendant: natural textures celebrated
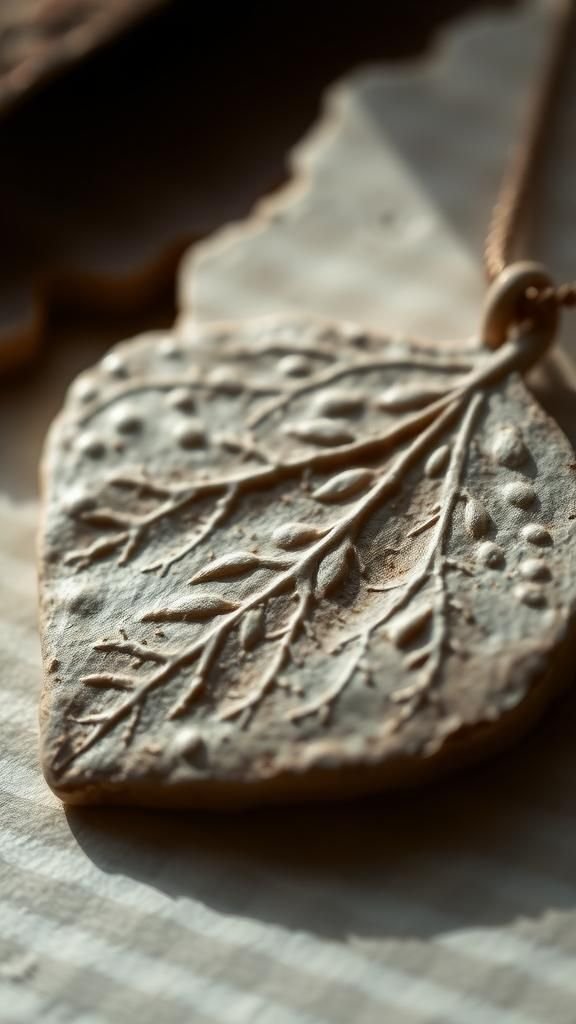
I remember pressing a delicate leaf into flat clay and being surprised by the fine network of veins left behind. The impression captured tiny, fragile details that felt almost botanical in scale.
The pendant held the cool, slightly powdery smell of the clay as it dried, and the edges kept a hand-finished irregularity that made each piece feel personal. A subtle wash of color in the crevices brought the pattern forward, while the raised areas stayed gentle to the touch.
Wearing one felt like carrying a small fragment of a walk in the park.
Steps
- Roll a thin slab of clay and gently press a leaf onto the surface to transfer texture.
- Trim around the imprint to form a pendant shape and create a small hole for hanging.
- Allow the piece to dry fully, then add color wash to accentuate the veins and finish with a sealant.
Whimsical magnet shapes for the fridge
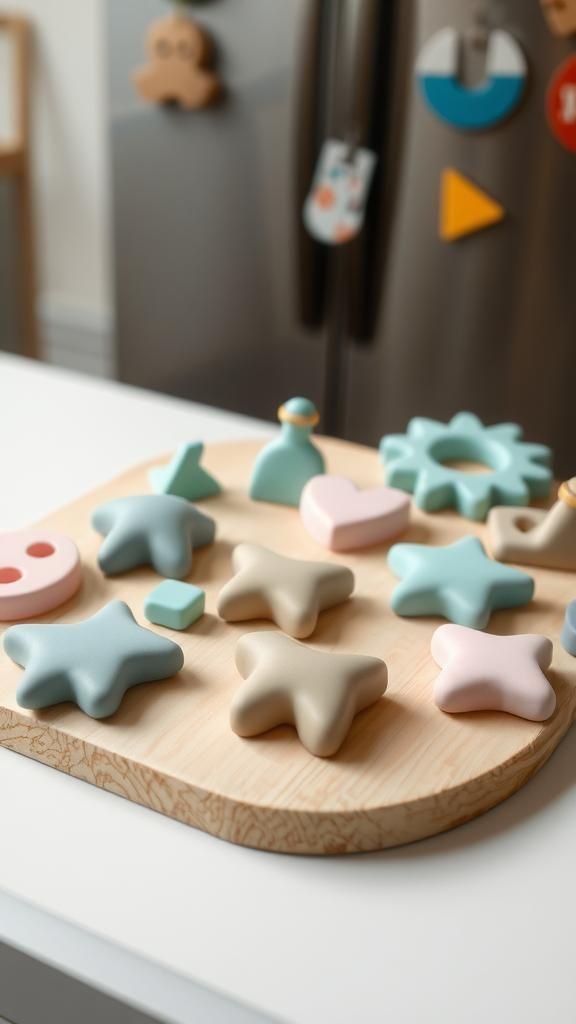
Making magnets brought a playful energy to an afternoon; the clay was cool and slightly yielding, easy to press into small, cheerful shapes. There was satisfaction in seeing tiny forms come together, each carrying a bit of personality from uneven edges and thumb marks.
After drying, the matte pieces sat on the countertop like tiny sculptures, waiting for a magnet to become part of their world. Sticking them to the fridge added a touch of handmade warmth to a practical surface and turned grocery lists into a casual gallery.
Steps
- Shape small flat-backed figures or shapes from clay and smooth the surfaces.
- Allow the pieces to dry completely on a nonstick surface.
- Attach small magnets to the backs with adhesive once dry, then enjoy on magnetic surfaces.
Cozy clay coaster set with subtle textures
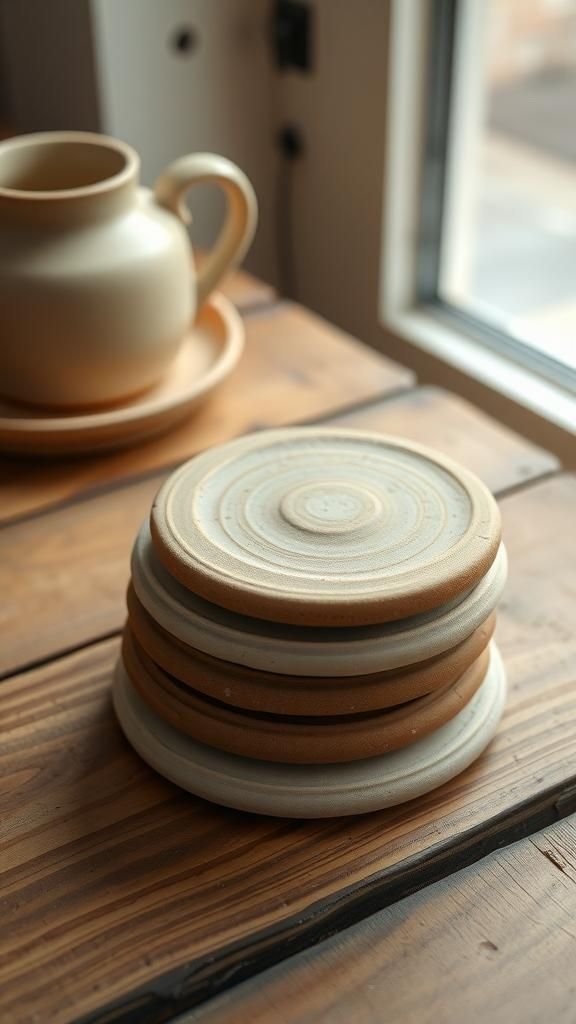
A stack of handmade coasters added a warm, tactile element to the coffee table. The clay felt substantial when flattened and surprisingly soothing under hands while forming round discs.
Textural interest came from pressing lace, fabric, or a fingertip into the surface, leaving soft patterns that caught coffee ring highlights. After drying, the edges had a gentle weight and the matte finish absorbed light in a calming way.
They settled into daily life quickly, each ring and mark telling a small story about mornings and slow conversations over warm cups.
Steps
- Press clay into flat, even discs and texture surfaces with fabric or stamps.
- Smooth the edges with a damp fingertip to remove roughness.
- Let the coasters dry thoroughly, then apply a protective finish to resist moisture.
Tiny animal figurines with simple charm
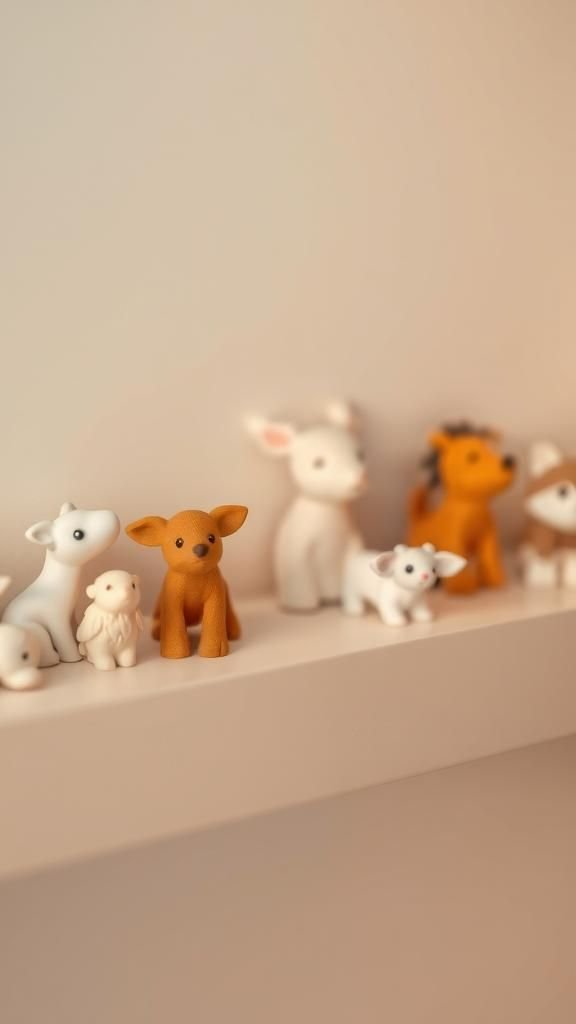
I made a little bird that never left my desk; shaping the body was playful, and the tiny beak added a surprising amount of character. The clay accepted small additions like wings and eyes without complaint, and the finished figures retained a warm simplicity.
Surface textures ranged from smooth bellies to lightly scored wings, which felt nice against the fingertips. Displayed on a bookshelf, the collection grew into a miniature menagerie that brought quiet smiles during late afternoons and made the space feel more personal and less formal.
Steps
- Shape the main body of the animal from a single lump of clay.
- Add small details by attaching tiny pieces for ears, beak, or tail and blend seams gently.
- Dry the figurine thoroughly and optionally add paint or finish to highlight features.
Textured wall tile for a cozy vignette
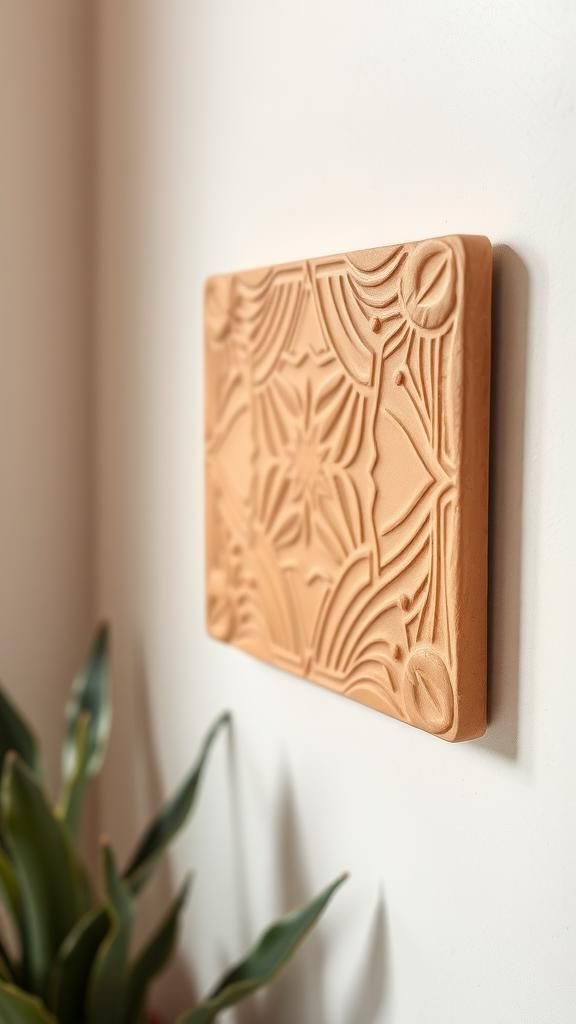
Working on a single wall tile felt like creating a tiny window of texture. The slab had a satisfying weight as patterns were impressed into it, and the clay held crisp ridges where tools met surface.
I liked the contrast between raised motifs and smooth backgrounds, which created a subtle play of light when hung. After drying, the tile kept a quiet presence, the edges slightly uneven in a way that felt handcrafted.
Hanging one near a plant added a calm focal point that shifted with the day’s light.
Steps
- Roll a flat slab of clay to an even thickness and transfer texture using stamps or found objects.
- Trim the tile edges to the desired shape and smooth rough areas.
- Allow to dry fully, then mount with a hanging fixture or adhesive suitable for walls.
Personalized name tag for a special gift
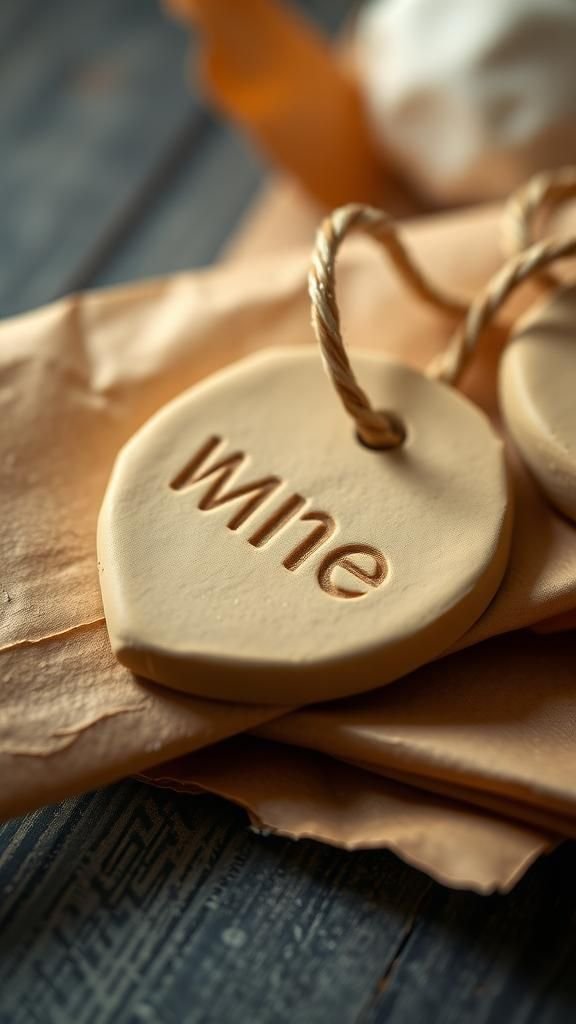
I crafted a small tag with a hand-pressed name and felt an immediate connection to the giver and recipient. The clay took letters with surprising clarity when pressed carefully, and the resulting piece had a soft, tactile appeal.
The edges were slightly uneven, giving the tag an informal charm that contrasted nicely with crisp script. When tied to a wrapped present, it turned ordinary paper into something more heartfelt.
The finished tag carried the faint scent of the clay and a warmth from the time spent forming letters slowly and attentively.
Steps
- Flatten a small slab of clay and cut out a tag shape with a tool.
- Press letters gently into the clay to spell a name and create a hole for tying.
- Let dry fully, then thread ribbon or twine through the hole to attach to a gift.
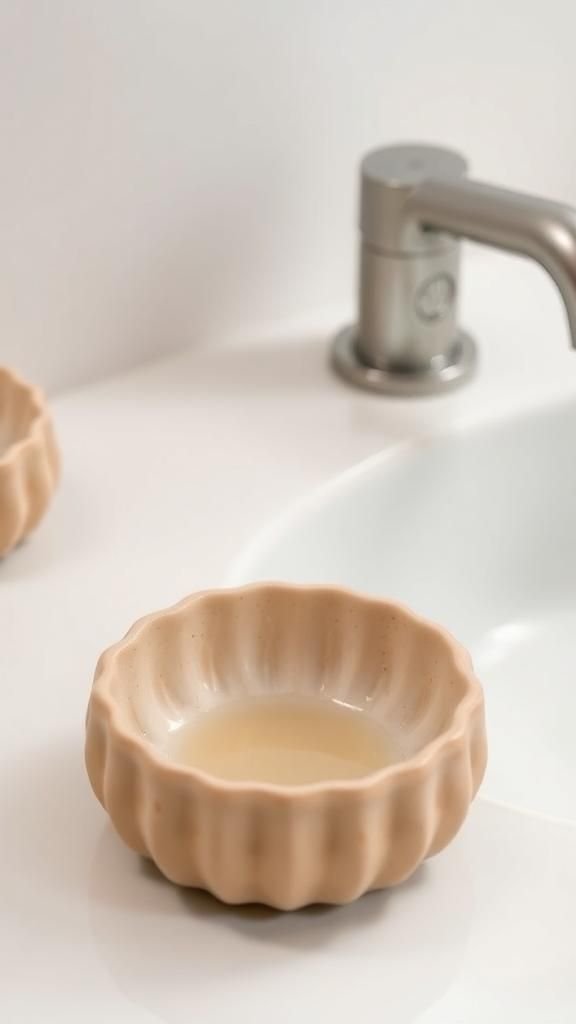
Delicate ring dish for bedside treasures
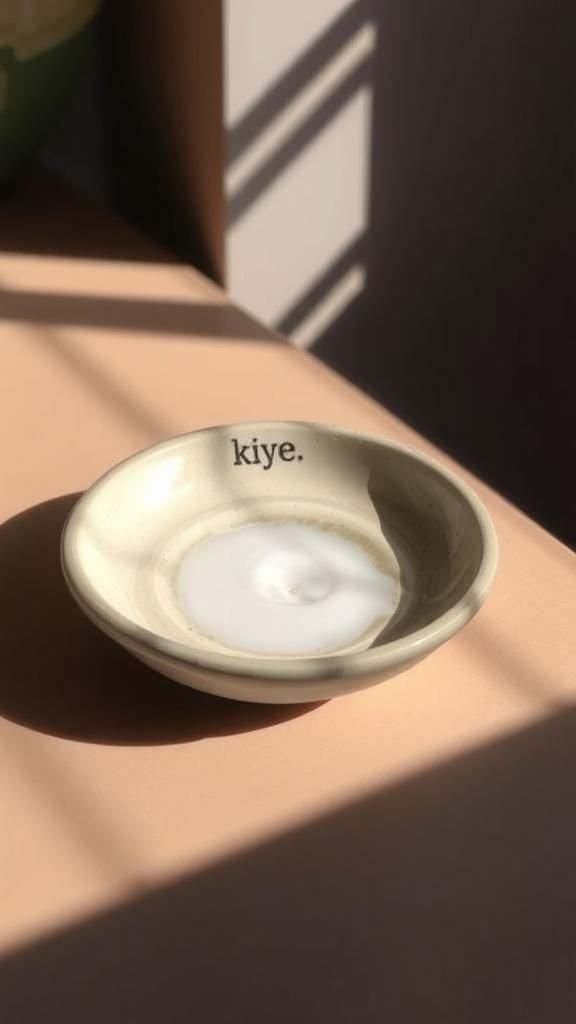
A tiny dish became the place where rings went at night, a small ritual that felt unexpectedly soothing. The clay was cool to touch while forming a shallow well, and the rim bore the gentle impression of fingertips.
Drying left a subtle porous surface that invited light and shadow play, and a thin wash of color made the dish feel refined without hiding its handmade nature. It sat on my nightstand like a quiet promise, catching morning light and keeping little items safely together in a compact, comforting way.
Steps
- Form a shallow dish shape from clay, creating a slight depression in the center.
- Smooth the rim and surface gently to refine the silhouette.
- Allow to dry completely, then apply a protective sealer if desired.
Rustic plant marker stakes for potted herbs
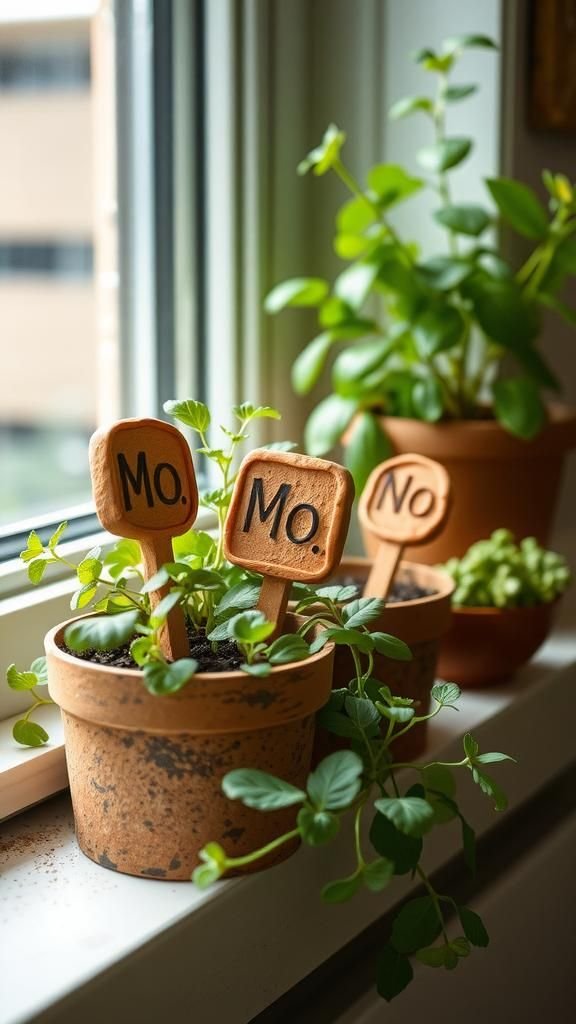
Handcrafted markers added a humble, personal touch to a windowsill herb garden. The clay felt slightly grainy when rolled into thin, flat sticks and the imprint of plant names gave each marker a little story.
After drying, the markers developed a reassuring stiffness and kept faint irregularities that made them feel familiar. They blended into the greenery rather than shouting for attention, their earthy tones echoing soil and leaf.
Placing a marker near a basil plant made the routine of watering feel a touch warmer and more intentional.
Steps
- Roll small flat sticks of clay and trim to desired lengths for plant markers.
- Impress plant names or simple symbols into each stick while the clay is soft.
- Let the markers dry thoroughly before inserting into potting soil near the plants.
Miniature house charms for a cozy collection
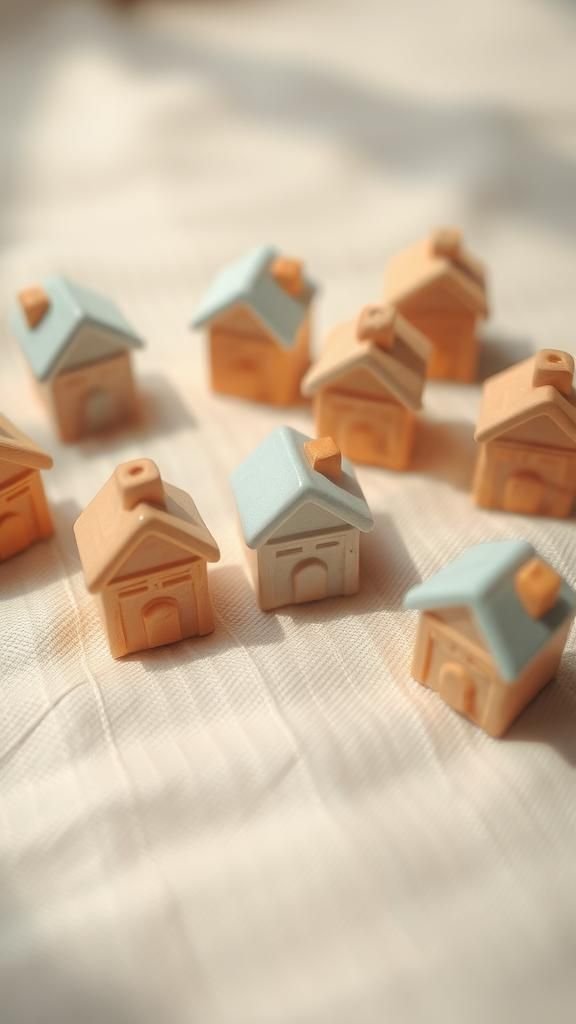
There was something oddly comforting about forming tiny houses with sloped roofs and little door impressions. The clay allowed small architectural quirks to show, like a crooked chimney or uneven window, which felt charming rather than flawed.
The surface caught light on tiny ledges, and subtle color accents highlighted roofs and doors without overwhelming the form. Arranged together, the collection evoked a miniature neighborhood full of personal touches.
Each charm held a memory of the making moment, from the warm feeling of the clay to the quiet patience shaping small details.
Steps
- Shape a basic house silhouette from a small block of clay and add roof and door details with tools.
- Smooth joins and refine edges before creating a small hole if used as a charm.
- Dry fully, then add color accents and a finish to protect the surface.
Sculpted spoon rest for quiet kitchen moments
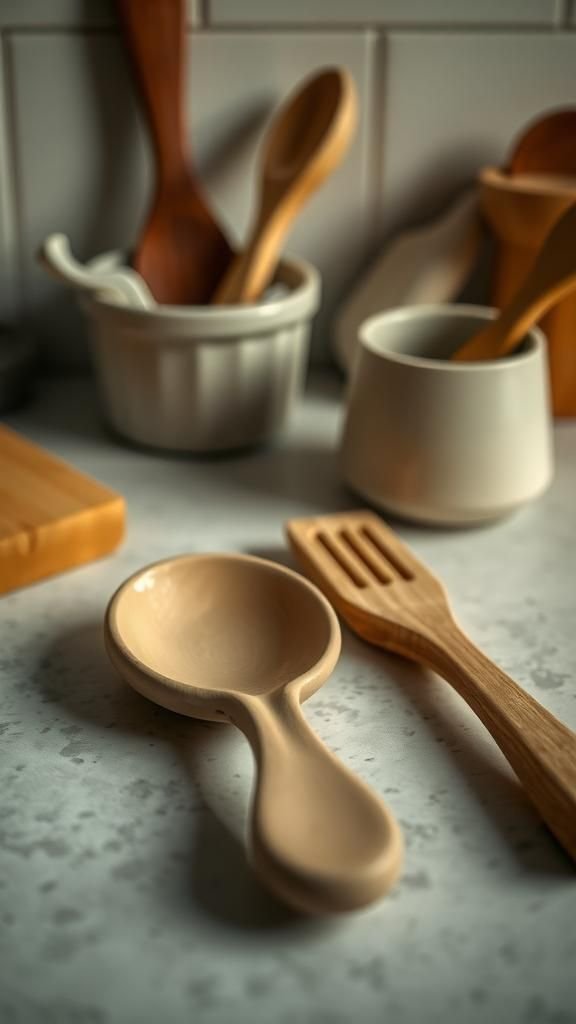
Crafting a spoon rest felt like making a small ritual object for cooking afternoons. The clay held a gentle curve that cradled utensils and the surface showed faint marks from a shaping tool that I found pleasing.
Its matte finish absorbed warm kitchen light and the color complemented wooden spoons nearby. The piece fit into daily life easily, catching drips and providing a designated spot for tools between stirring.
After drying, the spoon rest wore a calm presence on the counter, practical yet quietly decorative, reminding me of slow meal preparation.
Steps
- Shape a slightly concave form from a slab of clay sized to fit kitchen utensils.
- Refine edges and smooth the surface to create a comfortable resting area.
- Allow to dry completely and apply a suitable protective finish to handle moisture.
Decorative napkin rings with tactile interest
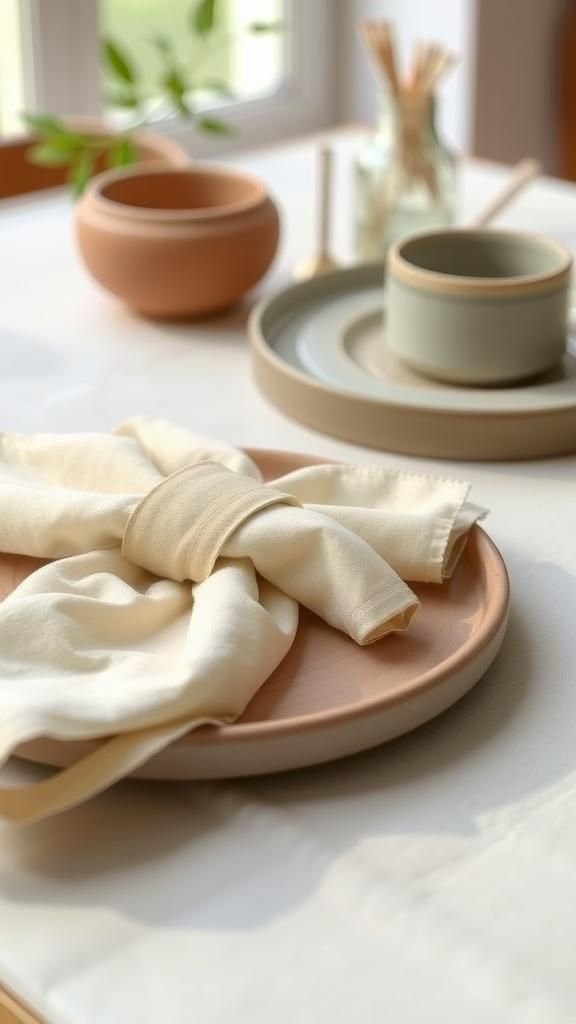
Creating napkin rings felt surprisingly indulgent; small coils of clay wrapped into soft loops and took on character from gentle texturing. The clay surface was slightly cool and left a trace of fingerprints that felt like a human signature.
A thin pattern around the band added playful contrast and caught light in a pleasing way when set at the table. The finished rings added an understated handcrafted note to casual dinners, making a simple place setting feel quietly personal and inviting.
Guests often paused to touch the texture and comment on the homemade touch.
Steps
- Roll even ropes of clay and form them into ring shapes, joining the ends smoothly.
- Add texture or pattern around the bands using stamps or tools.
- Let the napkin rings dry thoroughly before placing them on the table.
Simple candle holder with quiet presence
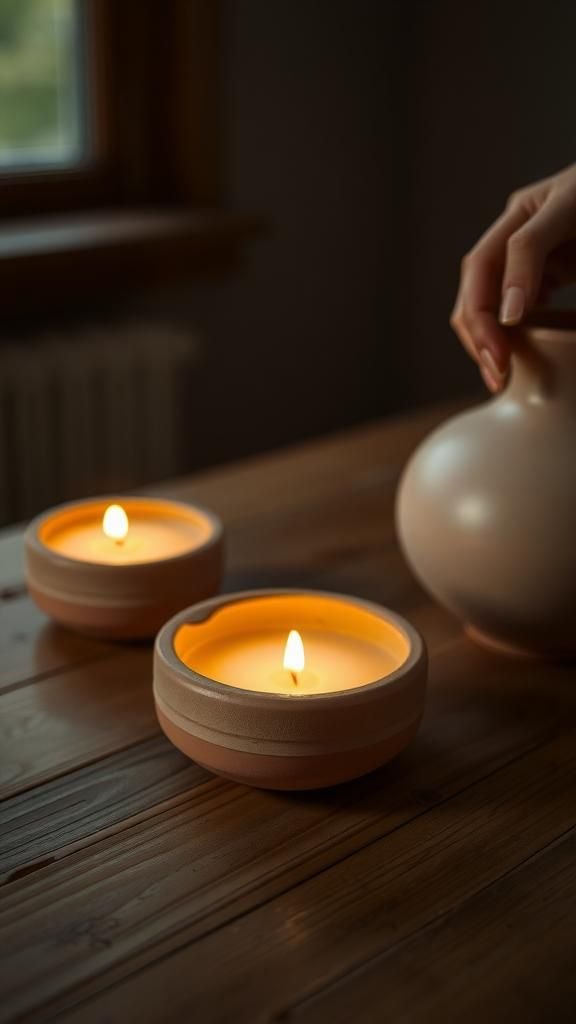
I made a small holder that caught the flicker of a candle in a comforting way. The clay was pleasant to cup, and forming a shallow well felt almost meditative.
The edges showed the faint lines of my fingers, which softened the piece and made it feel lived in. Holding a lit candle in the dinner hour gave the holder a gentle glow, and the clay’s matte surface contrasted warmly with flame light.
It settled into use easily, accompanying quiet evenings and reading sessions without calling attention to itself.
Steps
- Form a stable base and create a central well sized to hold a candle securely.
- Smooth the exterior and add subtle surface texture if desired.
- Allow to dry fully and ensure the holder is heat-safe before using with real candles.
Hand-stamped holiday ornaments for seasonal cheer

Rolling out ornaments brought back memories of cold afternoons and cozy music. The clay felt soft beneath stamps that left crisp impressions of stars, trees, and simple motifs.
Each shape was slightly different, holding hand-finished edges and the faint warmth of time spent. After drying, a ribbon threaded through a hole transformed the ornaments into small keepsakes that caught light in gentle ways.
Hanging them created a modest, handmade presence on the tree that felt more intimate than store-bought decorations and invited a few quiet compliments from visitors.
Steps
- Roll clay into even slabs and cut ornament shapes with a cutter or template.
- Impress stamps or simple motifs into each piece and create a hanging hole.
- Dry ornaments fully, then thread ribbon or twine through the holes for hanging.
Painted keepsake tile with soft color washes
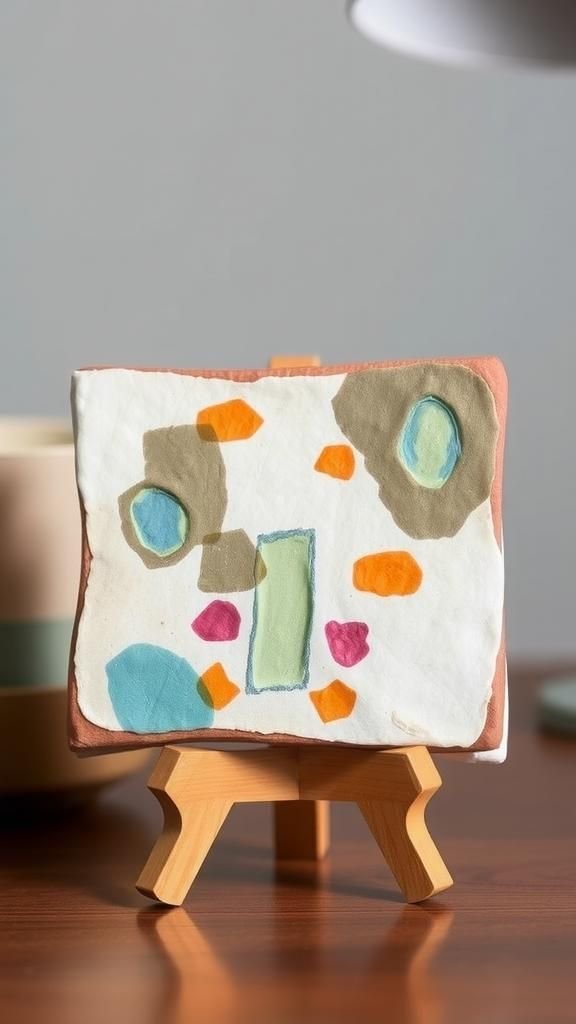
A keepsake tile became a canvas for gentle color experiments. The clay surface accepted thin washes that pooled slightly in recessed areas and left delicate gradients.
Working with subtle hues felt calming, and I enjoyed seeing pigment settle into tiny imperfections like a small map of the making process. The edges retained a handcrafted shape and the tile carried a faint tactile grain that begged to be touched.
Placing it on a shelf with a small stand turned it into quiet artwork, its muted palette harmonizing with nearby ceramics and books.
Steps
- Create a flat tile from clay and allow it to dry until firm but still slightly workable for finishing.
- Apply thin washes of color to accentuate recesses and add gentle gradients.
- Let the paint dry fully and seal with a protective finish if desired for display.
Quirky fridge letters for everyday notes
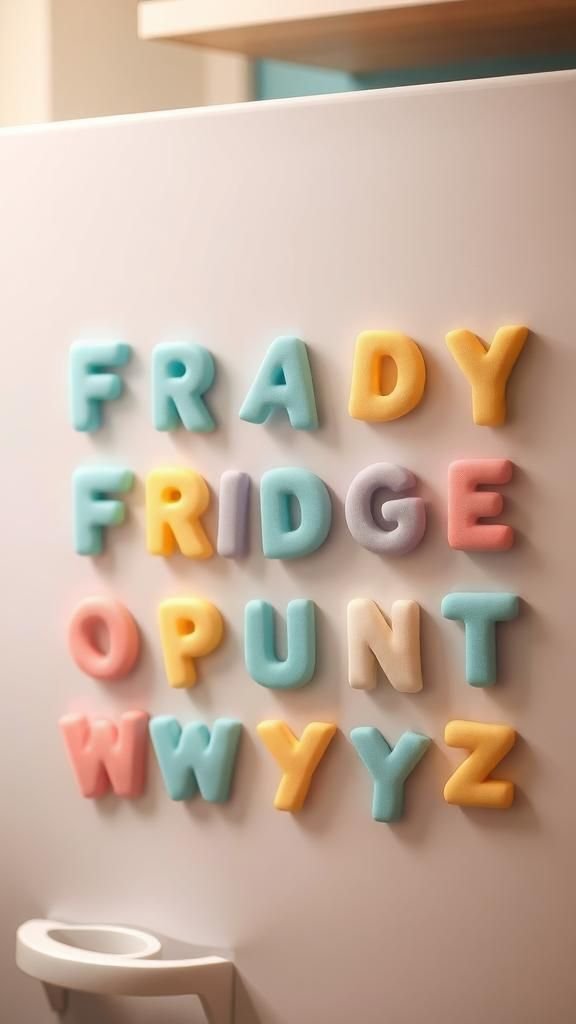
Shaping letters felt playful and immediacy made them endearing. The clay bent into curvy forms that kept the warmth of fingers, and imperfect edges added personality.
After drying, the matte letters were light enough to stick to a magnetic sheet and the color palette softened fridge clutter into a gentle display. Arranging a short message each morning became a tiny ritual, and the tactile letters invited family members to rearrange words and leave affectionate shorthand.
The letters turned ordinary notes into a shared, hands-on conversation piece on the kitchen surface.
Steps
- Form individual letters from clay, refining shapes and smoothing edges as needed.
- Allow letters to dry completely, then attach magnets to the back using adhesive.
- Place on a magnetic surface to spell messages and swap them out whenever desired.
Soap dish with ridged drainage details
Making a soap dish introduced a small focus on utility and form. The clay felt taut when shaping a shallow tray and adding ridges provided a tactile rhythm that helped drainage visually.
The finish stayed pleasantly matte and the ridges caught little glints of water when in use. Placed near the sink, the dish looked intentional rather than utilitarian, its handmade imperfections lending warmth to a practical corner.
Over time it developed a comfortable familiarity among daily routines, quietly performing a function while adding handcrafted texture to the space.
Steps
- Form a shallow rectangular or oval tray from clay and add gentle ridges across the base.
- Smooth the outer edges and refine the ridge heights for effective drainage.
- Let the dish dry thoroughly and apply a water-resistant finish if preferred for wet areas.
Tiny bowls for salt, spices, and small bits
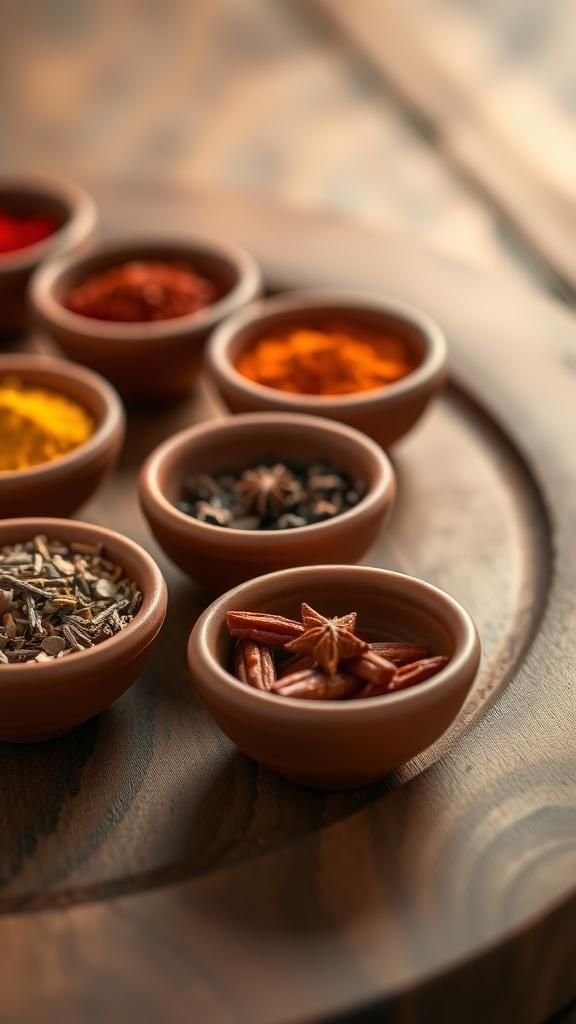
Crafting tiny bowls felt like designing small destinations for everyday items. The clay was sturdy as it took a shallow rounded form, and smoothing the interior gave a satisfying tactile finish.
Each bowl held a small amount of spice or a pinch of salt with dignity, and the matte surface made colors pop gently. Grouped together, they read like a miniature landscape across the counter.
Using them added a carefulness to cooking moments, and the bowls always prompted a small smile when reaching for that perfect pinch.
Steps
- Form small rounded bowls by pressing and refining a tiny clay mass into a shallow shape.
- Smooth the inside surface and refine the rim for balance and comfort.
- Allow to dry completely and apply a suitable non-toxic finish if using with food items.
Button set with handcrafted charm
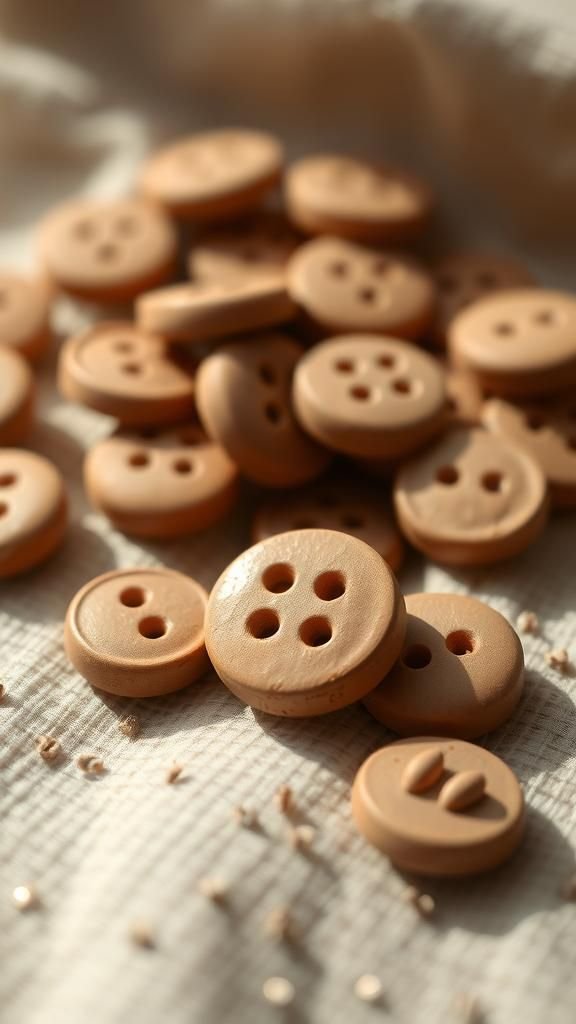
Making a set of clay buttons turned a mundane notion into a small craft pleasure. Pressing gentle motifs into each disc created tiny visual centers that felt homey.
The clay’s surface kept a tactile softness that made the buttons pleasant to handle, and the holes were neat and functional. Sewing them onto a knitted scarf later felt rewarding, each button carrying a hand-formed irregularity that gave the garment personality.
They were small details that made everyday items feel less anonymous, and visitors often noticed the little handmade touch when fastening a coat.
Steps
- Roll small discs of clay to a consistent thickness and create two or more sewing holes in each.
- Impress subtle patterns or textures onto the button faces before drying.
- Dry the buttons thoroughly and attach them to garments with thread once complete.
Keepsake spoon with hand-pressed details
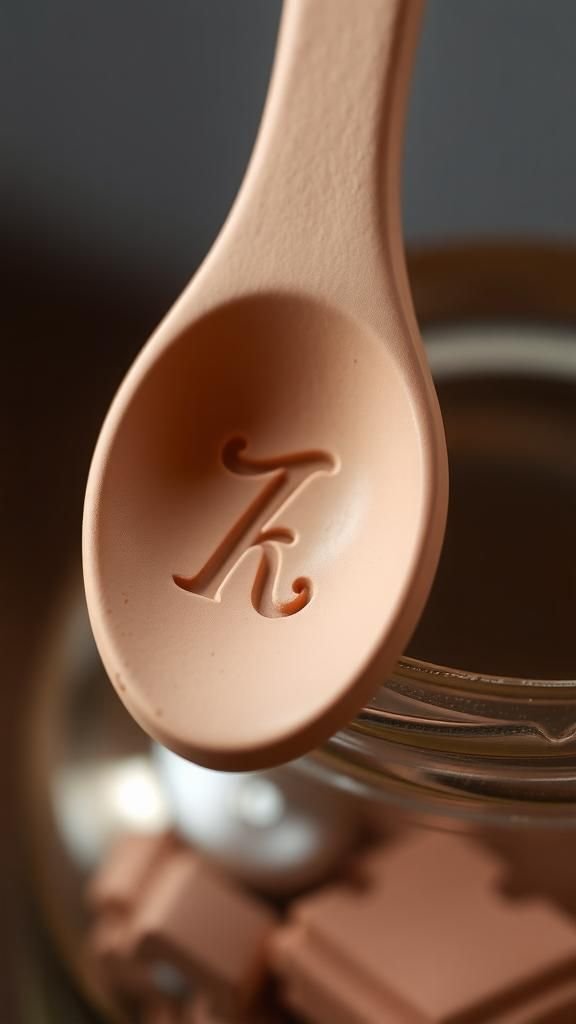
Creating a small keepsake spoon felt almost ceremonial; the handle carried a pressed initial and the bowl was petal-soft. The clay accepted delicate impressions and the finished object balanced nicely in the palm.
The surface texture invited touch and the spoon seemed to hold a quiet dignity even when leaned against a jar. It became a thoughtful little token to include with a gift of spices or tea, carrying both function and sentiment.
There was comfort in crafting an object meant for small, everyday exchanges between friends.
Steps
- Shape a small spoon from clay, forming a comfortable handle and shallow bowl.
- Press initials or a simple motif into the handle for personalization.
- Allow the spoon to dry completely and consider a food-safe finish if used with consumables.