
Beginner Scrap Wood Crafts turn leftover boards into charming, useful pieces that feel personal from day one. When I first explored beginner scrap woodworking, a tiny cedar offcut became a coaster that still sits on my desk, reminding me that small scraps can spark big creativity.
These beginner wood crafts carry a relaxed rhythm and a friendly entry point for anyone curious about making.
Rustic Square Coasters From Mixed Offcuts
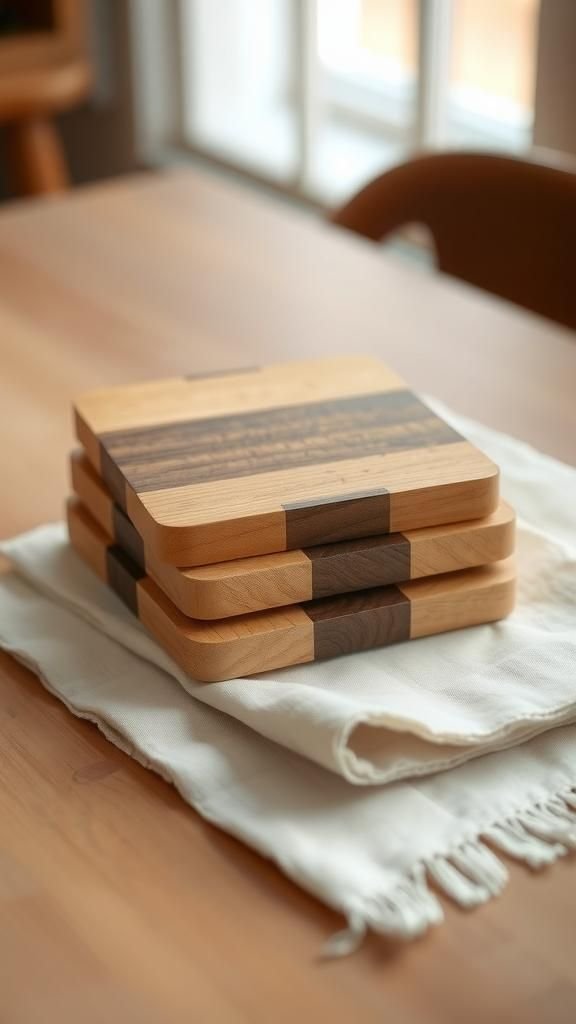
Short squares cut from oak, cedar, pine, or walnut create little table accents with grain that tells a story. A set presents mellow contrast between light sapwood and rich heartwood, while edges can stay crisp or softened for a cozy, worn-in vibe.
Natural oil, clear wax, or a matte color wash protects surfaces without drowning the texture. Stacked and tied with twine, they look thoughtful on a coffee table, bar cart, or breakfast tray.
Wrapped in kraft paper with a handwritten label, the set lands as a friendly host gift that pairs well with mugs or a small bag of coffee beans.
Steps
- Cut four to six scrap squares around 3.5–4 inches each.
- Sand faces and edges through medium to fine grits.
- Wipe dust away and apply oil, wax, or clear coat.
- Add soft cork or felt pads to the bottom of each coaster.
Simple Tea Light Candle Block
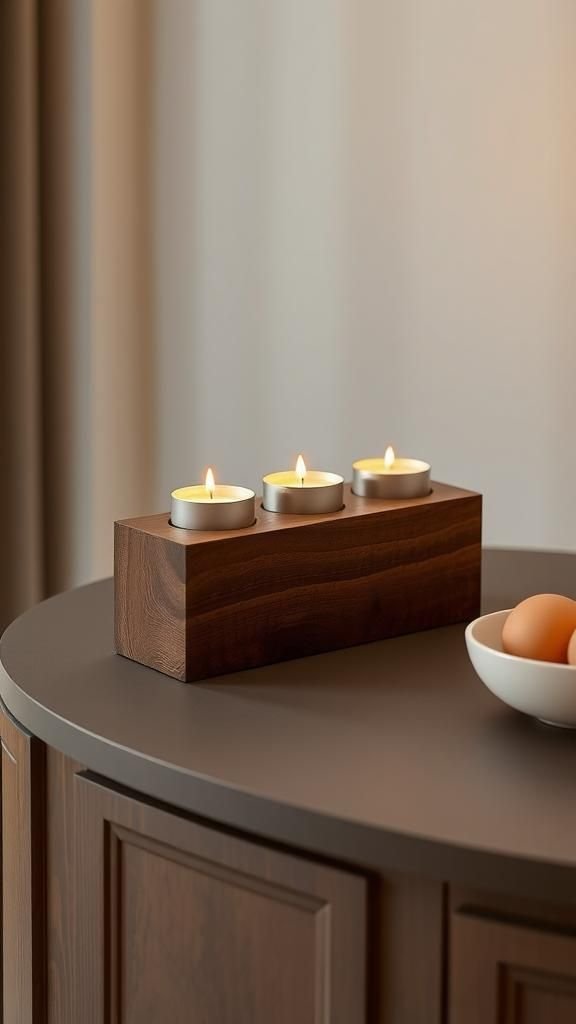
A chunky offcut transformed into a candle block brings calm to mantels and little nooks. Maple or alder adds pale warmth while walnut leans moody and dramatic.
Shallow cup recesses create a clean, modern grid, and subtle chamfered corners soften the profile. Natural oil or satin clear enhances chatoyance without glare, and an ebonized finish turns the piece into a minimal statement.
Presented with beeswax tea lights in a small kraft box, it becomes a thoughtful thank-you. On a sideboard, it pairs well with a ceramic vase, dried stems, and textured textiles for a relaxed evening glow.
Steps
- Crosscut a solid block to a comfortable length.
- Mark evenly spaced tea light centers on the top face.
- Drill shallow holes with a Forstner bit to fit tea lights.
- Smooth all surfaces and finish with oil or clear coat.
Minimalist Scrap Wood Phone Stand

A low-profile wedge cradles a phone at a gentle angle, perfect for desks or nightstands. Maple, cherry, or bamboo offcuts keep the look clean, while a darker stripe inlaid along the edge adds contrast.
A shallow groove with a relief notch supports a charging cable without visual clutter. Natural oil preserves clarity; milk-painted accents introduce playful color.
Packaged with a small linen pouch, the piece travels easily and lands as a practical gift for a new workspace. It rests neatly beside a notebook, pen cup, and plant, bringing warmth to a tech-heavy corner.
Steps
- Rip a scrap into a small wedge or rectangular block.
- Cut a centered slot wide enough for a phone.
- Add a small cable relief at the front edge.
- Sand smooth and apply a protective finish.
Geometric Mosaic Wall Art Panel
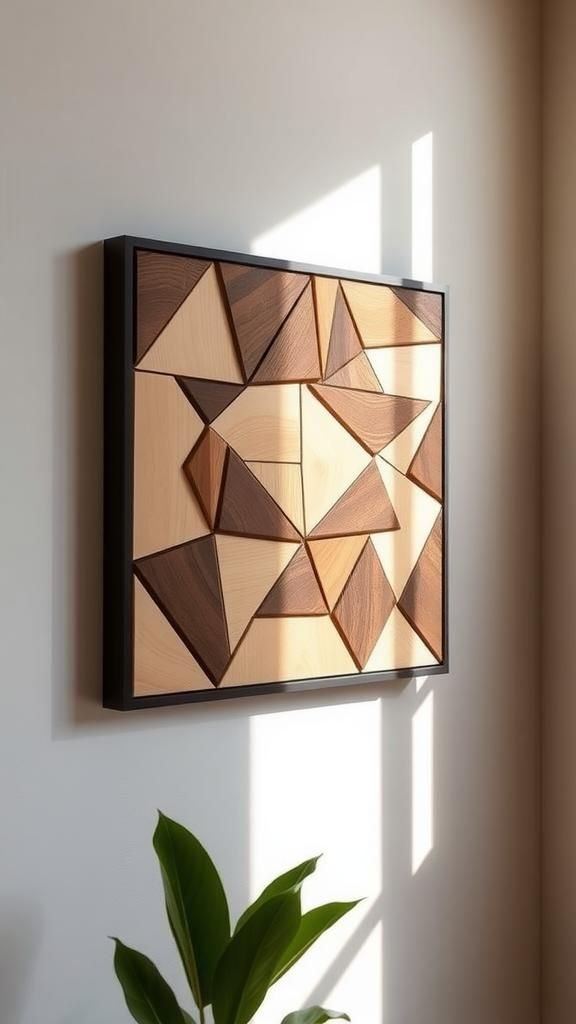
Short trimmings in maple, ash, and walnut join into angular geometry that reads modern while staying warm. Contrasting tones create movement across triangles, chevrons, or herringbone strips.
A thin frame in blackened oak or raw pine keeps focus on the interior pattern. Clear satin finish maintains clarity and a soft sheen, while color-popped segments introduce playful rhythm.
Hung above a console or in a gallery wall, the panel adds texture without dominating the room. Wrapped with kraft corners and cotton ribbon, it makes a heartfelt housewarming surprise that shows care for reclaimed materials.
Steps
- Cut scrap strips and triangles from varied species.
- Arrange a pattern on a plywood backer until balanced.
- Glue pieces to the backer and clamp until set.
- Trim edges flush and add a simple perimeter frame.
Slim Entryway Key Holder Rail
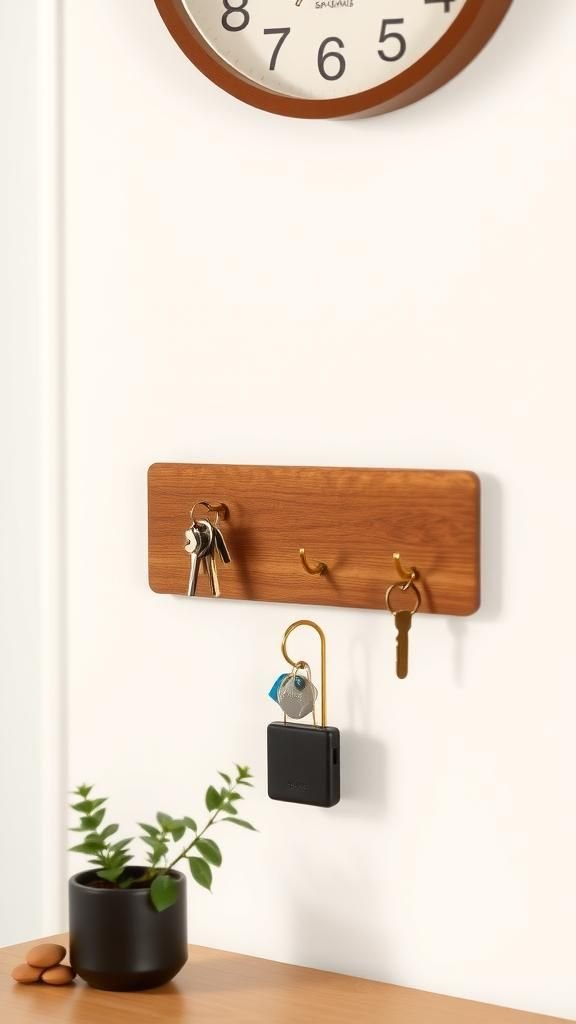
A thin rail from hardwood trim keeps keys organized while staying discreet. Walnut or stained pine provides rich tone against light walls, and brushed brass hooks lend a gentle gleam.
For a more coastal mood, whitewashed ash pairs with matte black hardware. Minimal branding burned into the back adds a craftsperson’s touch.
This rail suits narrow entryways, dorm rooms, or mudroom lockers, offering calm order near the door. Presented in a narrow box with tissue wrap and a tiny tag, it becomes a kind gesture for new neighbors or first apartments.
Steps
- Cut a straight, knot-free strip to desired length.
- Mark and pre-drill evenly spaced holes for hooks.
- Install hooks and smooth the wood surface.
- Finish the wood and mount with keyhole slots or screws.
Farmhouse Mini Sign Trio From Offcuts
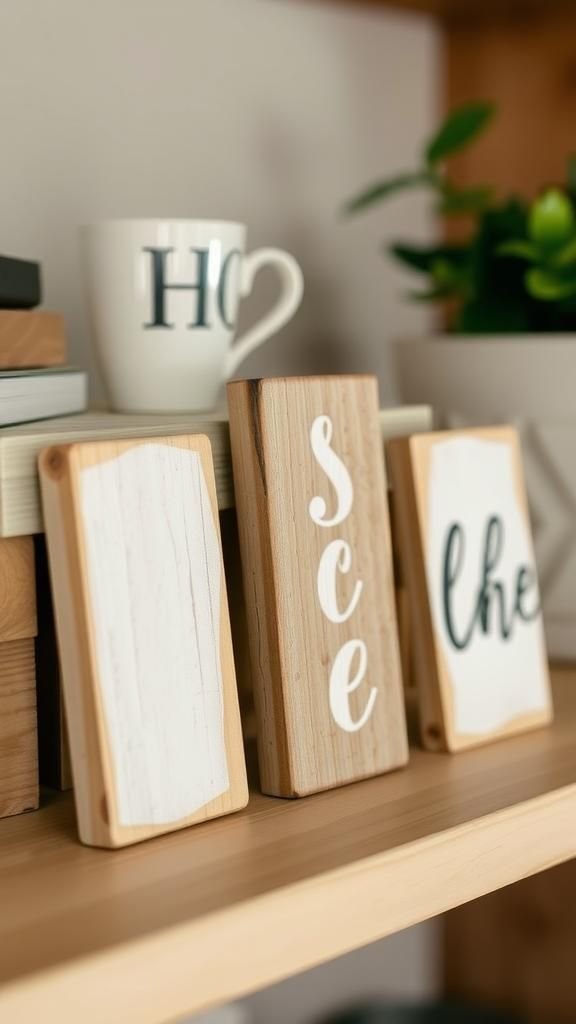
Small plaque-style signs bring charm to shelves and counters without taking over. Reclaimed fence boards or pallet slats lend character through knots and patina, while crisp planed edges give a more refined feel.
Stenciled words or simple icons appear in neutral chalky hues, with twine or sawtooth hangers for display options. Clustered as a trio, they brighten a coffee station, pantry shelf, or laundry corner.
Delivered bundled with jute and a handwritten card, they feel heartfelt and approachable, perfect for seasonal swaps or easy gifting throughout the year.
Steps
- Cut three equal rectangles from flat offcuts.
- Lightly sand to smooth splinters while keeping texture.
- Stencil short words or icons and let dry.
- Apply clear wax and add hangers or stand-off blocks.
Wooden Herb Garden Markers
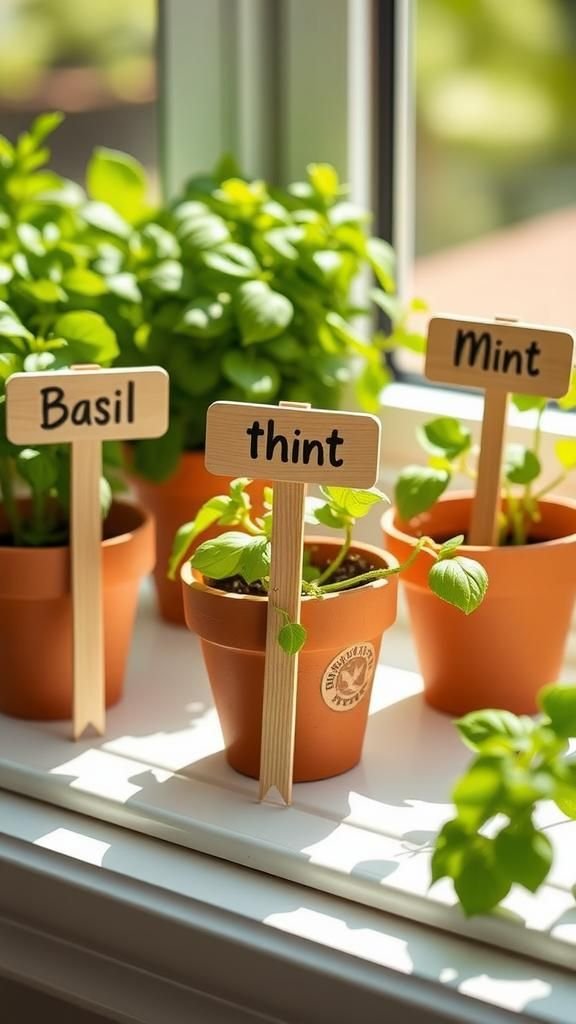
Short stakes made from cedar or cypress bring natural character to planters and window boxes. Soft-edged rectangles or gentle spear points look friendly among basil and mint.
Hand-lettered names in waterproof ink or pyrography stay legible through watering, and a beeswax-mineral oil blend adds a mellow sheen. A set arranged in a kraft envelope with twine becomes a sweet gift for garden lovers and kitchen growers.
When tucked into terracotta pots on a sunny sill, the warm grain contrasts beautifully with green leaves and rich soil.
Steps
- Rip scraps into thin slats and cut to stake length.
- Shape tips and smooth surfaces with sandpaper.
- Letter herb names with waterproof marker or burning pen.
- Seal with food-safe finish and allow to cure.
Modern Mixed-Species Bookends
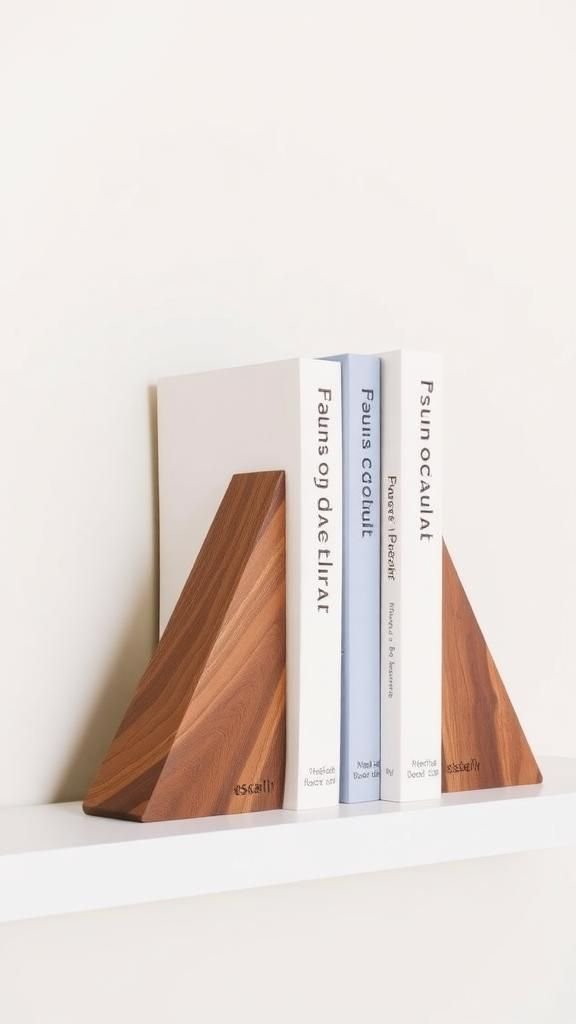
Chunky blocks in maple and walnut team up for a high-contrast pair that keeps shelves tidy. A subtle L-profile or weighted base prevents slipping, while felt bottom pads protect furniture.
Clear satin finish highlights the color difference and crisp geometry. For playful energy, a thin accent stripe in a third species adds rhythm.
Wrapped as a pair with a simple belly band, they make a thoughtful gift with a paperback tucked between. On a credenza beside a framed print and stoneware bowl, they add quiet structure and artisan character.
Steps
- Cut two matching blocks with stable, square faces.
- Join a contrasting strip or cap if desired.
- Sand all sides and ease sharp corners slightly.
- Finish and apply felt pads to the bottoms.
Desk Pencil And Brush Caddy Block

A sturdy block dotted with clean holes organizes pens, brushes, and scissors with tasteful simplicity. Maple or beech reads fresh and light, while a charred shou sugi ban surface introduces texture and drama.
Hole patterns can follow a grid or gentle arc for visual rhythm. Beeswax or hardwax oil keeps the touch silky without glare.
Presented with a kraft-wrapped set of pencils, it becomes a thoughtful desk-warming gift. On a studio table, it pairs naturally with sketchbooks and a ceramic water cup, turning clutter into a curated display.
Steps
- Trim a rectangular block with a stable base.
- Lay out hole sizes and spacing on the top face.
- Drill clean vertical holes with brad-point or Forstner bits.
- Sand smooth and apply a hand-rubbed finish.
Small Hanging Shelf With Rope Detail
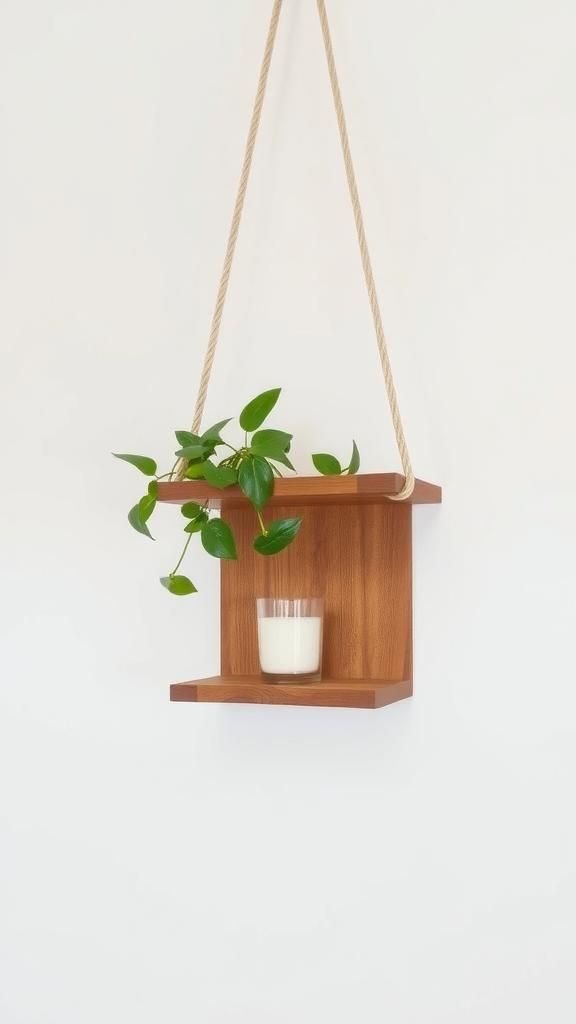
A single board becomes a floating perch for plants, candles, or small speakers. Pine brings an airy cottage feel while ash adds linear grain for modern rooms.
Two rope or leather cord loops support the shelf from a wall hook, creating a breezy visual line. Whitewash or clear oil suits light interiors, with charcoal stain adding drama against pale walls.
Styled with a trailing pothos and a little stone, the piece makes calm vertical storage. Wrapped with the cord tucked neatly and a tiny care tag, it arrives gift-ready.
Steps
- Cut a flat board with clean edges and rounded corners.
- Drill two holes near each end for cord pass-throughs.
- Thread rope or leather and tie secure knots underneath.
- Smooth surfaces and seal; hang from a sturdy hook.
Chunky End-Grain Trivet From Offcuts
Short blocks rotated to end grain deliver durability and charming checkerboard pattern. Maple and cherry combine for warm contrast, while walnut squares sprinkle dark accents.
The dense surface resists heat, and small rubber feet lift the piece for airflow and stability. A food-safe oil-wax blend maintains luster near the stove or on the table.
Presented with a linen tea towel, the trivet feels kitchen-ready and handmade. On open shelving, its pattern acts like a little piece of art even when resting between meals.
Steps
- Cut uniform short blocks from clean hardwood offcuts.
- Arrange blocks end-grain up in a tight grid.
- Glue the grid to a thin plywood backer and clamp.
- Flatten, ease edges, finish, and add heat-resistant feet.
Strip-Frame Picture Frame From Scraps
Narrow strips in alternating woods create a frame with subtle rhythm around photos and prints. A thin rabbet holds the glazing and art, while a crisp mitered corner keeps the profile elegant.
Natural oil emphasizes grain variation, or a blackened wash turns the piece into a modern outline. Hung with a sawtooth or stood on an easel back, the frame works for travel snapshots, botanical prints, or kid art.
Wrapped with tissue and a blank card, it becomes an easy, heartfelt gift that highlights memories and craft.
Steps
- Rip thin strips from straight-grained offcuts.
- Laminate strips into wider frame stock and flatten.
- Cut miters, add a rabbet for glazing, and glue the frame.
- Sand, finish, and install glass, mat, and backing.
Magnetic Bottle Opener Wall Board
A compact board pairs a metal opener with hidden magnets that catch caps in mid-fall. Dark walnut sets a refined tone, while weathered reclaimed pine leans casual and pub-like.
Contrasting screws and a brass opener add a small flash of hardware interest. A matte clear finish keeps the grain touchable, and a small routed detail or burned logo gives personality.
It mounts near a patio door, bar cart, or grill station, turning a small ritual into a tidy moment. Presented in a narrow box with kraft crinkle, it lands well with craft beverage fans.
Steps
- Cut and square a board sized for opener hardware.
- Drill shallow recesses on the back for strong magnets.
- Mount magnets with epoxy and install the opener on front.
- Finish the wood and hang on a wall stud or anchors.
Tic-Tac-Toe Board With Chunky Pieces
A friendly game board made from a single square offcut brings casual fun to coffee tables. Grooves mark the grid, and chunky X and O tokens from contrasting wood feel pleasant in the hand.
Clear satin finish preserves legibility while keeping things tactile. A simple canvas pouch stores the pieces, turning the set into a great family gift.
On rainy afternoons, it lives on the table alongside a candle and a plate of cookies, blending game time with cozy decor.
Steps
- Square a board and add shallow grooves to form a grid.
- Cut thick discs or blocks for X and O tokens.
- Carve or brand the letters on the tokens.
- Smooth all parts, finish, and package with a small pouch.
Simple Fence-Picket Bird Feeder
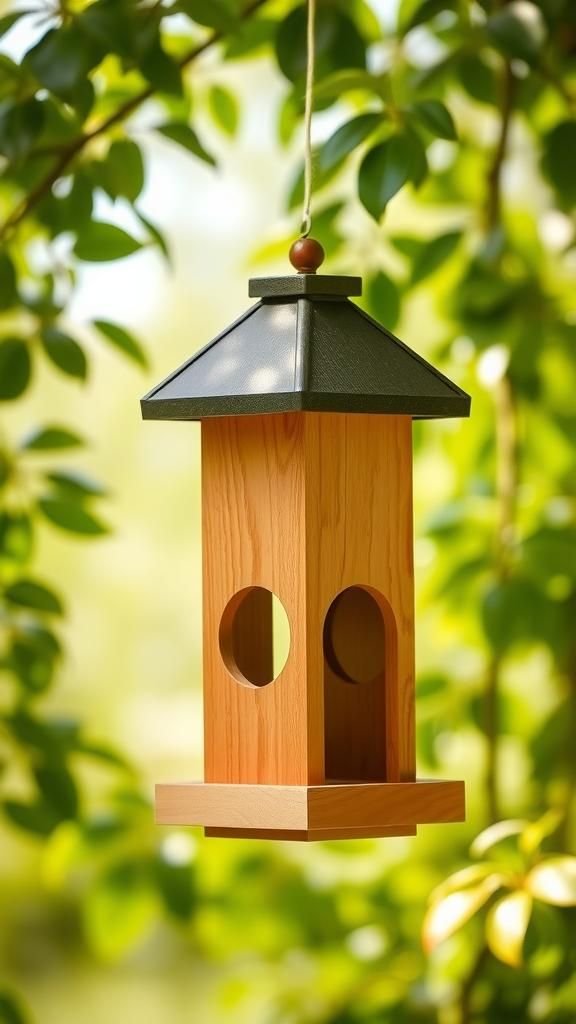
Short fence pickets become a charming feeder with a pitched roof and open sides. Cedar weathers gracefully and brings a pleasant aroma; pine takes color stains for a cottage look.
Mesh or dowel perches invite small birds, while a clear finish keeps grain visible. Hung from a tree or shepherd’s hook, it joins the garden as a friendly landmark near herbs and flowers.
Gifted with a small bag of seed and a handwritten tag, it delights nature lovers and patio dwellers alike.
Steps
- Cut base, two side walls, and a small roof from pickets.
- Assemble the body with exterior glue and brads.
- Add dowel perches and a hanger eye screw.
- Sand edges, finish for weather, and fill with seed.
Slot-Style Wooden Napkin Holder
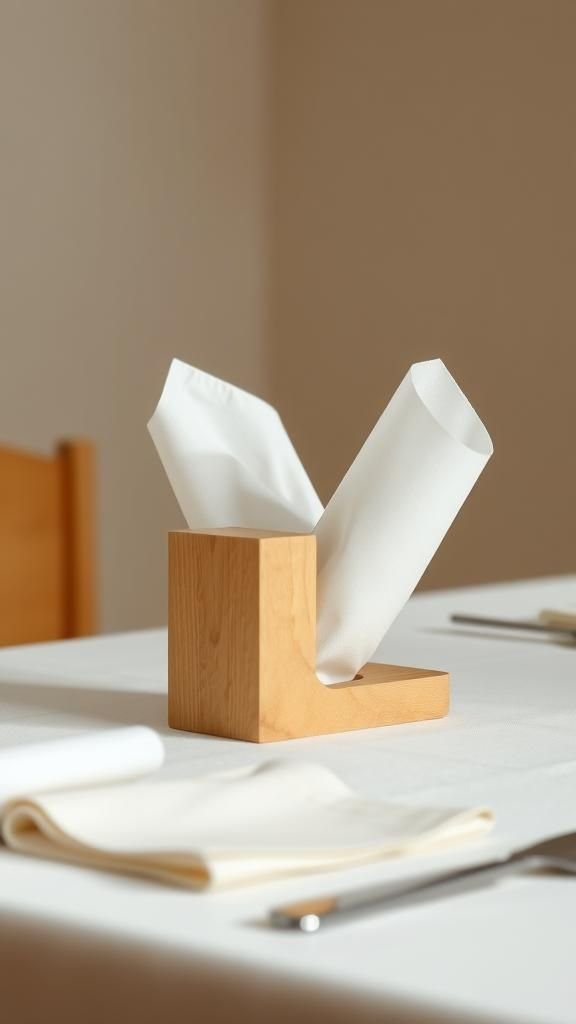
A compact U-shaped piece cradles napkins with clean lines that suit modern tables. Maple or beech reads light and airy, while a walnut base provides grounded contrast.
A gentle radius across the top adds softness to the minimal silhouette. Food-safe oil brings out subtle figure, and a muted color block along the base gives a playful hint.
Sitting beside salt and pepper mills, the holder blends form and function without fuss. Wrapped with a linen napkin tucked inside, it becomes a thoughtful host gift that feels handmade and tidy.
Steps
- Cut two identical panels and a matching base from scraps.
- Create a centered slot by spacing the panels on the base.
- Glue and clamp until the assembly is firm.
- Smooth, soften edges, and finish with a food-safe oil.
Hexagonal Planter Sleeve For Nursery Pots
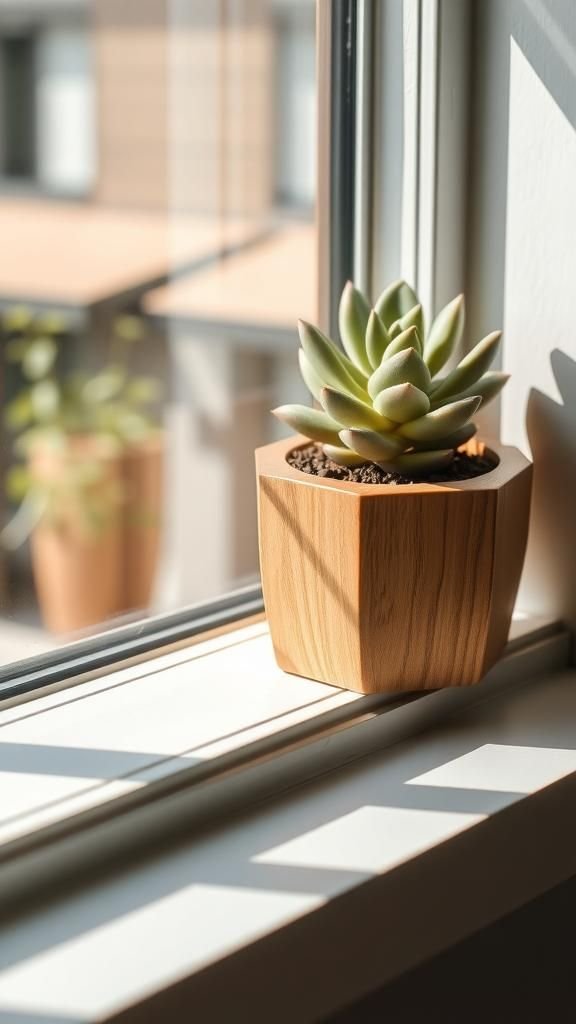
Thin slats in six panels meet to form a geometric sleeve that fits a standard nursery pot. Ash and oak provide crisp grain; walnut delivers a handsome contrast for modern interiors.
Interior waterproof liner or a removable plastic pot keeps moisture off the wood. A subtle bevel on each edge creates a neat shadow line around the hexagon.
Clear matte or whitewash keeps the mood fresh on windowsills or shelves. Presented with a small succulent, the sleeve arrives ready for an office desk or apartment ledge.
Steps
- Rip six equal slats with matching bevels on the long edges.
- Tape edges together, apply glue to bevels, and fold closed.
- Secure with a strap clamp until cured and square the top.
- Lightly sand and finish; insert a plastic liner or pot.
Slatted Serving Tray With Side Handles

Short slats from pallet-safe stock or flooring cutoffs line up to form a sturdy surface with pleasing rhythm. A simple frame and low handles keep the tray light yet supportive, while felt pads treat tabletops gently.
Natural oil highlights color shifts across mixed species, and a chalky color wash adds farmhouse cheer. Styled with a mug, croissant, and napkin, the tray brings breakfast-in-bed charm to weekends.
Wrapped in tissue with a simple cord tie, it makes a friendly host gift for brunch lovers.
Steps
- Cut frame pieces and interior slats to length.
- Assemble the frame square, then glue and nail the slats.
- Install low-profile handles and fill any tiny gaps.
- Sand smooth, finish, and apply felt pads underneath.
Headphone Stand From A Single Offcut

A gently curved or stepped profile gives headphones a graceful resting spot on a desk. Walnut or sapele emphasizes sleek lines; maple offers a lighter Scandinavian mood.
A leather or cork pad on the crown protects the headband, and a weighted base prevents tipping. Satin finish keeps fingerprints minimal.
Paired with a small cable catch, it organizes audio gear in style. Boxed with kraft fill and a tiny care card, it suits music fans and remote workers who appreciate tidy tools.
Steps
- Cut a tall central piece and a stable base block.
- Shape the top profile and round all touch points.
- Join the base to the upright with glue and screws.
- Finish and add cork or leather padding where headphones rest.
Wall-Mounted Mail And Letter Sorter
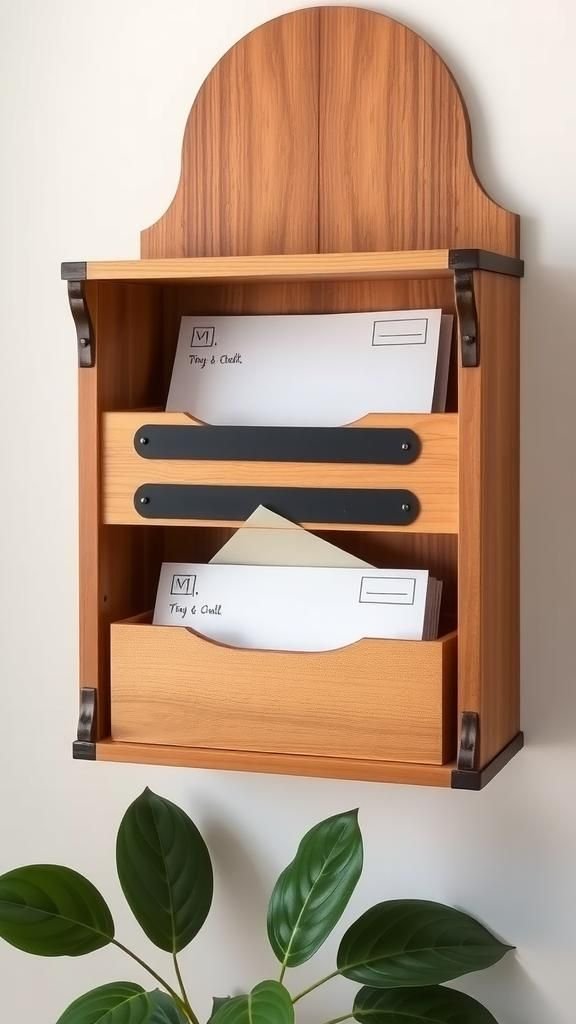
A shallow box with a front slot corrals envelopes, invites, and notes. Pine boards keep things lighthearted, while a walnut face lends a refined look near a door.
A chalkboard or cork strip across the front adds a small memo area. Keyhole hangers make the piece float, creating a tidy landing zone in compact entryways.
Clear finish, milk-paint color, or a whitewash suits different interiors. Presented with a mini pencil and card bundle, it becomes a friendly organizational gift that feels handmade and thoughtful.
Steps
- Cut sides, bottom, and back from straight scrap boards.
- Assemble the box and add a slanted front panel.
- Sand the edges and mount keyhole hardware on the back.
- Finish and hang at a comfortable reach near the door.
Simple Wall Hook Block For Coats Or Bags

A compact block with a single sturdy hook keeps a hallway tidy without clutter. Oak or ash brings calm grain, while a burned edge detail adds character.
The hook can be brass for warm sparkle or matte black for a minimal look. A soft bevel on the back creates a floating shadow line.
Installed in a row, the blocks create a rhythm along the wall while remaining unfussy. Wrapped as a pair with tissue and a small hardware packet, they make a neat apartment upgrade gift.
Steps
- Cut a small rectangular block with squared faces.
- Pre-drill for the hook and for wall mounting.
- Apply finish to the wood and install the hook.
- Mount on anchors or into a stud at eye level.