
Graduation day outfits should feel personal, comfortable, and photo-ready. These DIY Graduation Outfit Ideas mix handmade touches with easy upgrades—think embroidered caps, repurposed jackets, and custom sashes—from playful color pops to subtle heirloom details that photograph well.
A graduation cap once got a hand-sewn ribbon after a last-minute fabric raid, and the pictures still spark laughter—small DIY touches make the day feel like home.
Embroidered mortarboard: floral thread and pearls
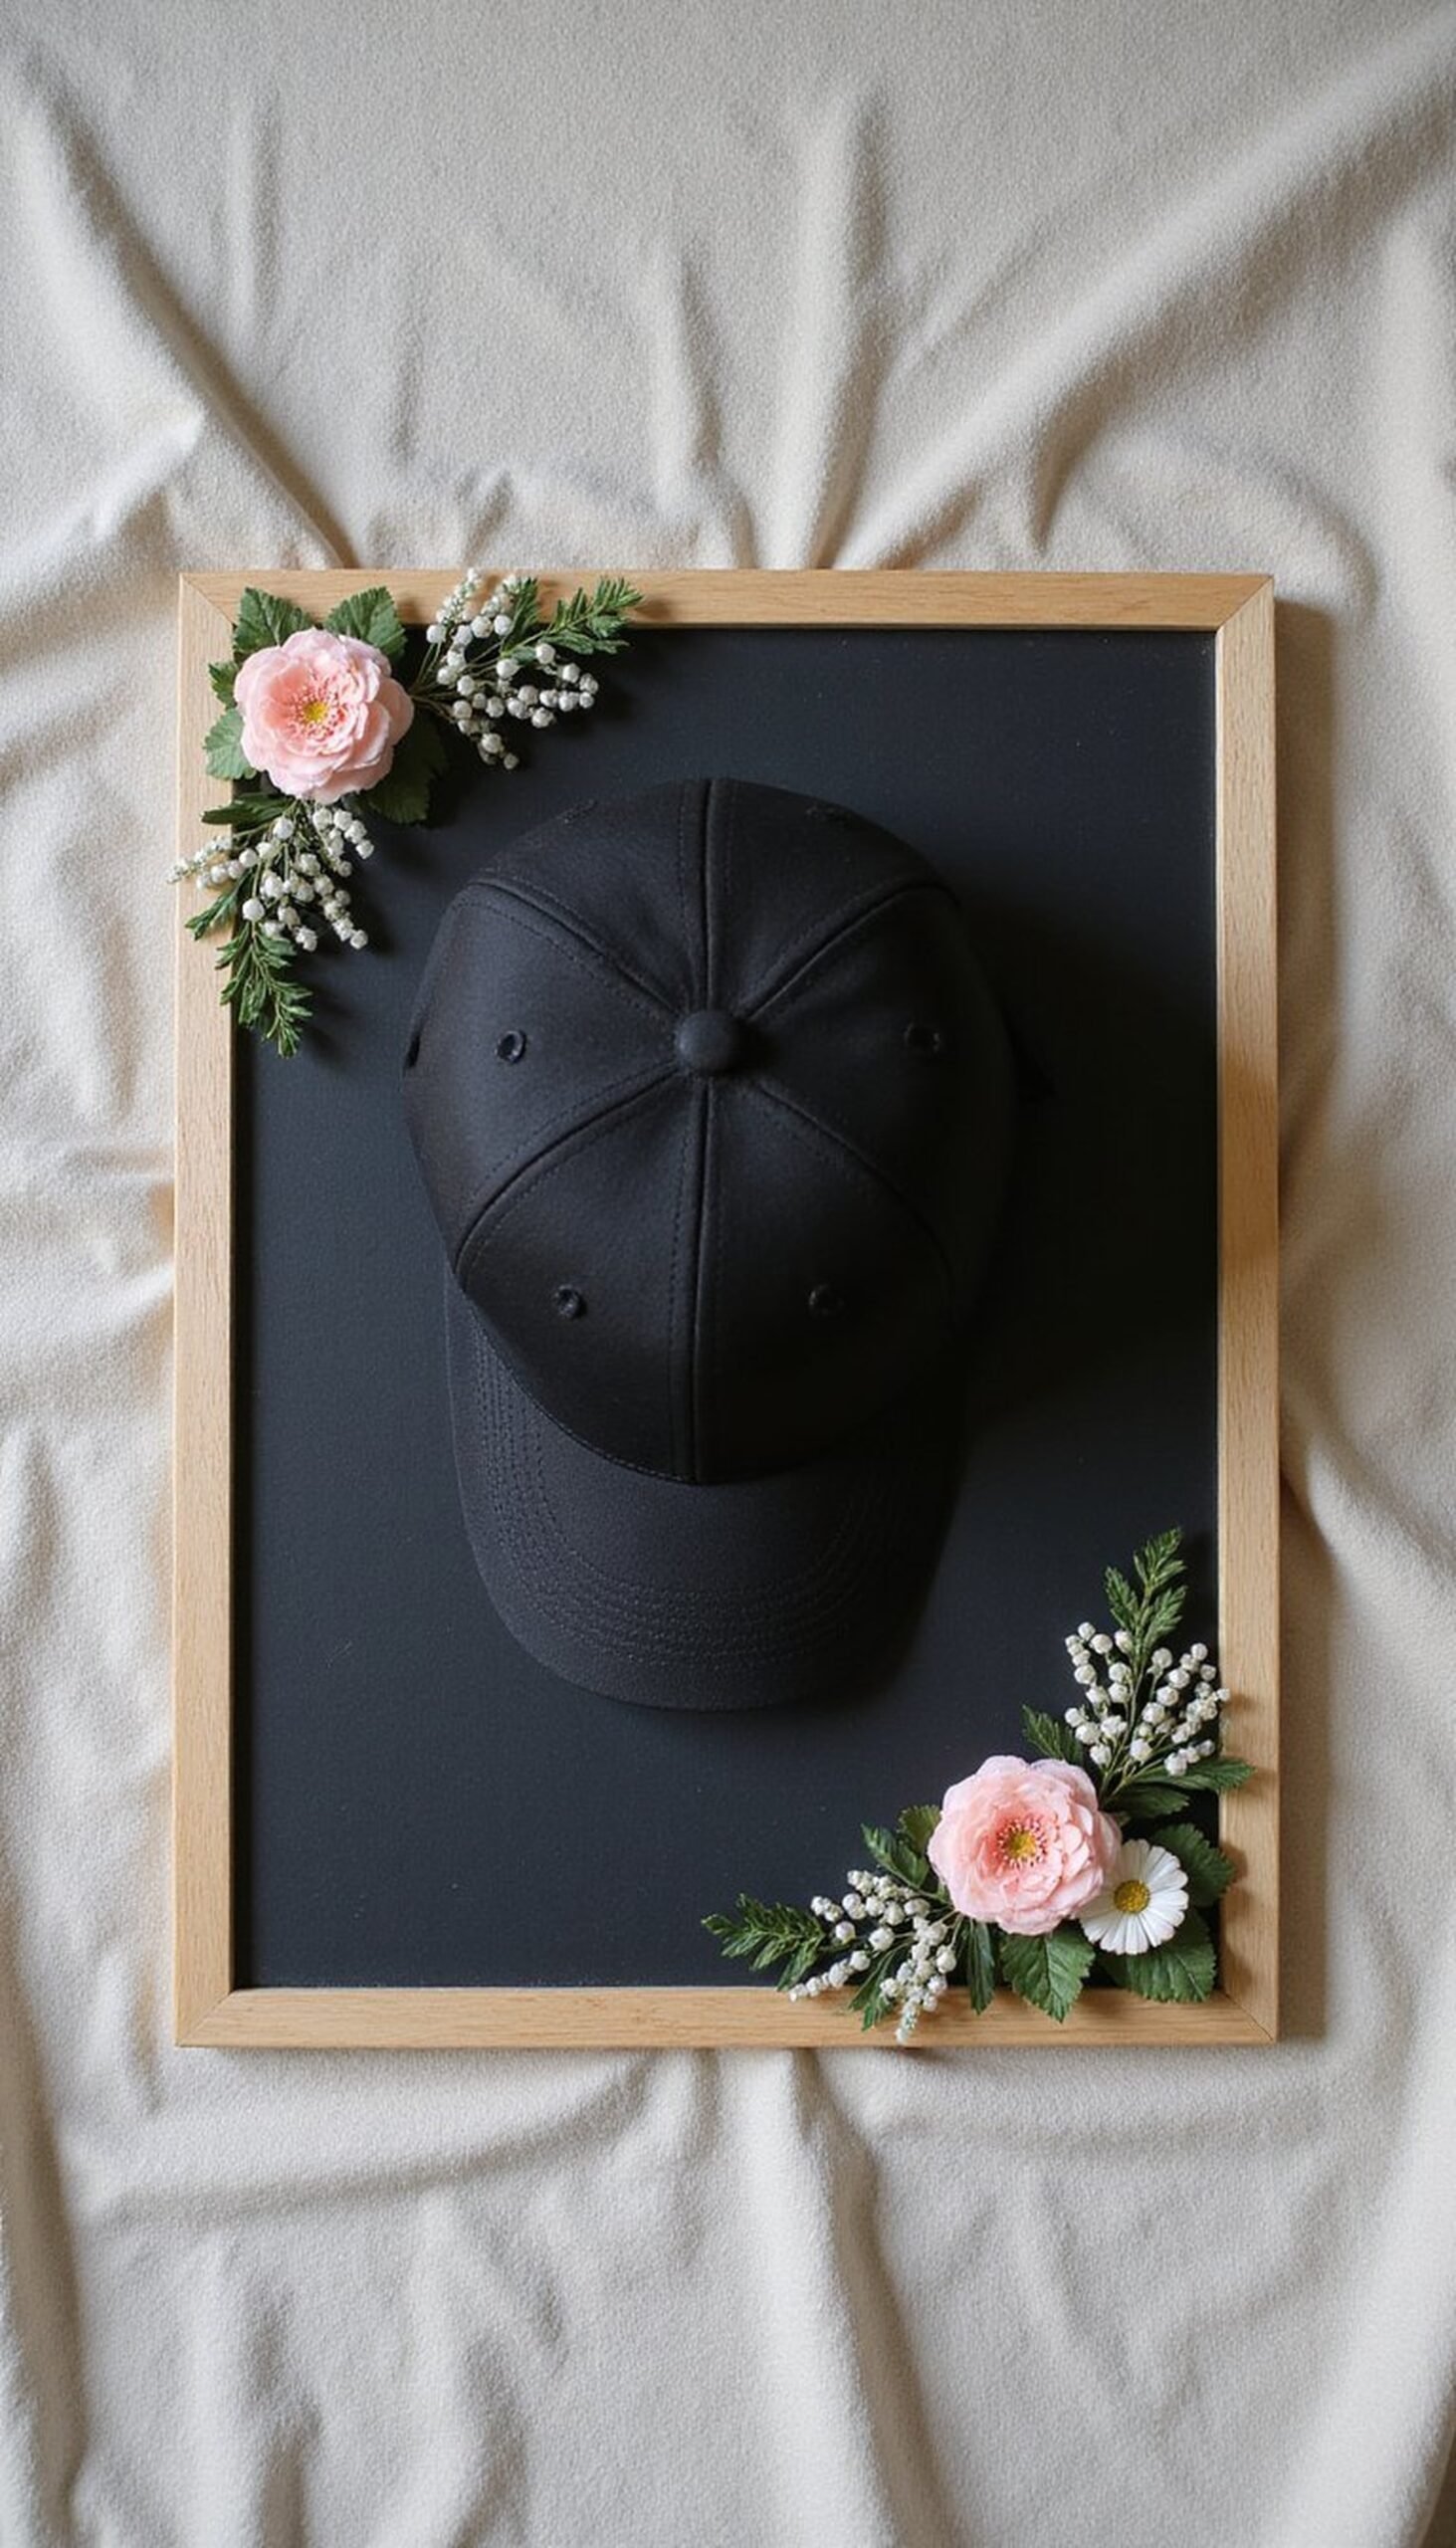
An embroidered mortarboard is an easy way to add personality to graduation attire. Use cotton embroidery floss, tiny seed beads, and small faux pearls sewn into hand-drawn floral motifs across the mortarboard top. Pick a soft palette—blush, sage, and cream—against a classic black cap, or choose navy with silver thread for a refined feel. The stitched texture and beads catch light in photos, creating subtle shine without overpowering the robe. Finishing with a satin ribbon along the edge gives a neat, polished look.
Styling Tips
- Trace your design in light pencil before stitching to avoid mistakes.
- Anchor beads with a small knot and a dab of clear fabric glue for security.
- Match tassel color to one thread in your embroidery for cohesion.
Slip dress with hand-stitched lace hem
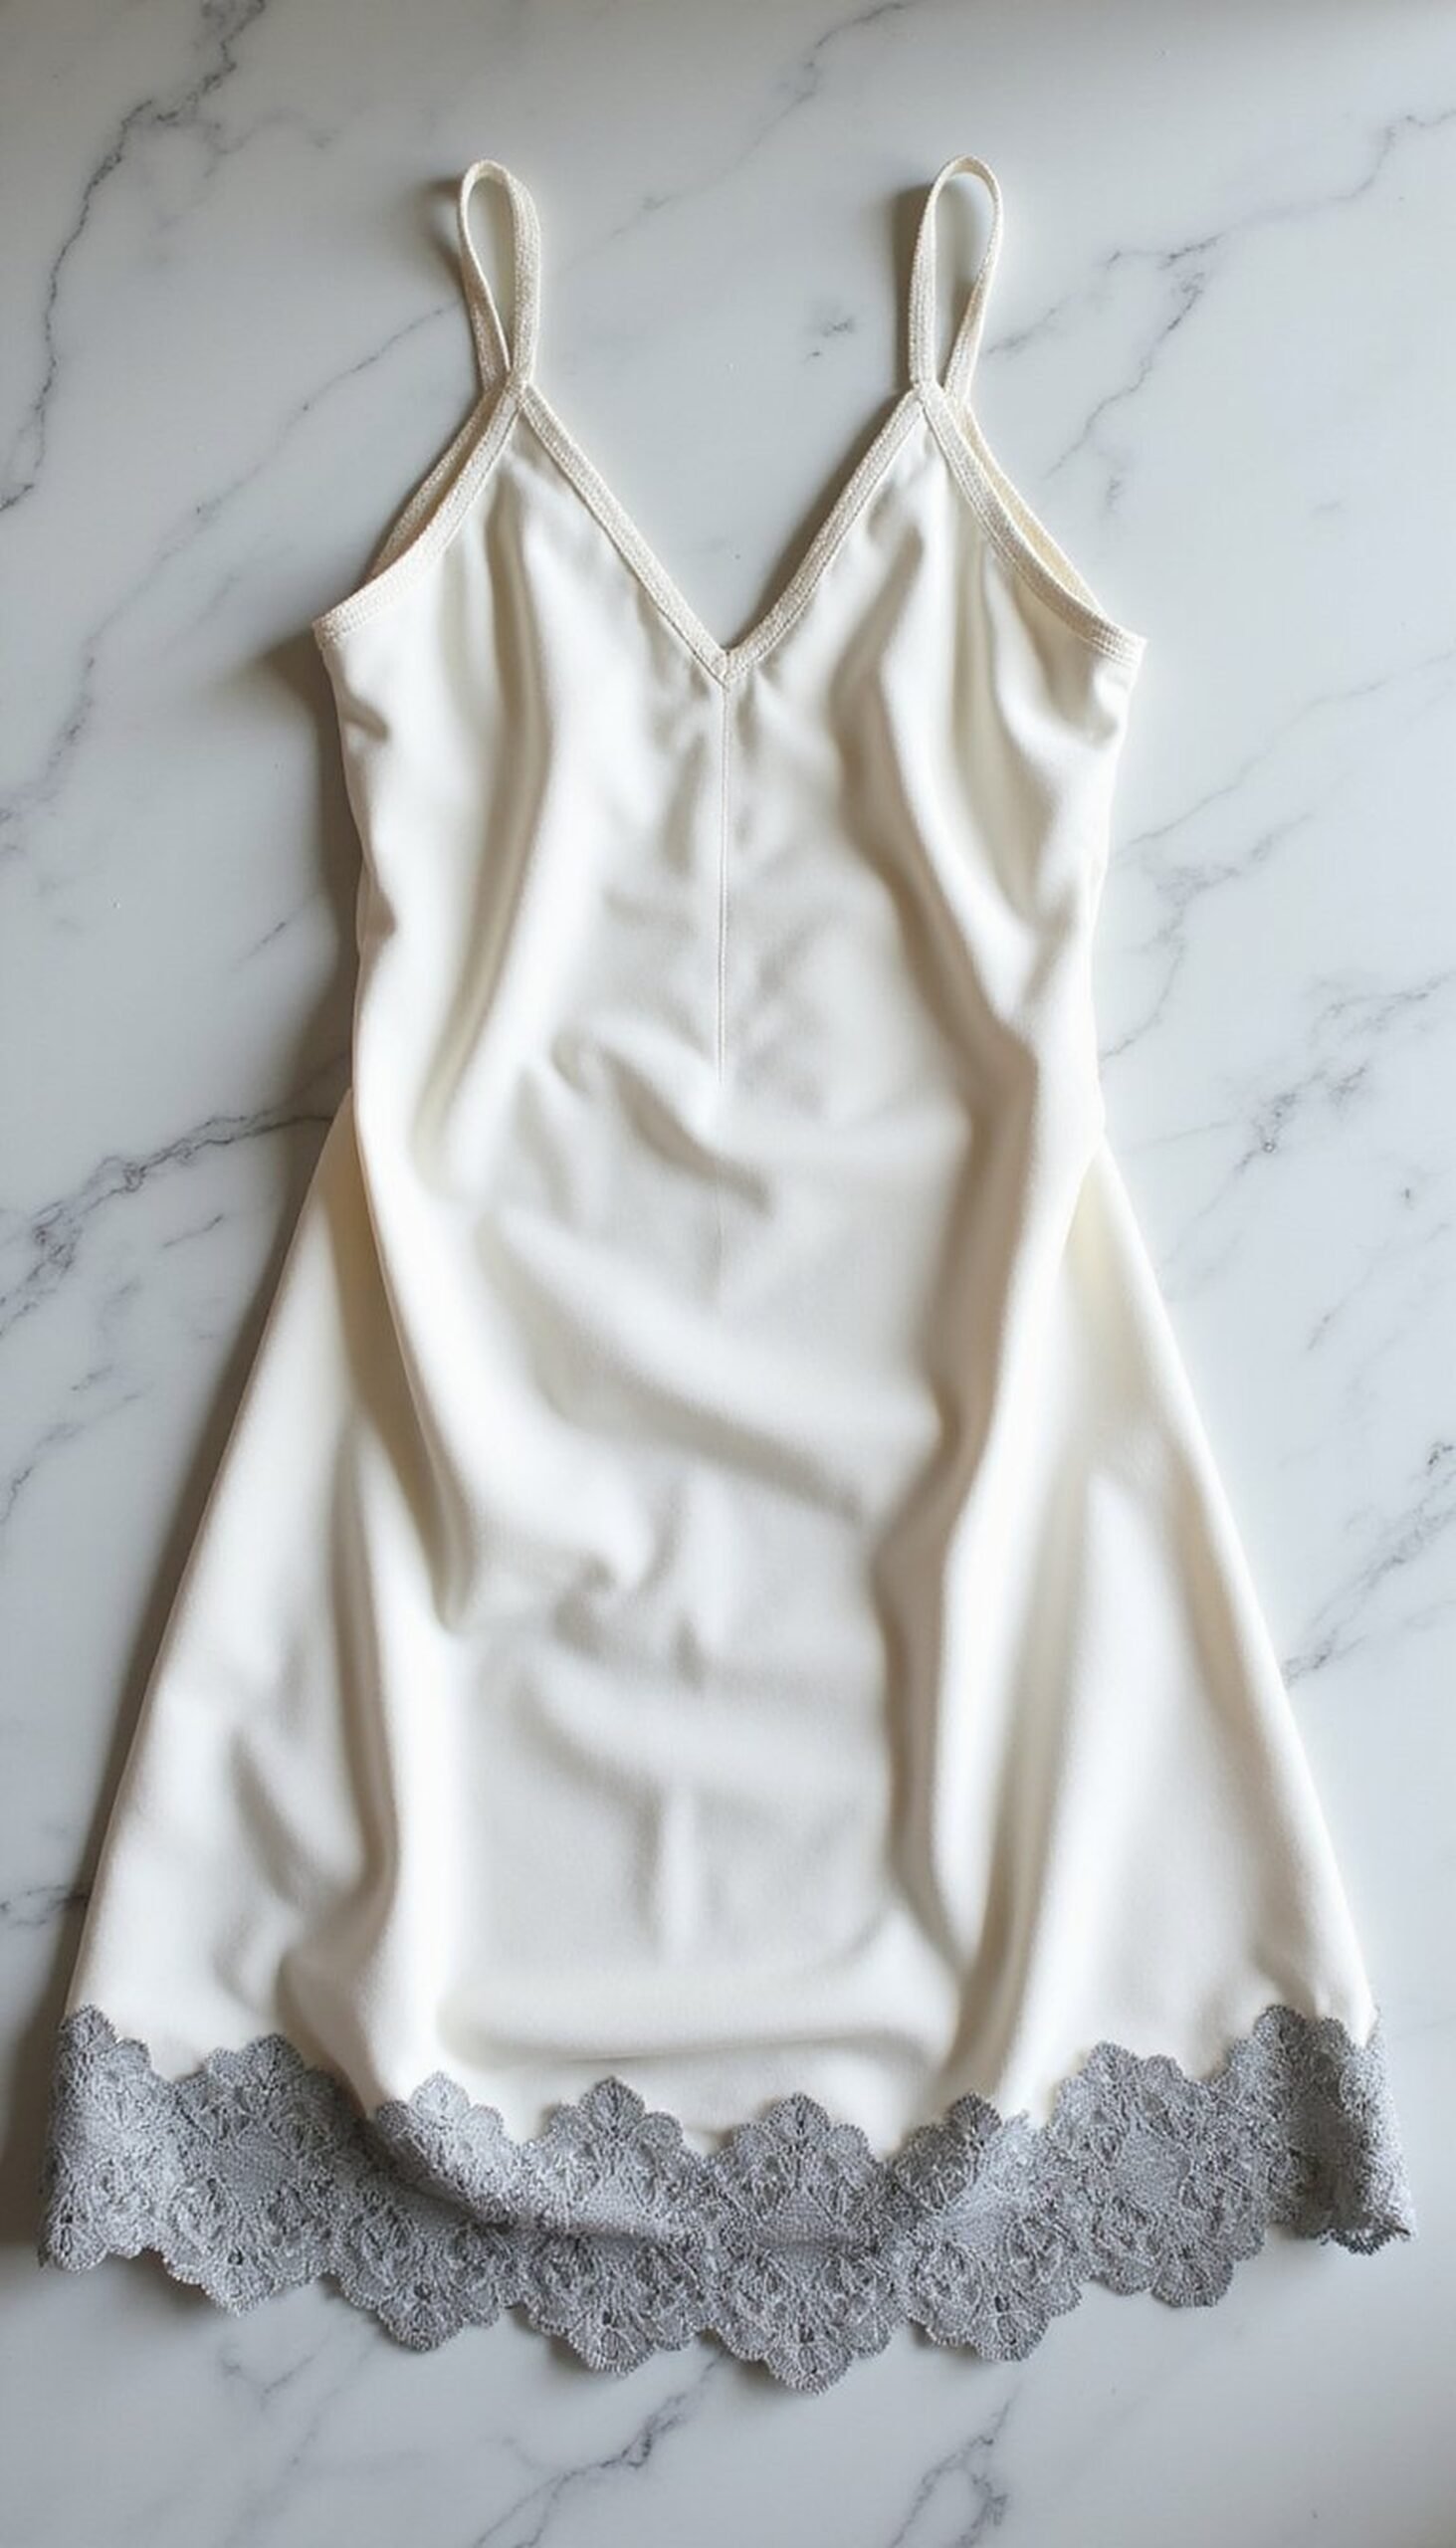
A simple silk or satin slip dress gets new life with a hand-stitched lace hem. Choose a delicate Chantilly or embroidered lace trim in ivory or dove gray and hand-sew with small, neat stitches so the lace lies flat. The contrast between smooth satin and airy lace adds texture and motion in photos, while keeping the outfit lightweight and comfortable. This approach works with midi or maxi slips and allows adding a slight scallop or layered lace for extra dimension without heavy tailoring.
Styling Tips
- Use matching thread and tiny slip stitches for an invisible finish.
- Add a short lining behind the lace if the hem feels see-through.
- Pair with simple pearl pins near the neckline for subtle shine.
Satin sash made from vintage scarves
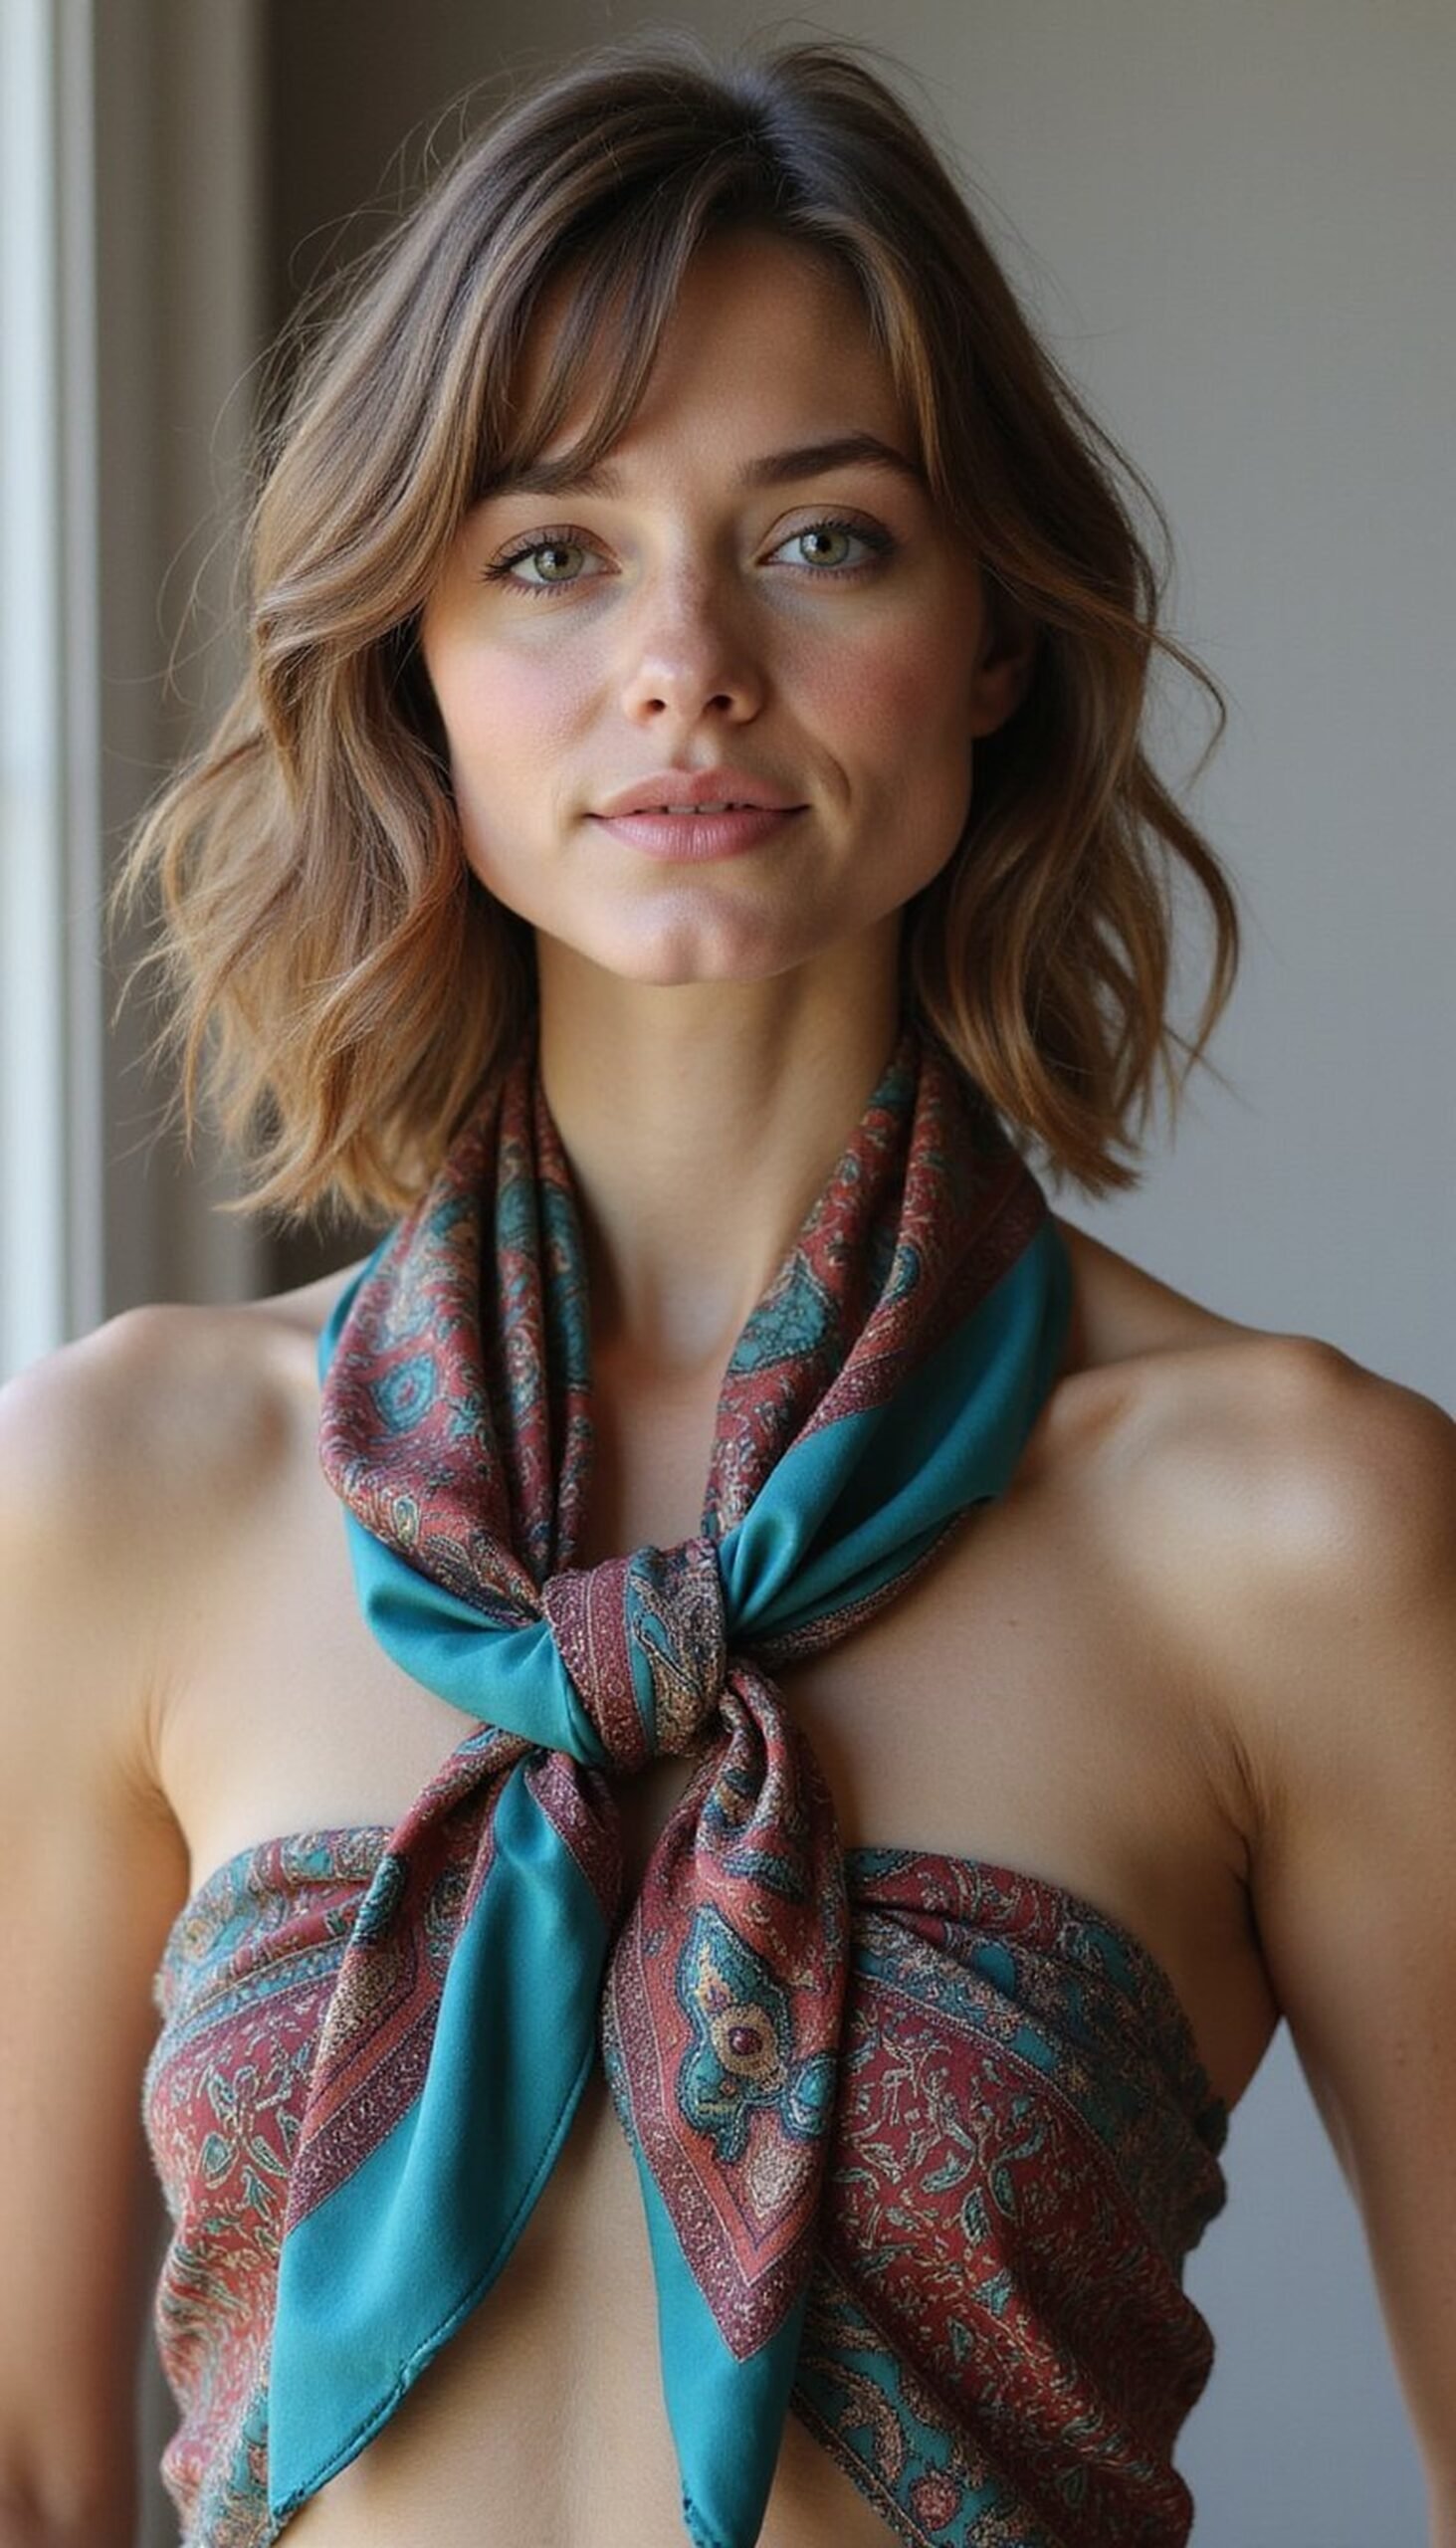
Turn a vintage silk scarf into a sash that ties graduation attire together. Cut and hem the scarf into a long rectangle, or fold and topstitch into a double-layer sash for more weight. Silky textures and rich vintage prints—muted florals, jewel tones, or painterly strokes—add color without clashing with gown colors. A sash can be draped, knotted, or wrapped and secured with a brooch. The lightweight satin moves nicely in photos and feels more personal than a standard sash bought off the rack.
Styling Tips
- Use French seams or narrow rolled hems to prevent fraying.
- Anchor the sash with a small safety pin under the gown to keep it in place.
- Add a vintage brooch at the knot for a keepsake touch.
Painted blazer sleeves for subtle color pop
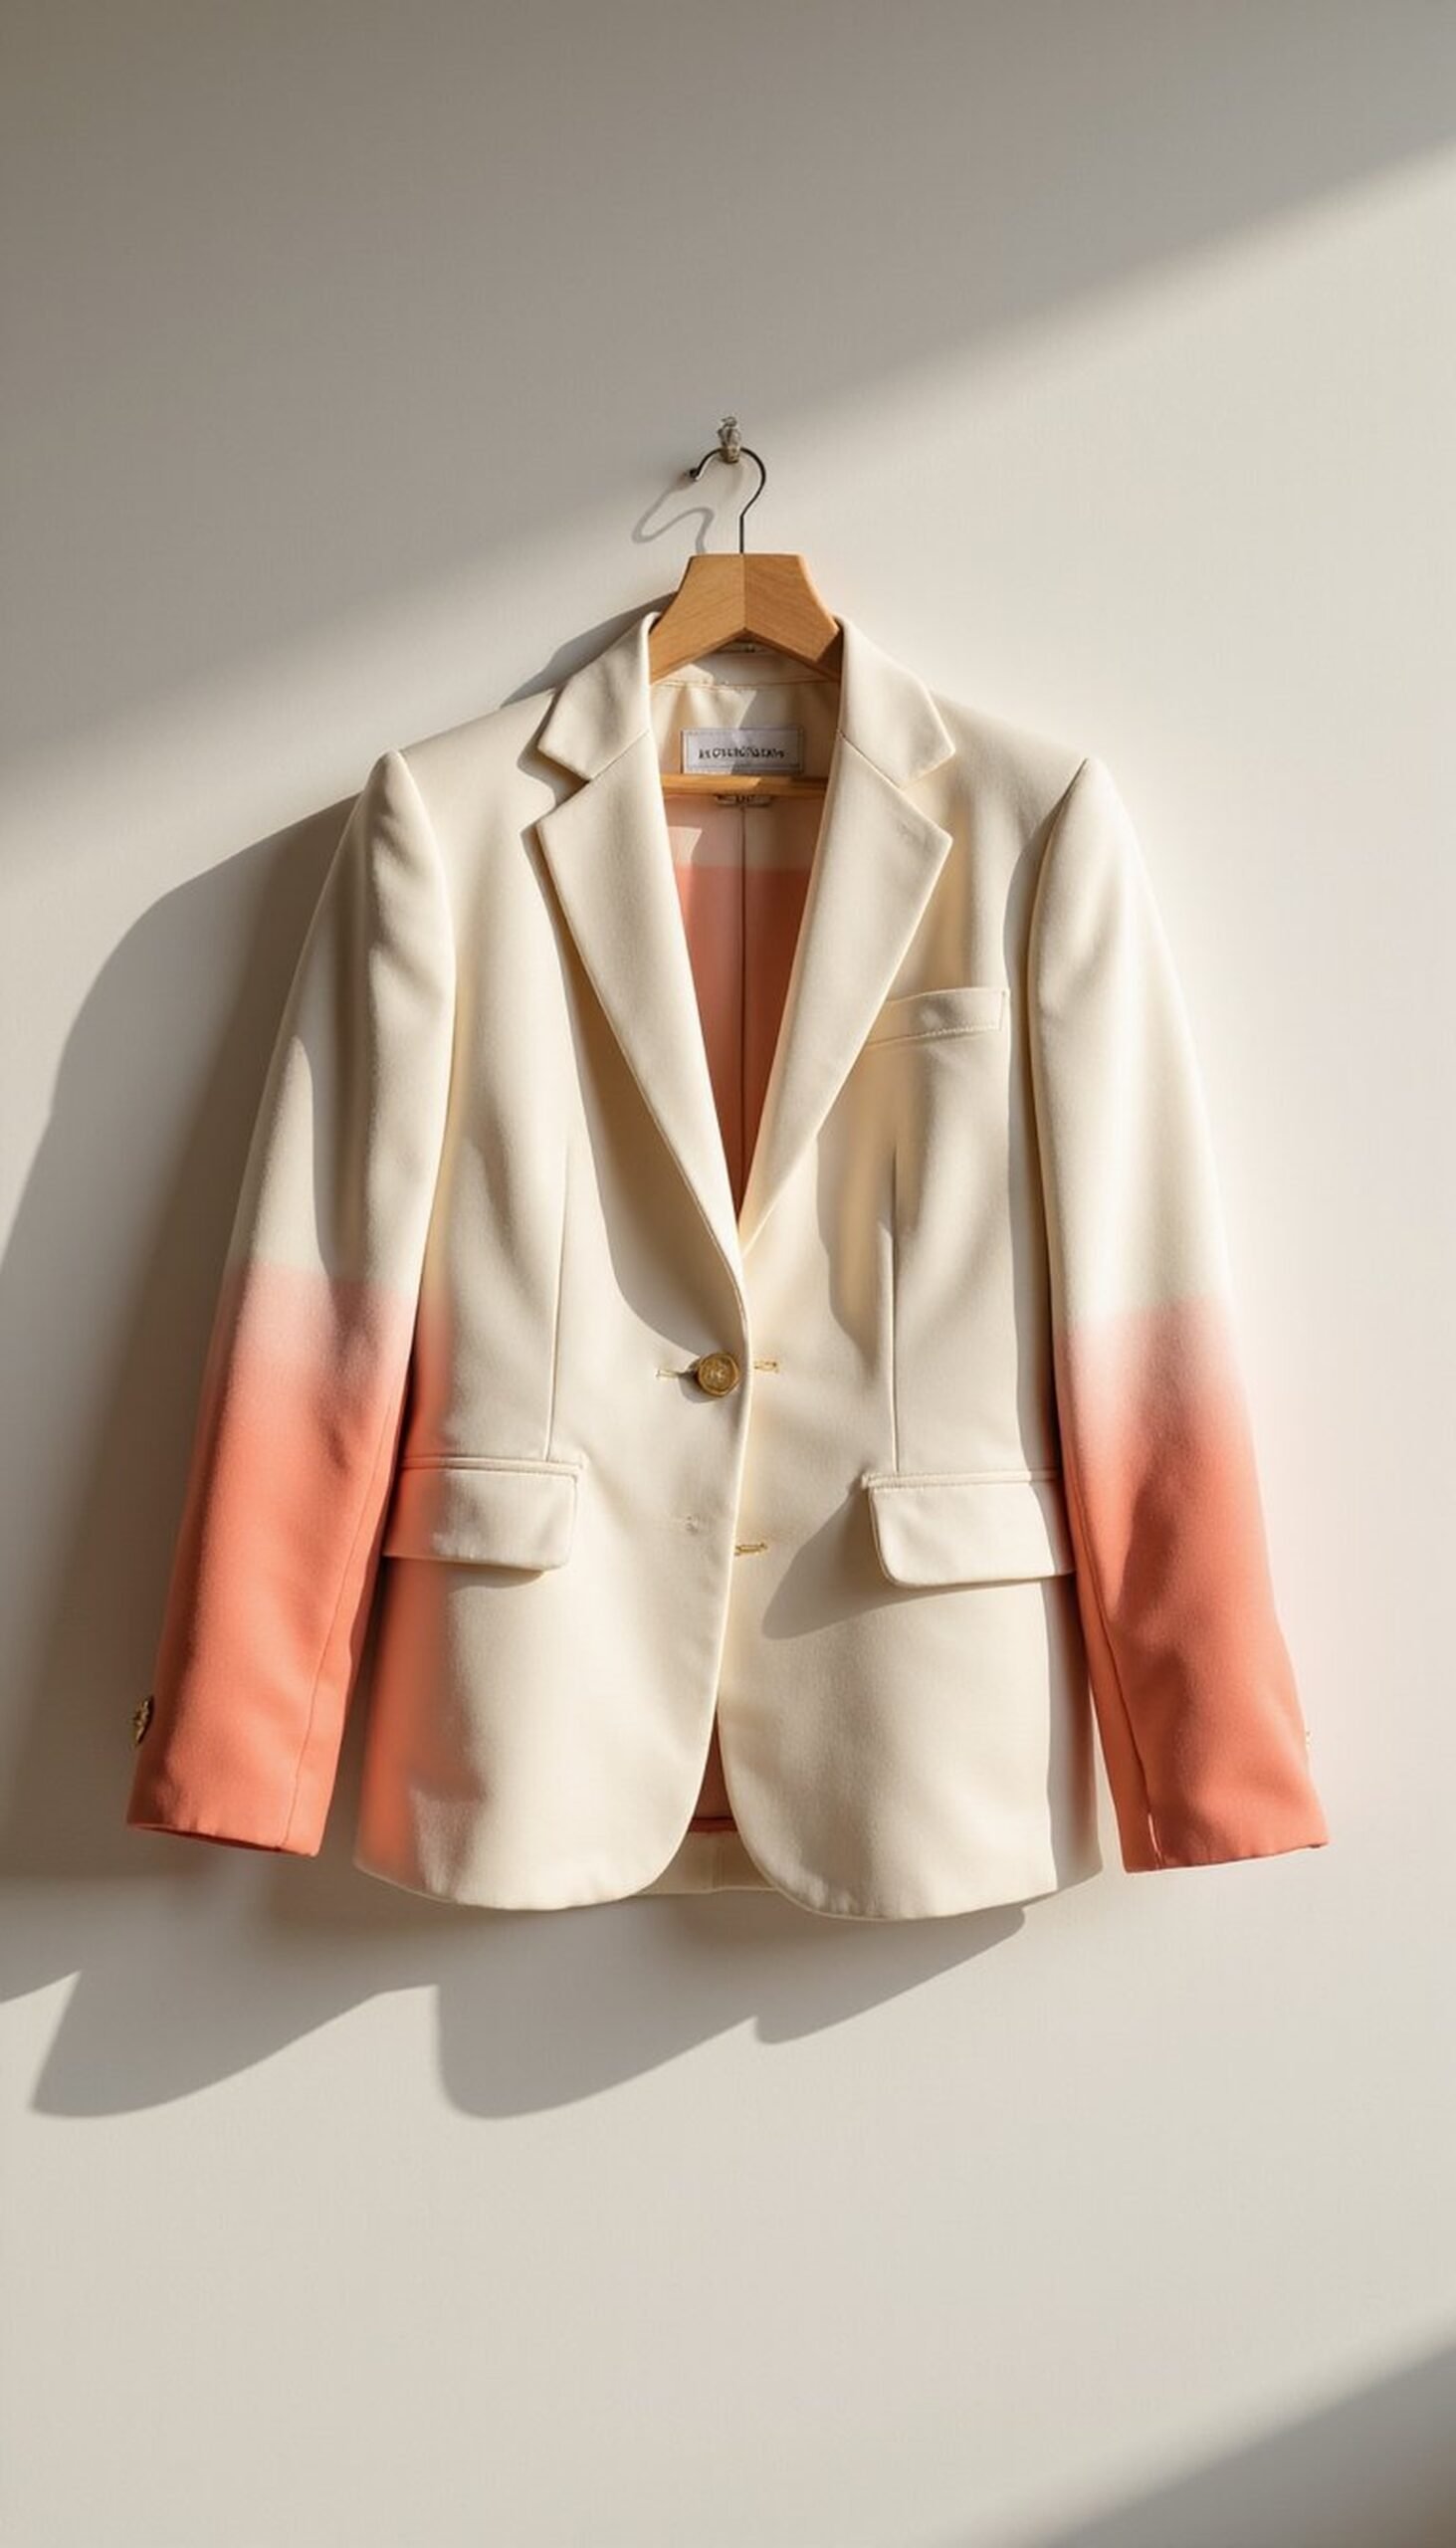
Give a plain blazer a fresh edge with painted or dyed sleeve cuffs. Use textile paint in a complementary color to create ombré sleeves, geometric cuff designs, or a soft dipped dye effect at the hem. Choose breathable cotton, linen, or a light wool blend so paint adheres smoothly. The tactile brush strokes add subtle texture, and the color pop keeps the rest of the graduation outfit refined. This is a low-commitment update that photographs well and lets a blazer feel more intentional without changing its silhouette.
Styling Tips
- Mask areas with painter’s tape for clean edges or go freehand for an organic look.
- Heat-set paint according to instructions to make it wash-stable.
- Keep the rest of accessories neutral to let the sleeves stand out.
Sequin skirt under a classic blazer
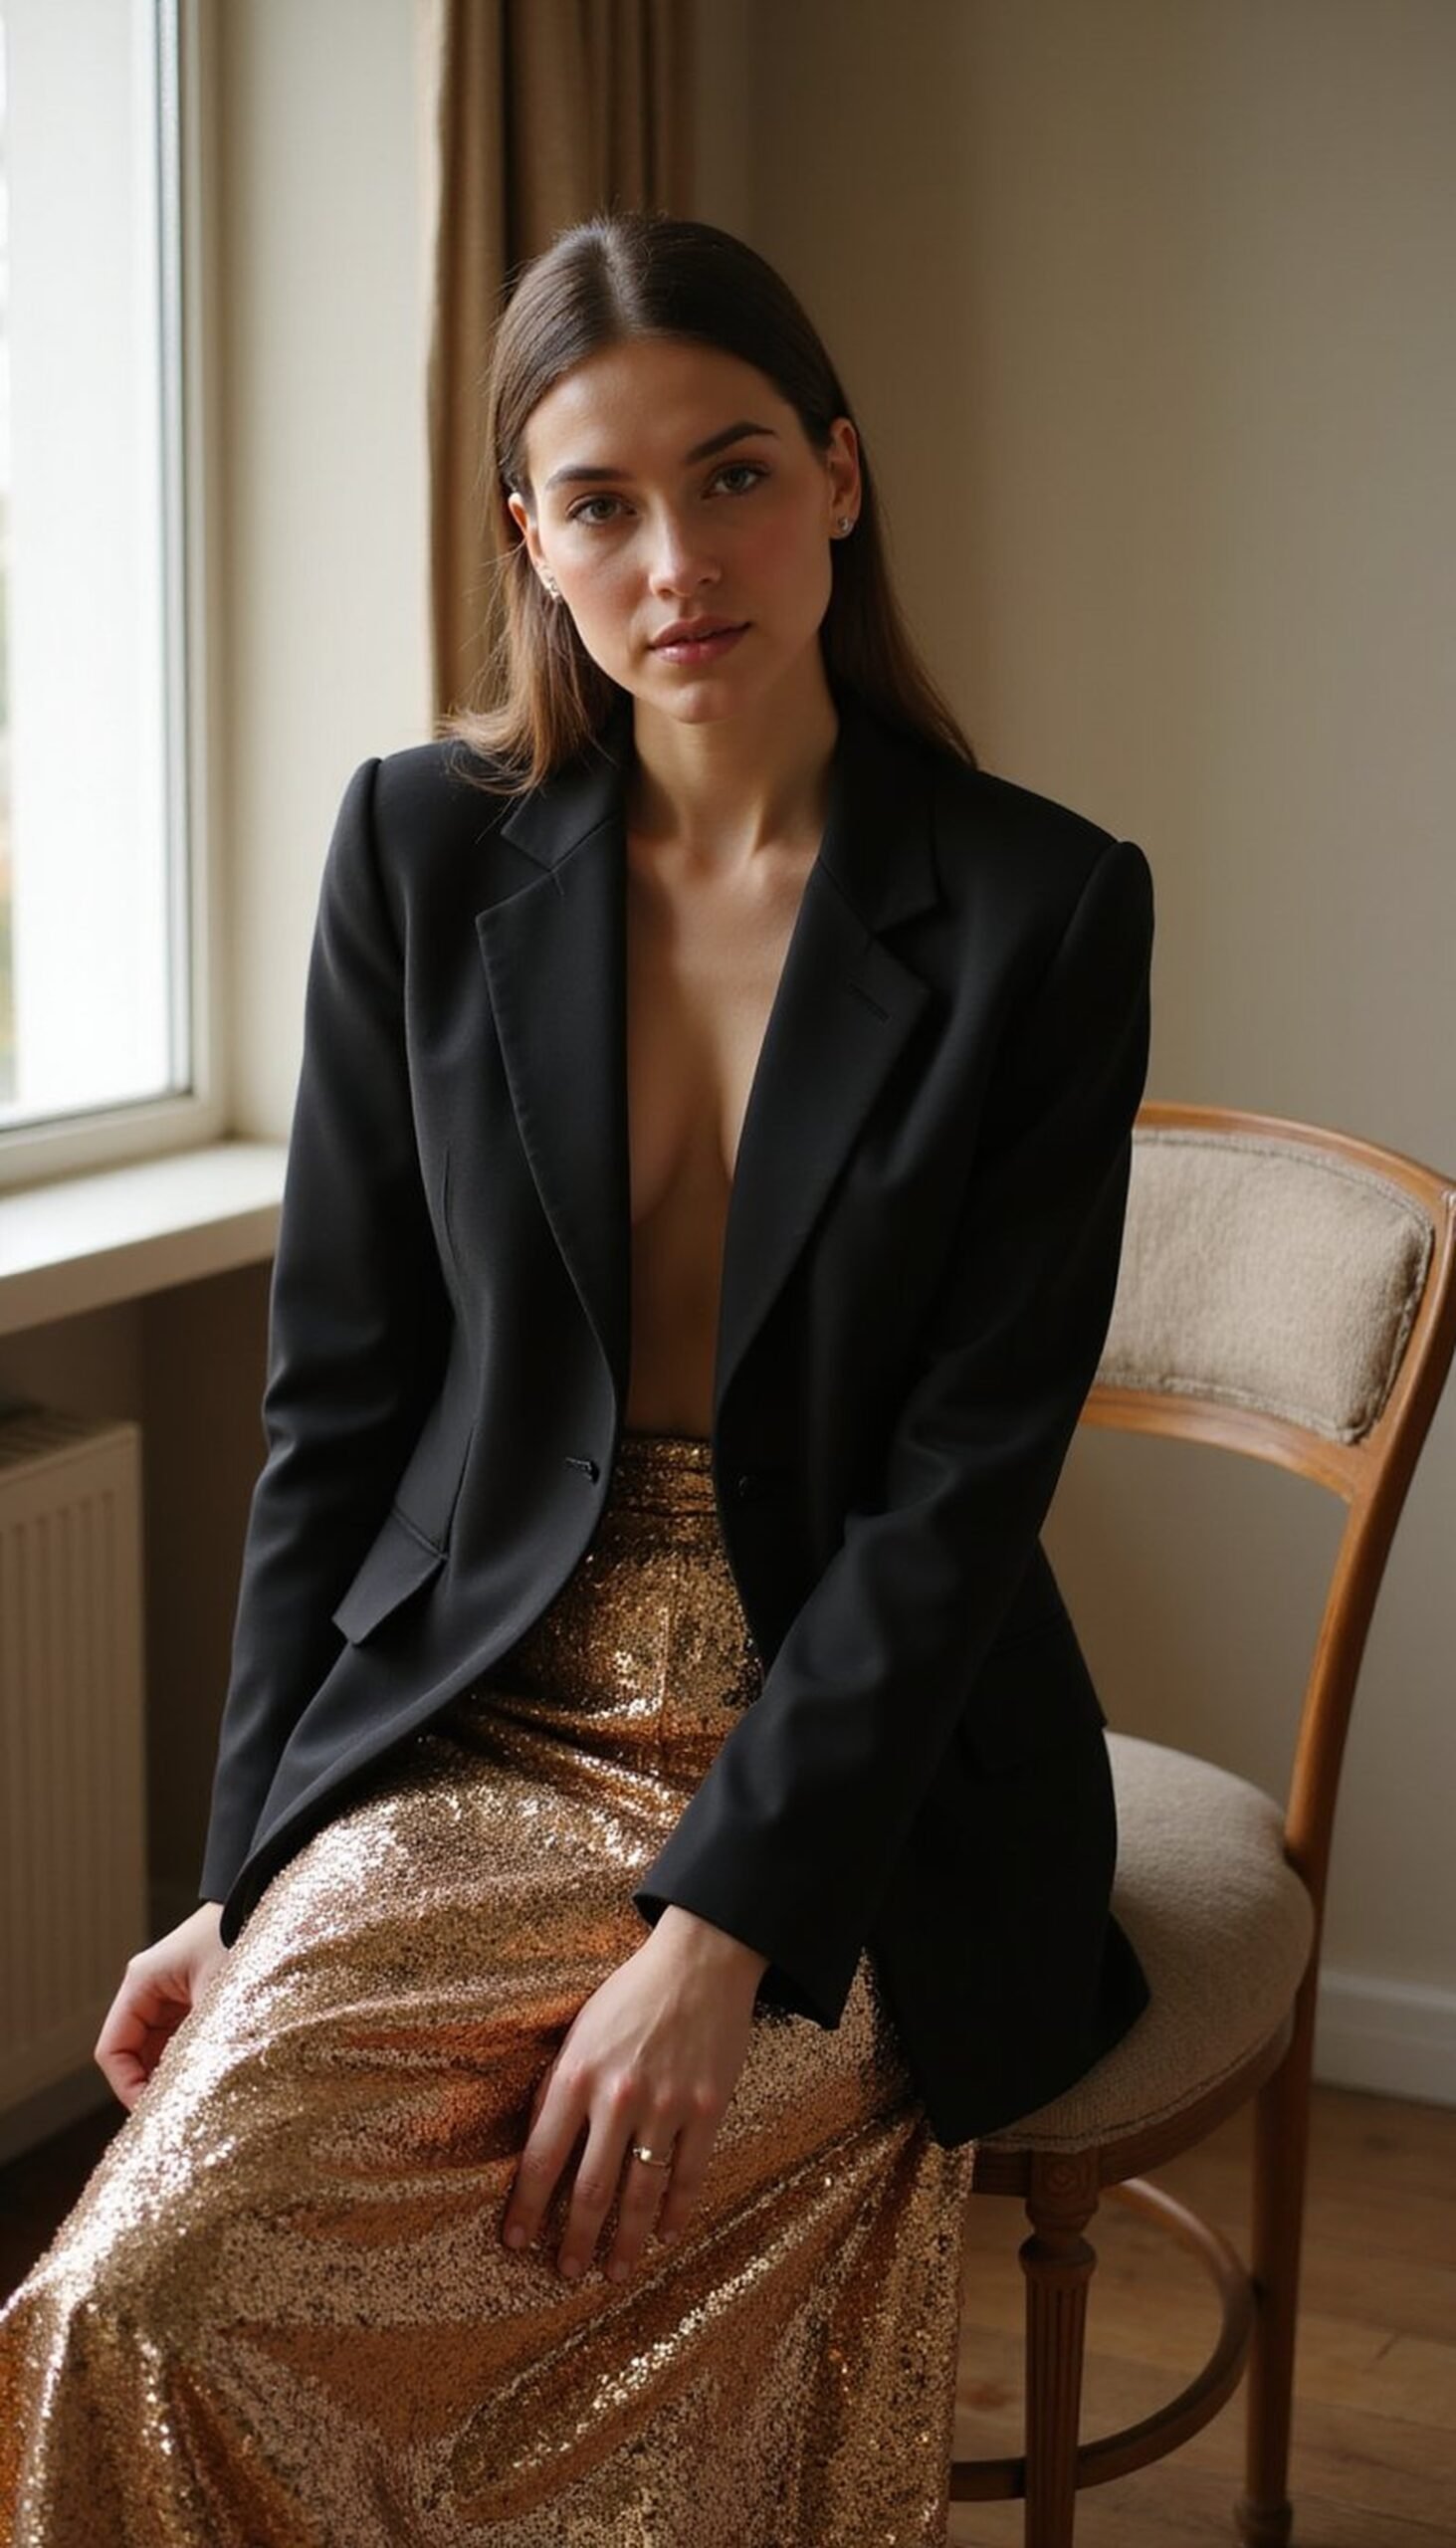
A sequin midi or mini skirt layered under a structured blazer creates a balanced mix of glam and restraint. Choose small, matte sequins in bronze, pewter, or champagne for subtle shine rather than high-gloss sparkle. Pair with a neutral blazer in camel, navy, or black to ground the look, and add a simple knit top to keep textures cohesive. Sequins add movement and catch light in photos, while a blazer keeps the outfit ceremony-ready. This combo is easy to adapt for seated ceremonies and post-graduation photos.
Styling Tips
- Line the skirt or add a soft slip to avoid itch from sequins.
- Choose a blazer with structured shoulders to balance the skirt’s volume.
- Keep jewelry minimal—small studs and a thin bracelet complement the shine.
Convertible gown: wrap to one-shoulder style
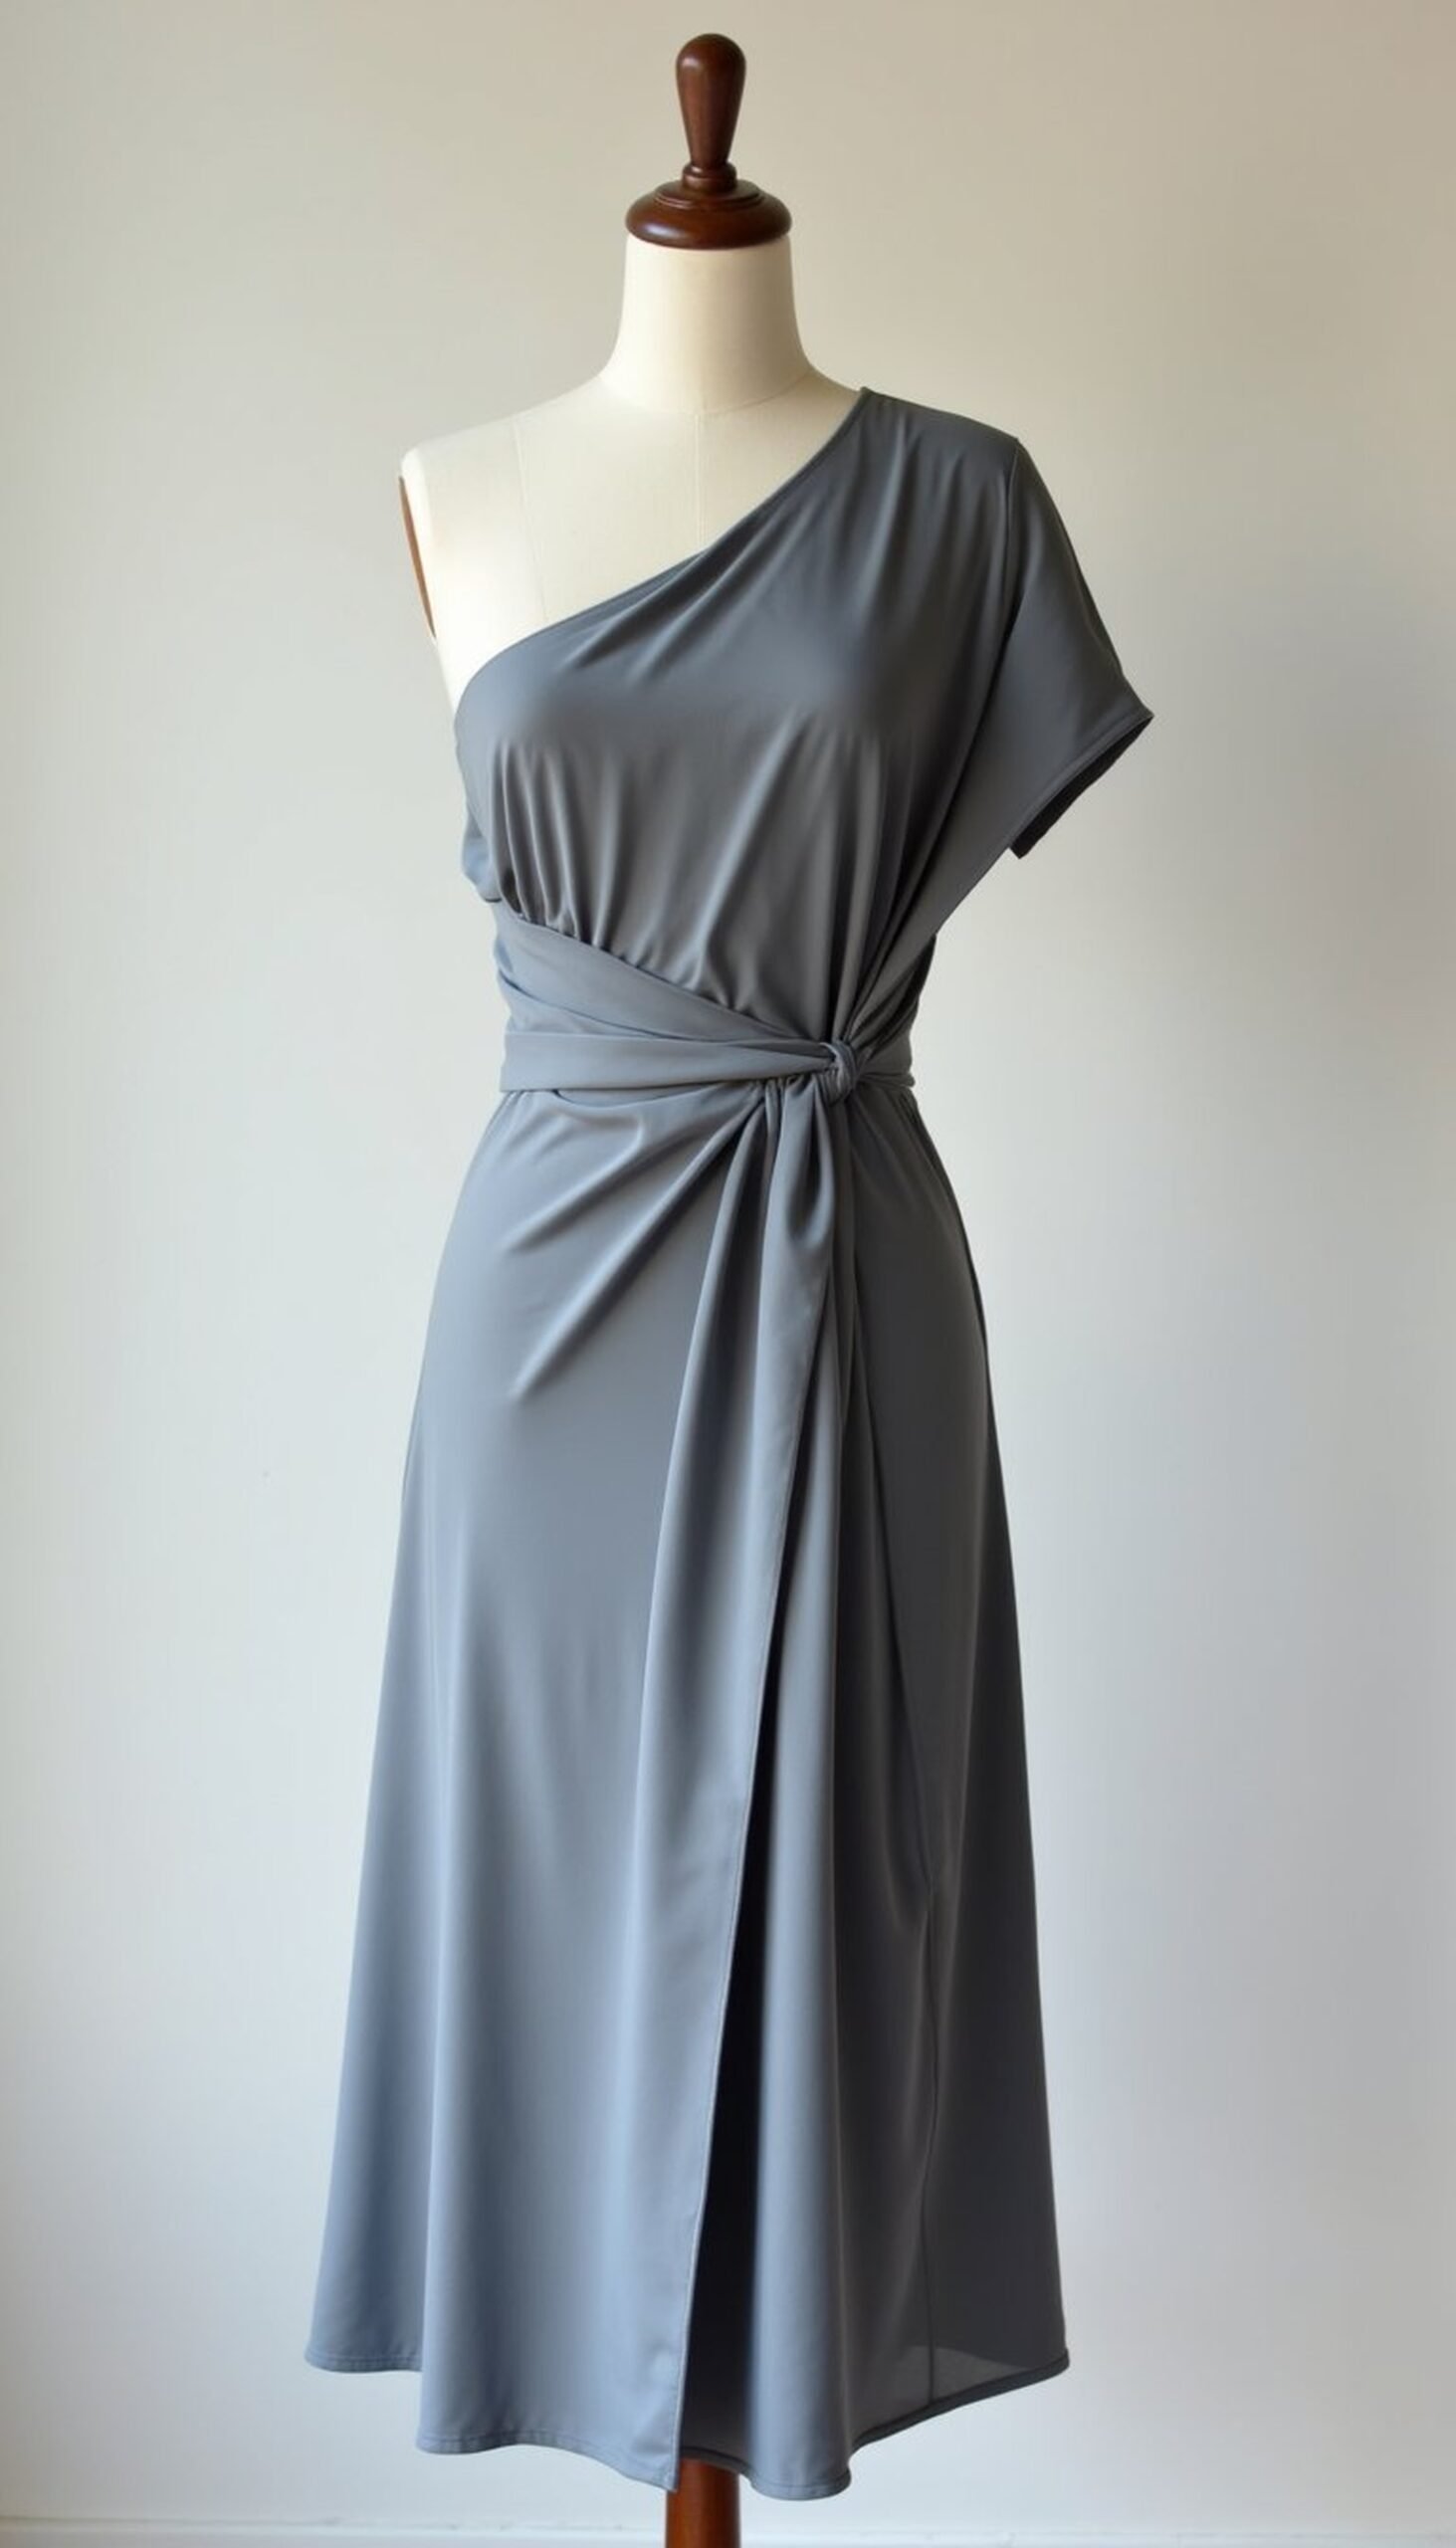
A convertible gown that shifts from wrap to one-shoulder lets the wearer change looks between ceremony and celebration. Use lightweight jersey or stretchy silk blends with good drape so ties and knots sit comfortably. The wrap silhouette offers coverage and comfort for sitting, and retying into a one-shoulder configuration creates a fresh silhouette for photos. Think neutral palettes—cream, slate, or soft navy—or a muted pastel for a gentle pop. Small safety stitches at strategic points keep ties secure without altering the flow.
Styling Tips
- Sew tiny anchor stitches where knots sit to avoid slipping during movement.
- Practice tying variations at home to find the most flattering drape.
- Pair with a simple belt for definition if the fabric feels too loose.
Ribbon belt and brooch: quick outfit upgrade
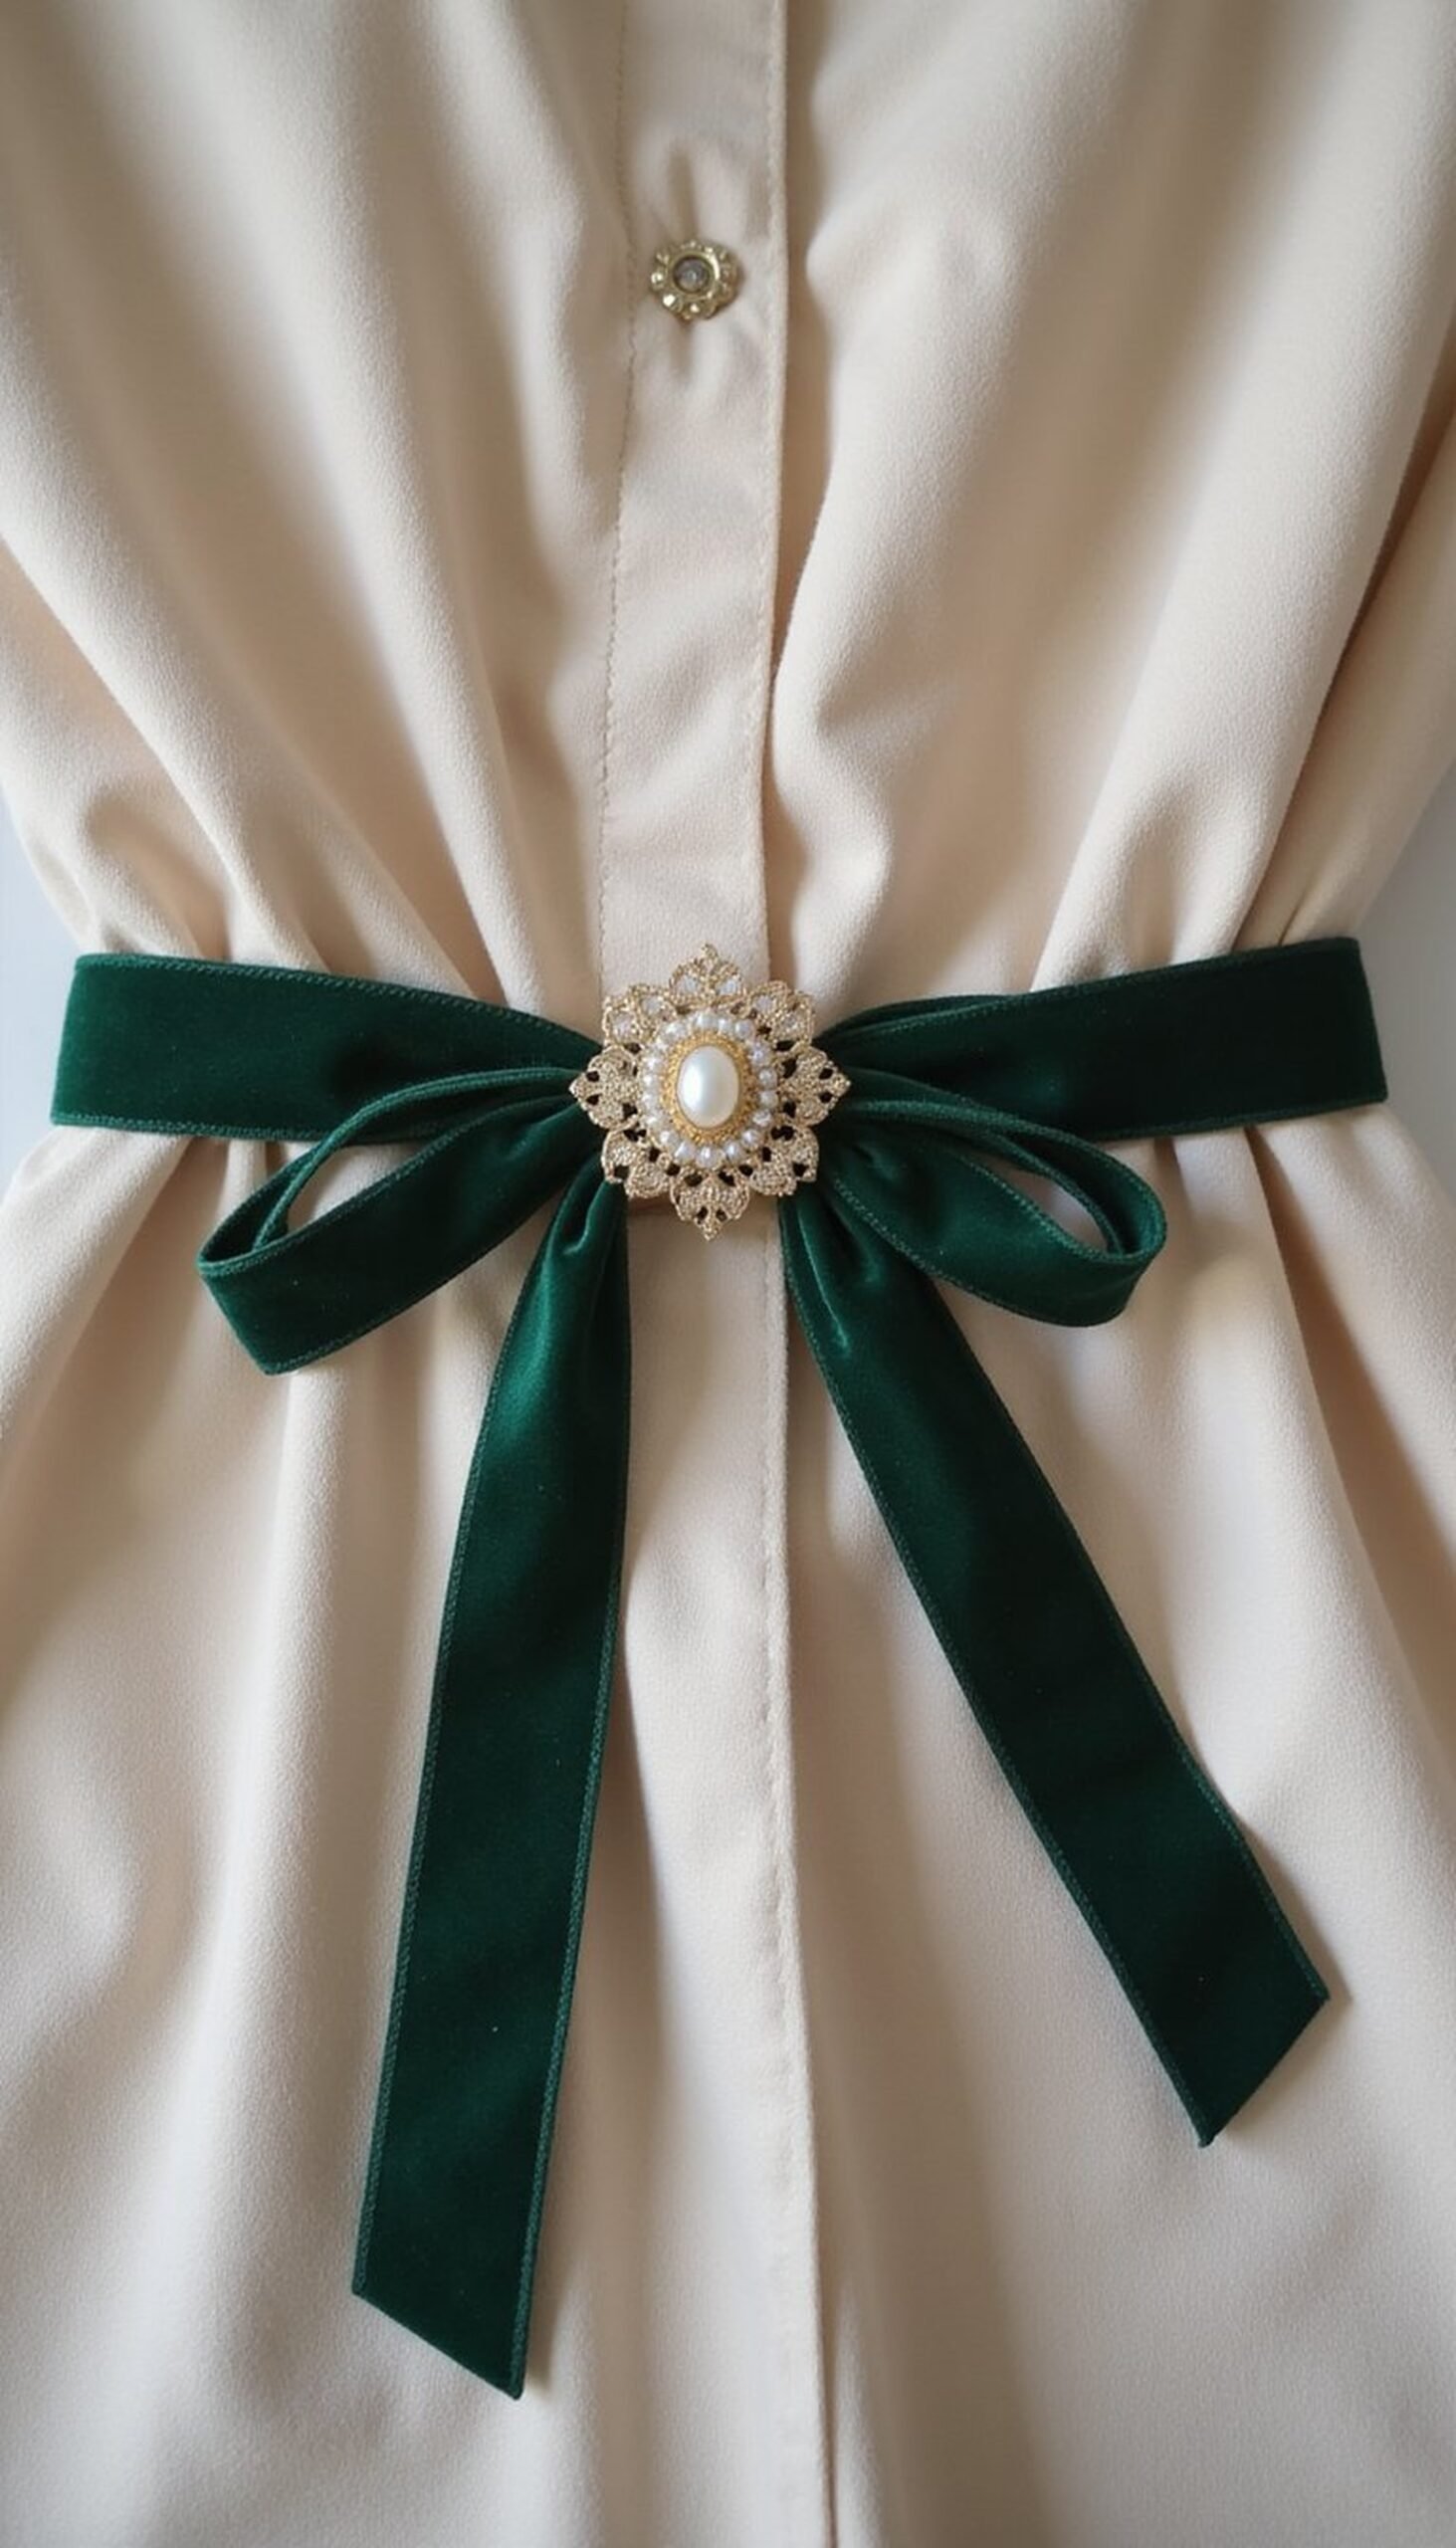
A wide ribbon belt tied with a vintage brooch instantly personalizes gowns and dresses. Pick grosgrain, satin, or velvet ribbons in colors that echo cap details or shoes—deep emerald, soft blush, or rich burgundy. Knot the ribbon at the side and pin a decorative brooch to anchor it; brooches add metallic shine or sparkling accents without heavy jewelry. This approach is quick, reversible, and gentle on fabrics. It’s an especially nice way to reuse family heirlooms or thrifted finds while adding layered texture to a simple silhouette.
Styling Tips
- Slip a small fabric loop under the ribbon to keep the brooch from sliding.
- Choose a ribbon width that balances the dress proportions.
- Coordinate the brooch metal tone with other accessories for cohesion.
Tulle mini over jeans for playful contrast
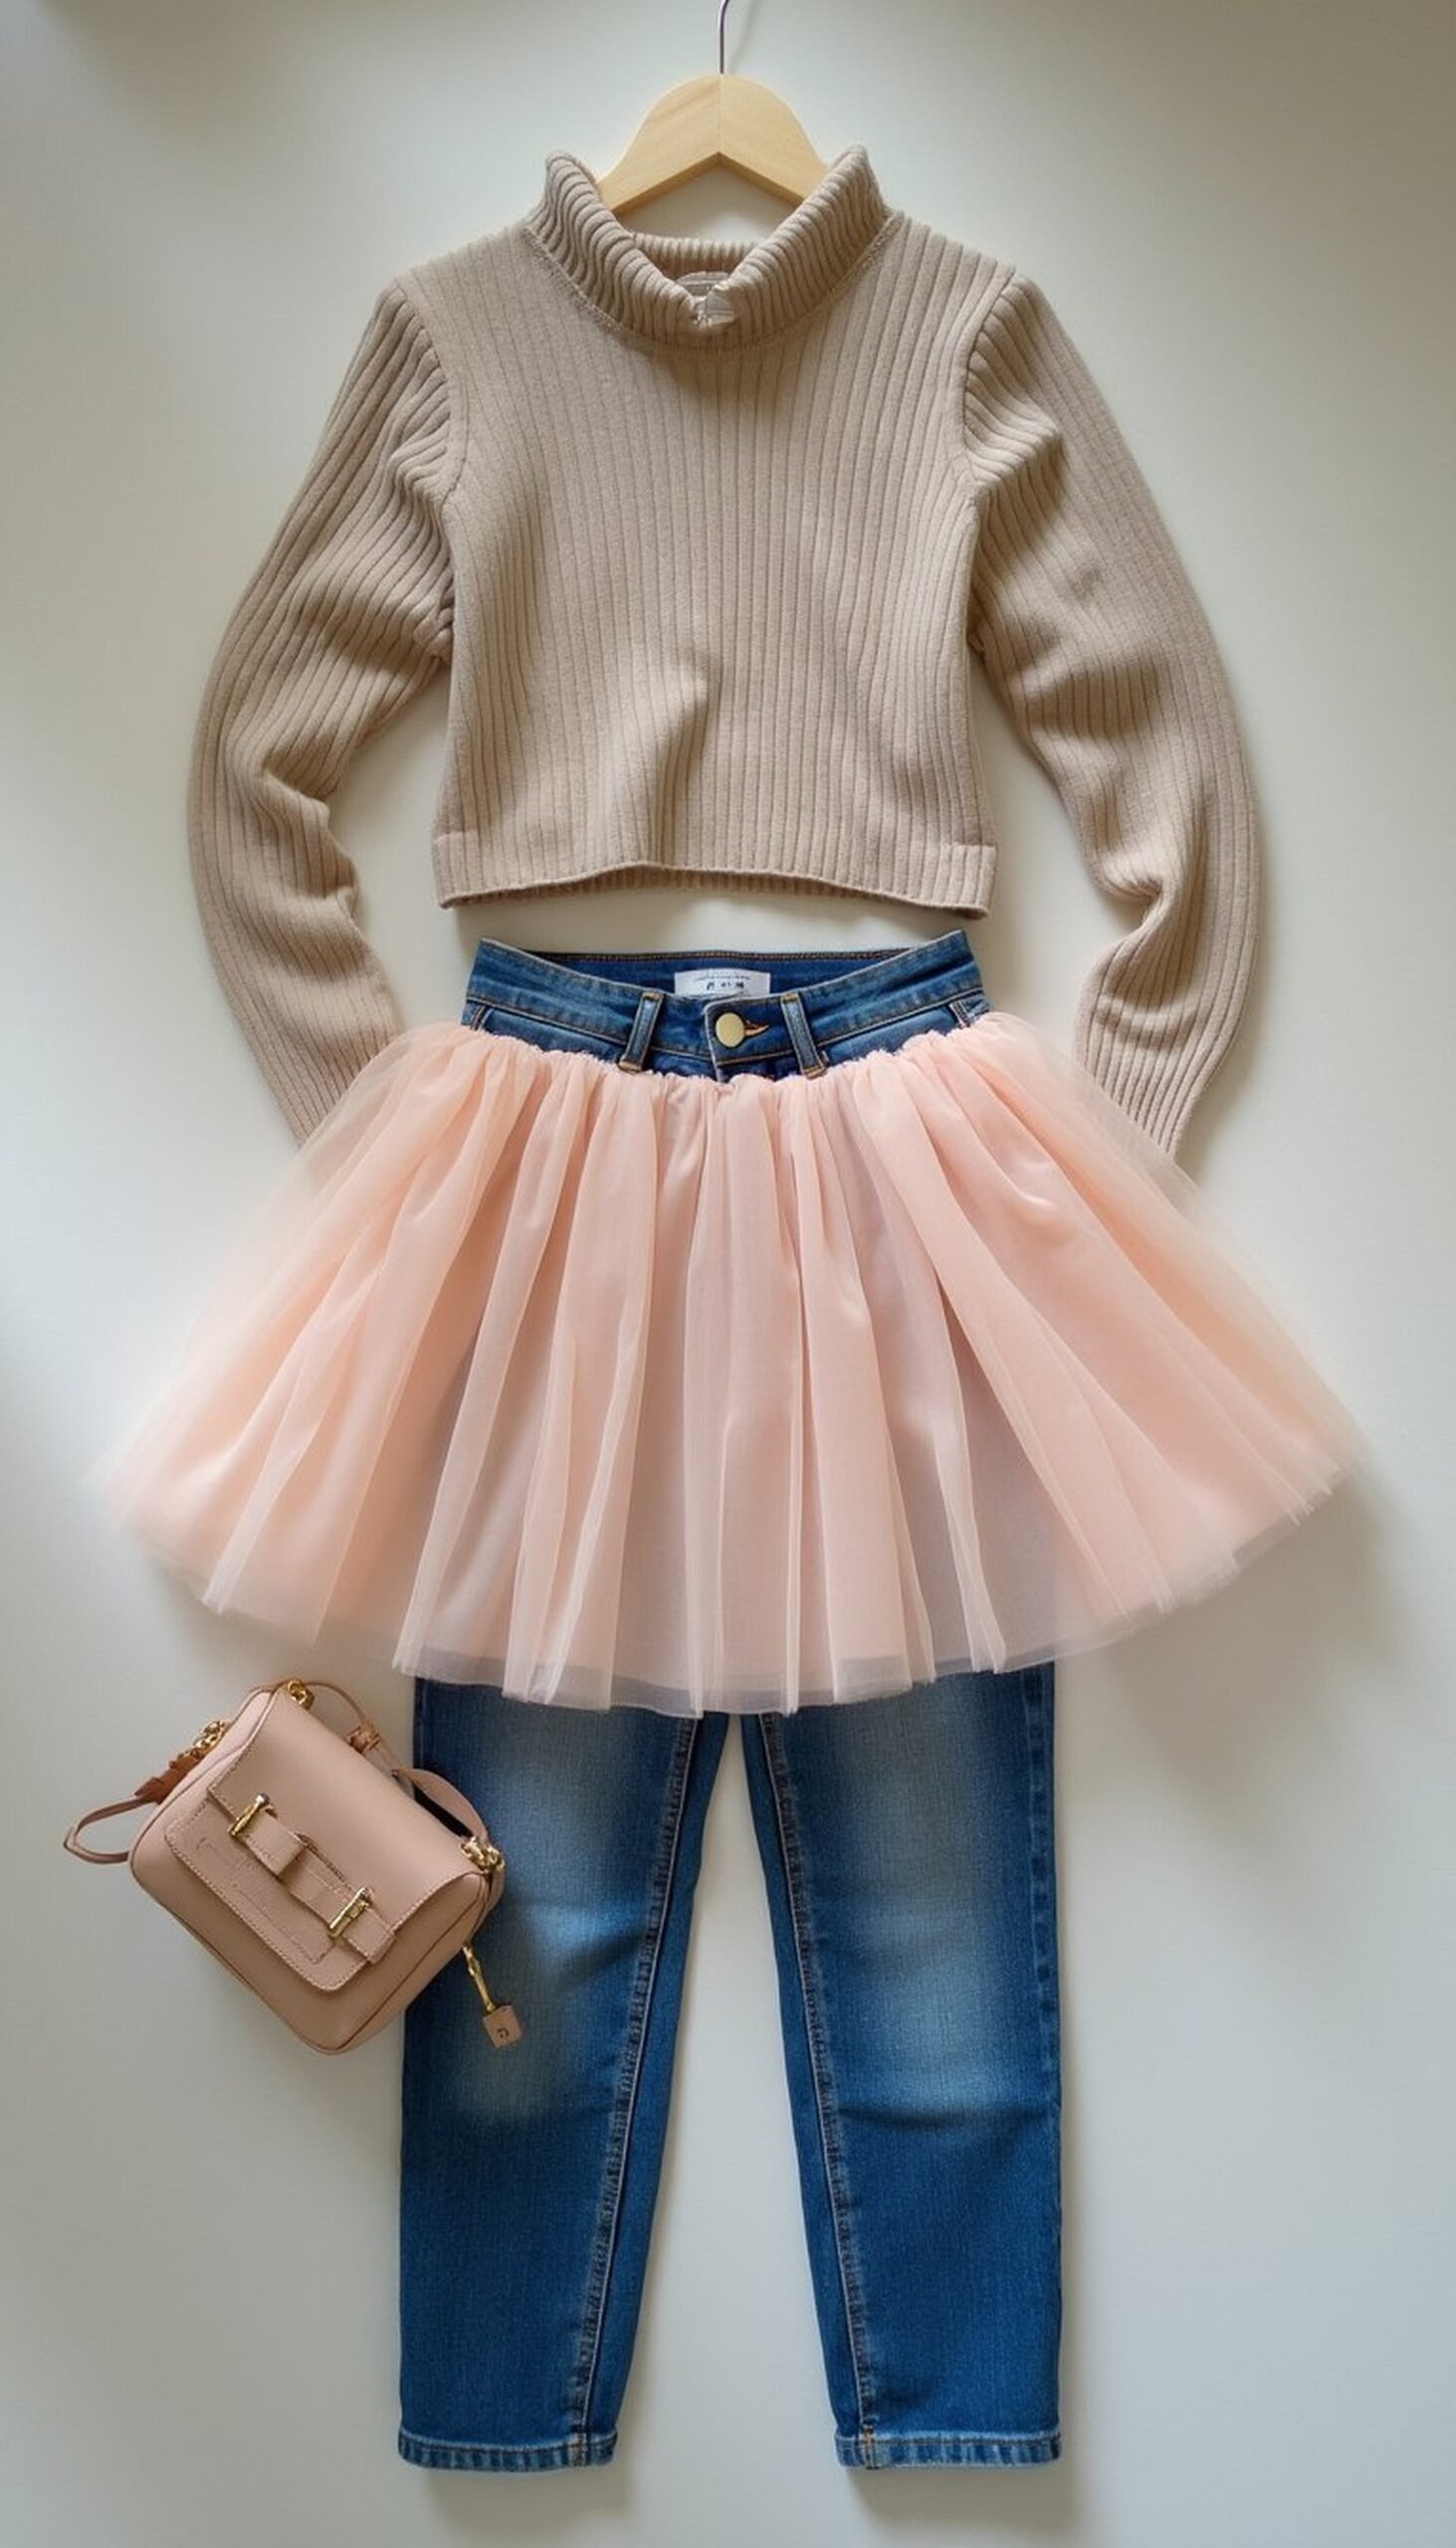
Layering a light tulle mini skirt over high-waist jeans creates a playful, modern look that blends casual with ceremony. Choose soft tulle in cream, blush, or soft gray with a simple elastic waistband for comfort. The contrast of airy tulle and structured denim makes for lively movement in photos, and the jeans keep the outfit grounded and practical. This is a great route for informal celebrations or outdoor ceremonies where comfort and movement matter. Add a slim belt or chain at the waist for definition and a polished finish.
Styling Tips
- Opt for a straight-leg or slightly tapered jean to balance tulle volume.
- Add a neutral fitted top to keep the silhouette streamlined.
- Use a thin leather belt or metallic chain to anchor the waist visually.
Hand-stitched bead trim on sheath hem
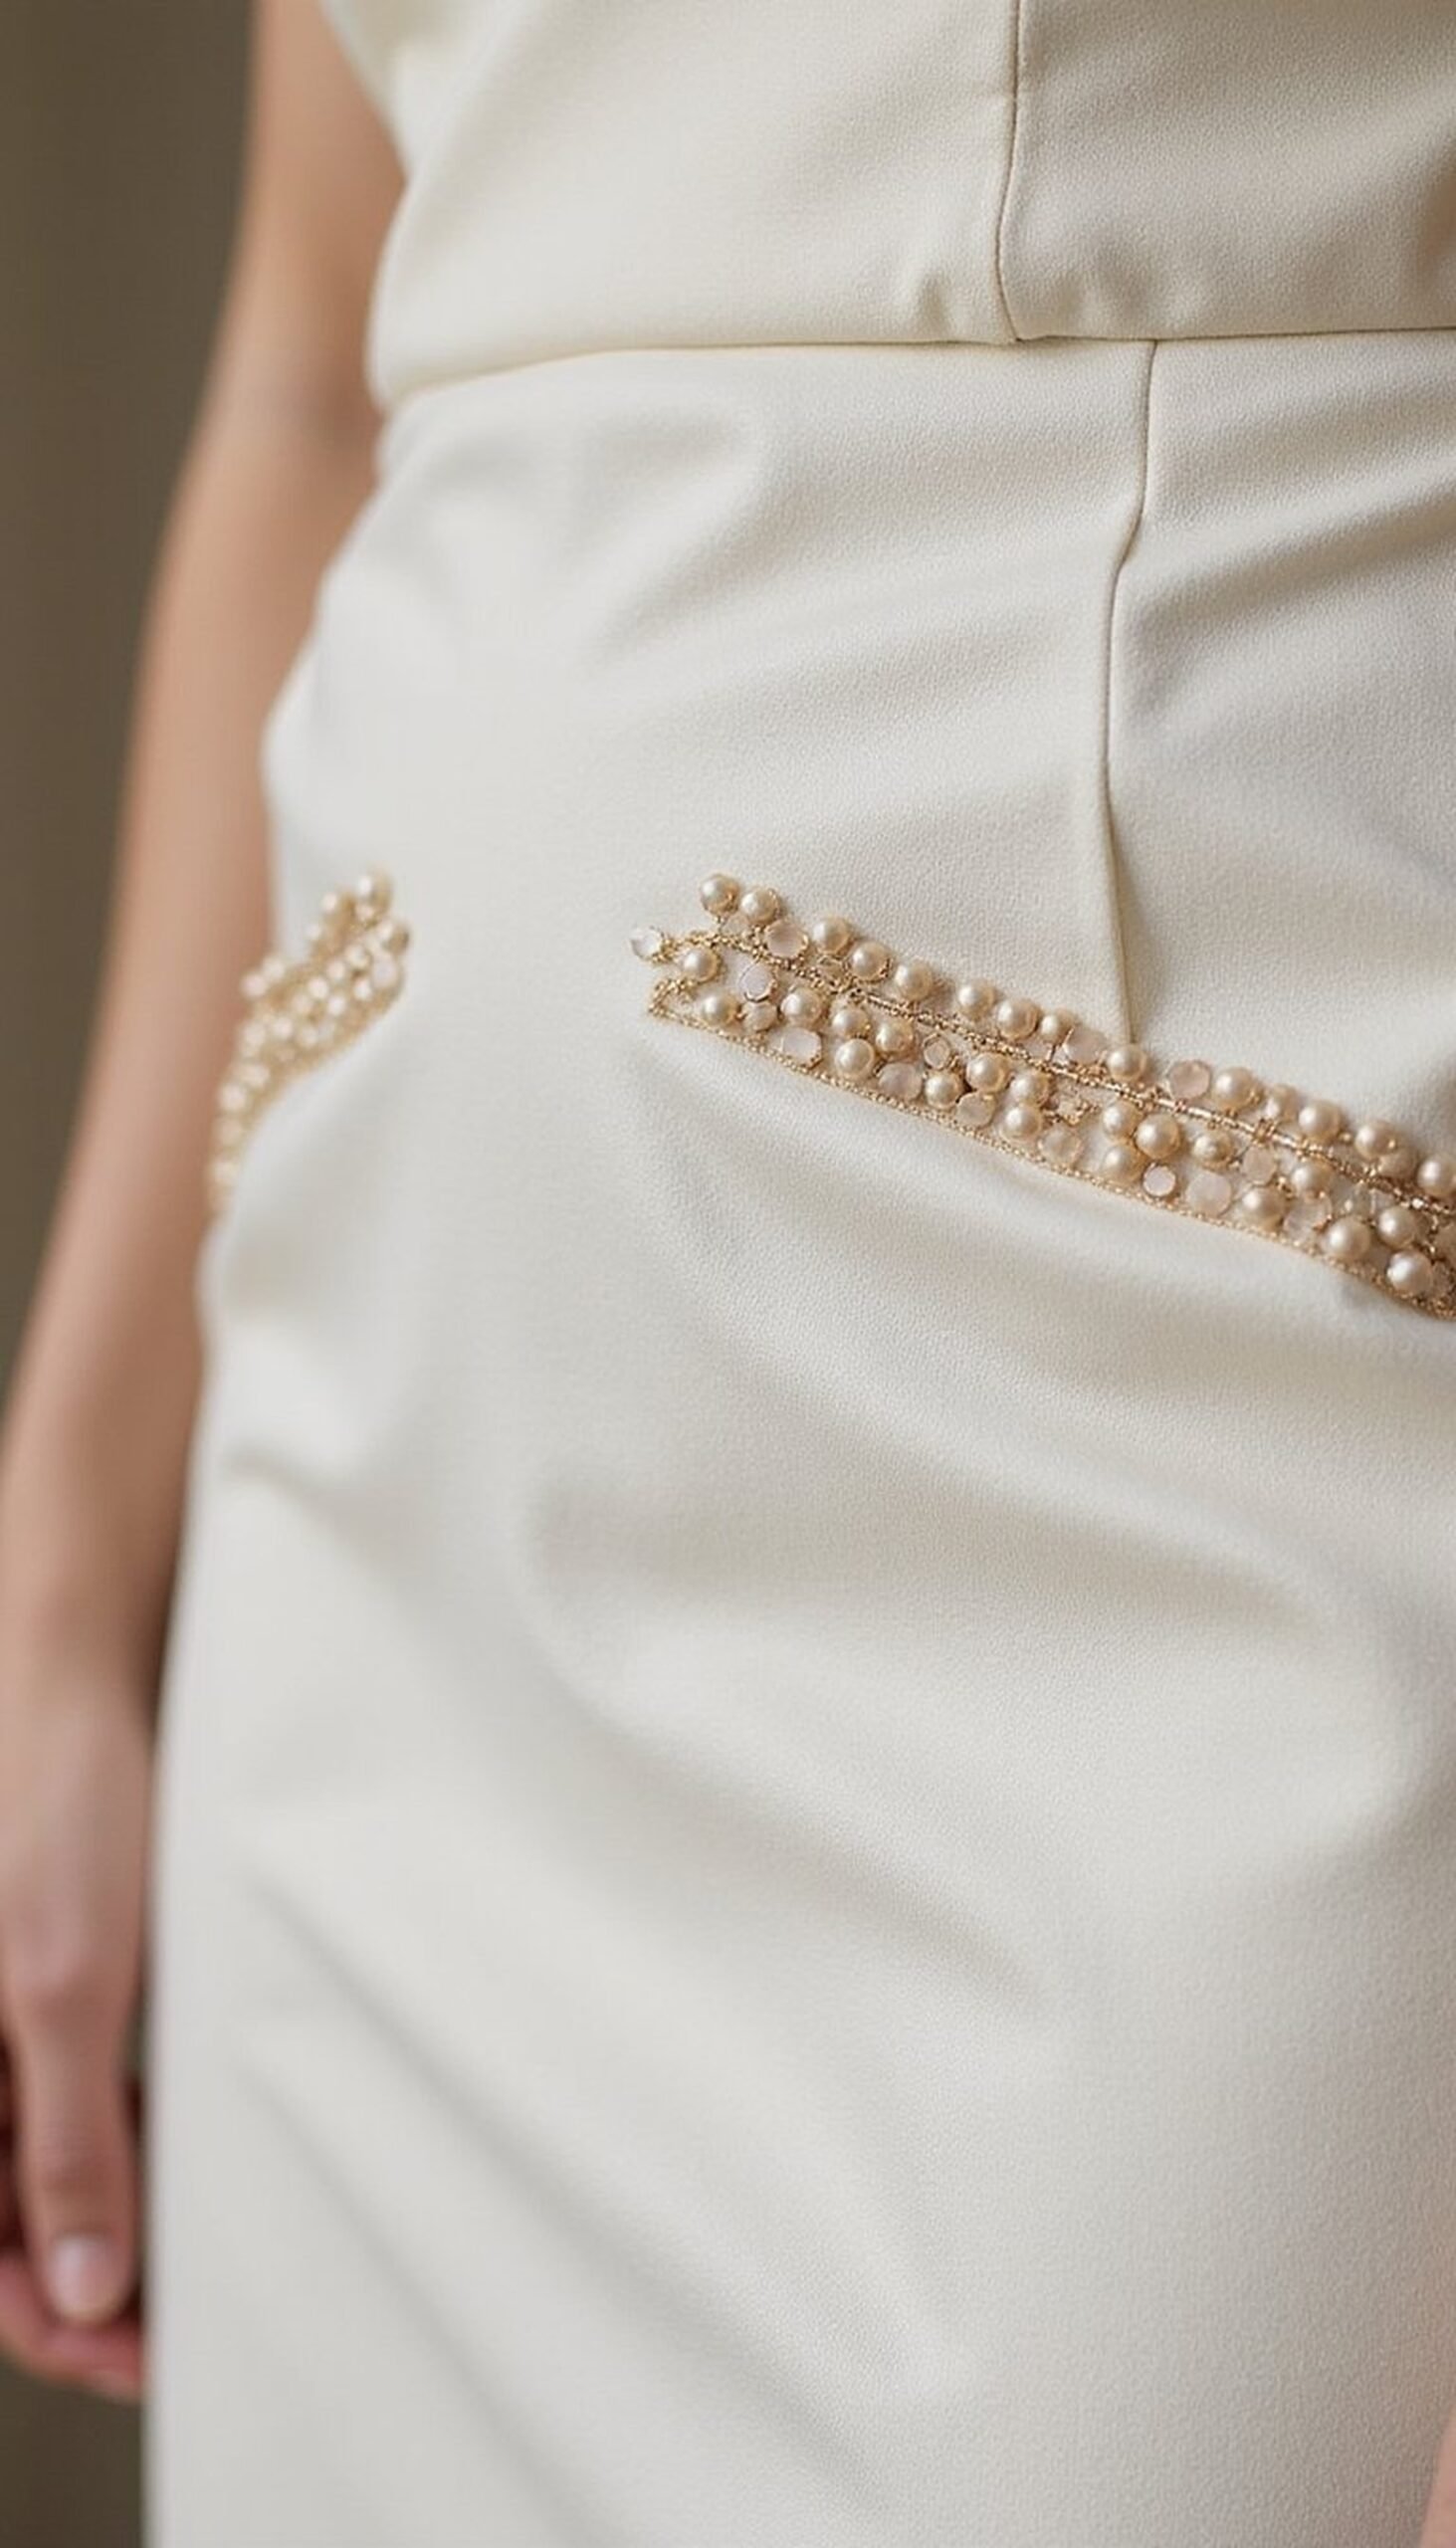
Adding a hand-stitched bead trim to a sheath dress hem elevates a minimal dress with tactile detail. Pick small seed beads or crystal rondelles and stitch them close to the hemline with matching nylon thread. Monochrome palettes—ivory beads on ivory fabric or matte black beads on navy—keep the result refined while adding subtle shimmer when moving. The texture reads well in close-up portraits, and the technique is forgiving for beginners. Sewing in short sections prevents tension issues and keeps the hemline smooth.
Styling Tips
- Work on a table with good light and a padded surface to keep stitches even.
- Test bead placement on a scrap before starting on the dress.
- Secure thread ends with tiny knots tucked under the hem for neatness.
Boho capelet from lace tablecloth or shawl
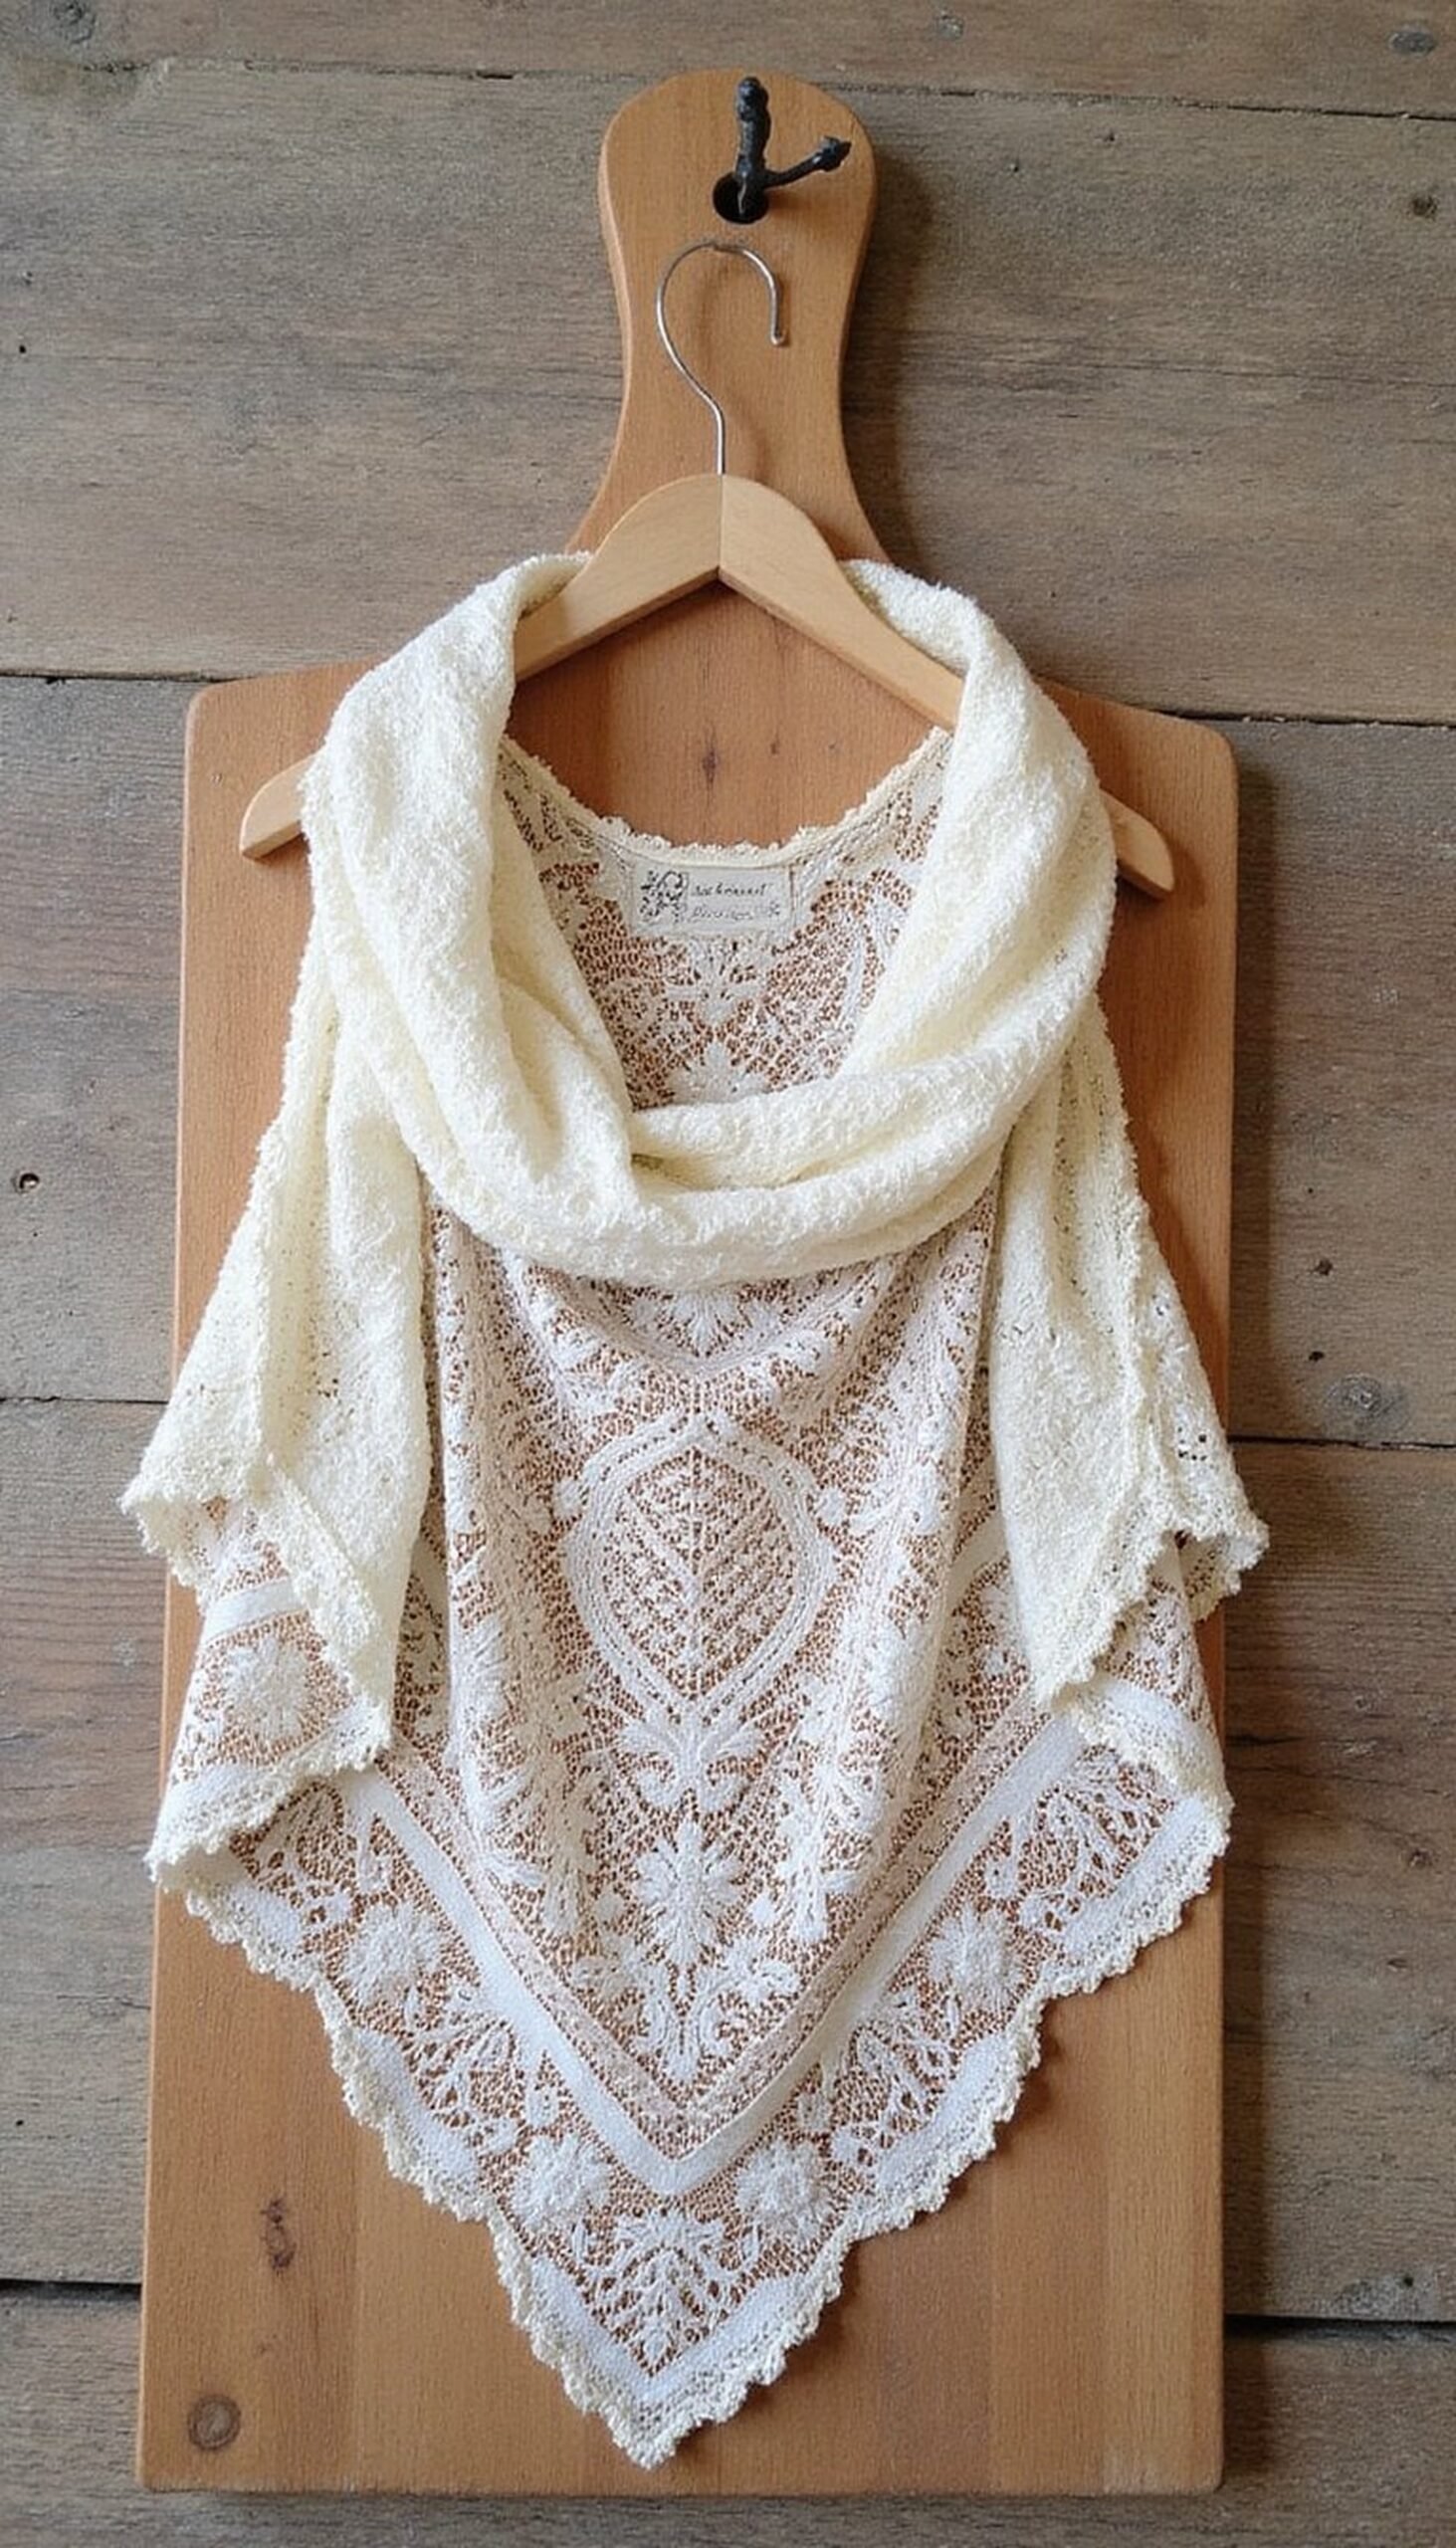
A short capelet made from an old lace tablecloth or delicate shawl adds a soft, romantic layer over gowns. Trim the lace into a rounded cape shape, finish with a narrow hem or delicate scallop, and fasten at the neck with a vintage button or ribbon tie. Choose cream, ecru, or soft taupe shades to pair with most robe colors. The open lace provides coverage without heat, and the drape frames the shoulders for flattering photos. This project is quick and needs minimal sewing if seams are tidy.
Styling Tips
- Reinforce the neckline with a narrow facing so the tie sits securely.
- Layer the capelet over a contrasting color to let the lace pattern show.
- Anchor with a small safety pin under the tie if windy weather is expected.
Monochrome look with painted platform shoes
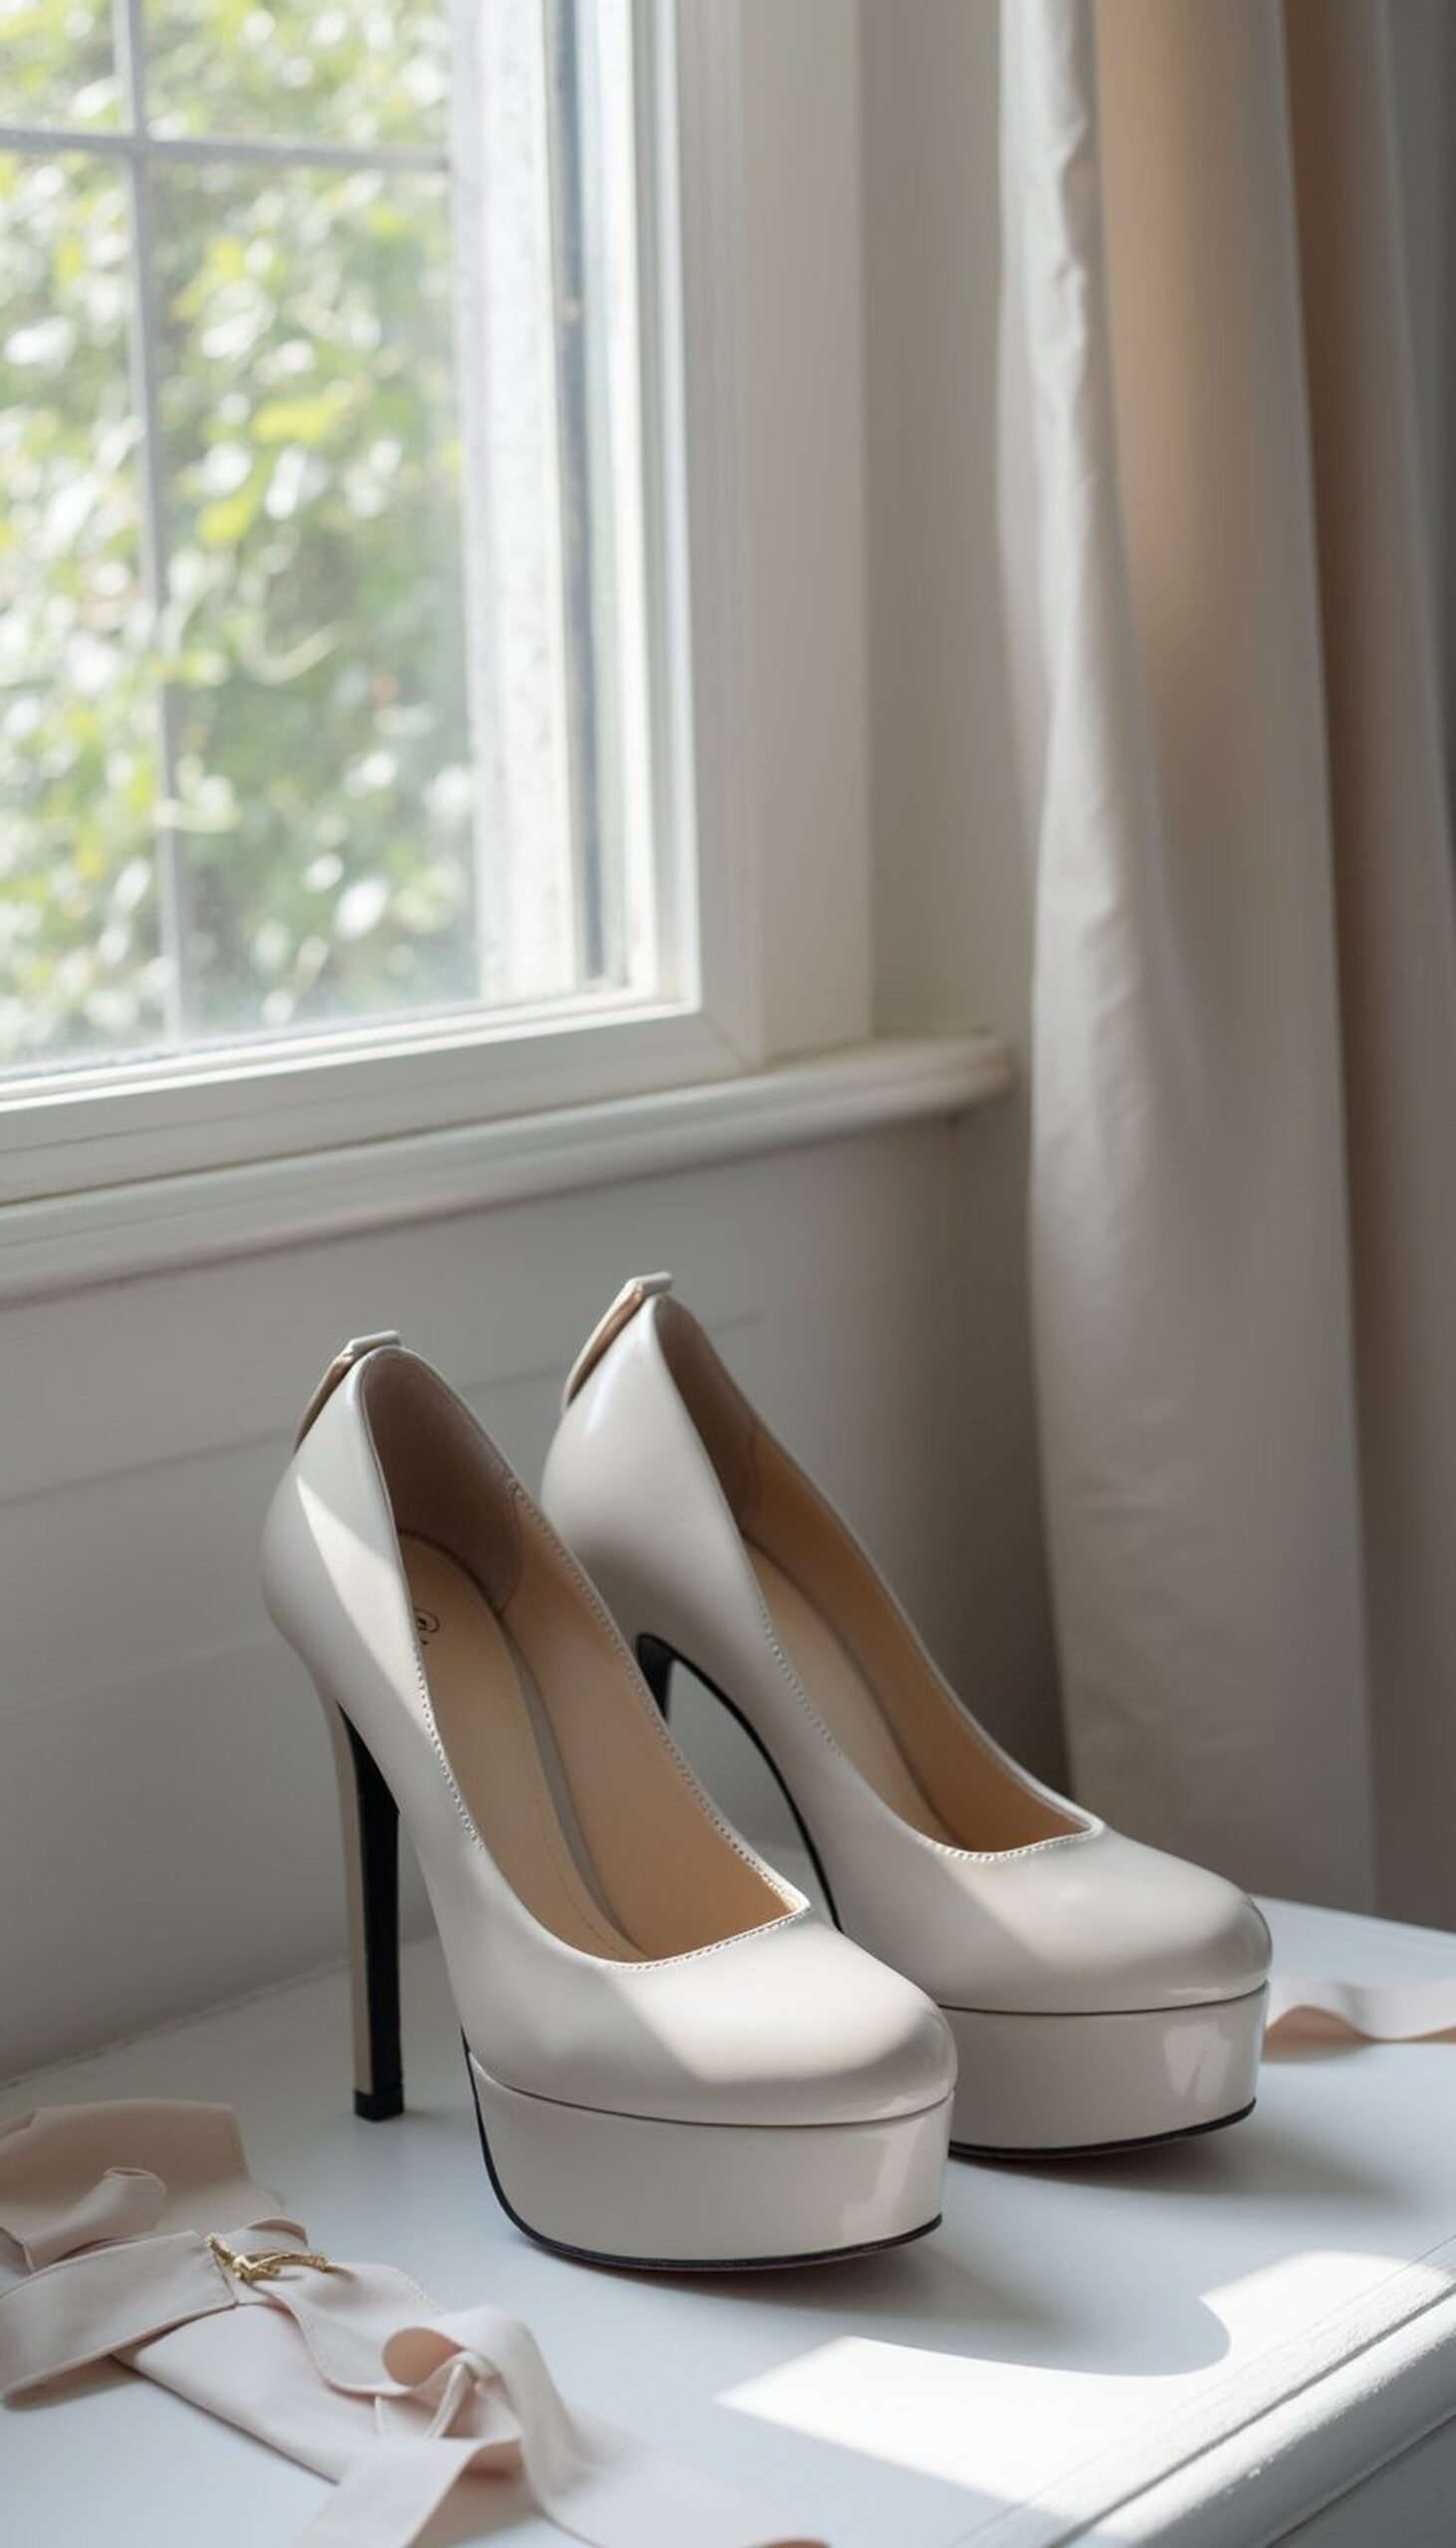
Create a chic monochrome graduation outfit by painting platform shoes to match a gown or sash. Use fabric paint, leather dye, or acrylic medium made for footwear to tint canvas or leather platforms—soft pewter, dove gray, or muted blush work well. Painting shoes unifies the palette and adds a curated touch that reads well in full-length photos. Keep brush strokes even and protect the finish with a clear sealer. Platforms add posture and presence for ceremony photos while being surprisingly comfortable for standing.
Styling Tips
- Mask off soles and hardware before painting for clean lines.
- Apply thin multiple coats for even color and to avoid cracking.
- Test dye on a hidden area first to check absorption and finish.
Vintage scarf halter paired with pleated skirt
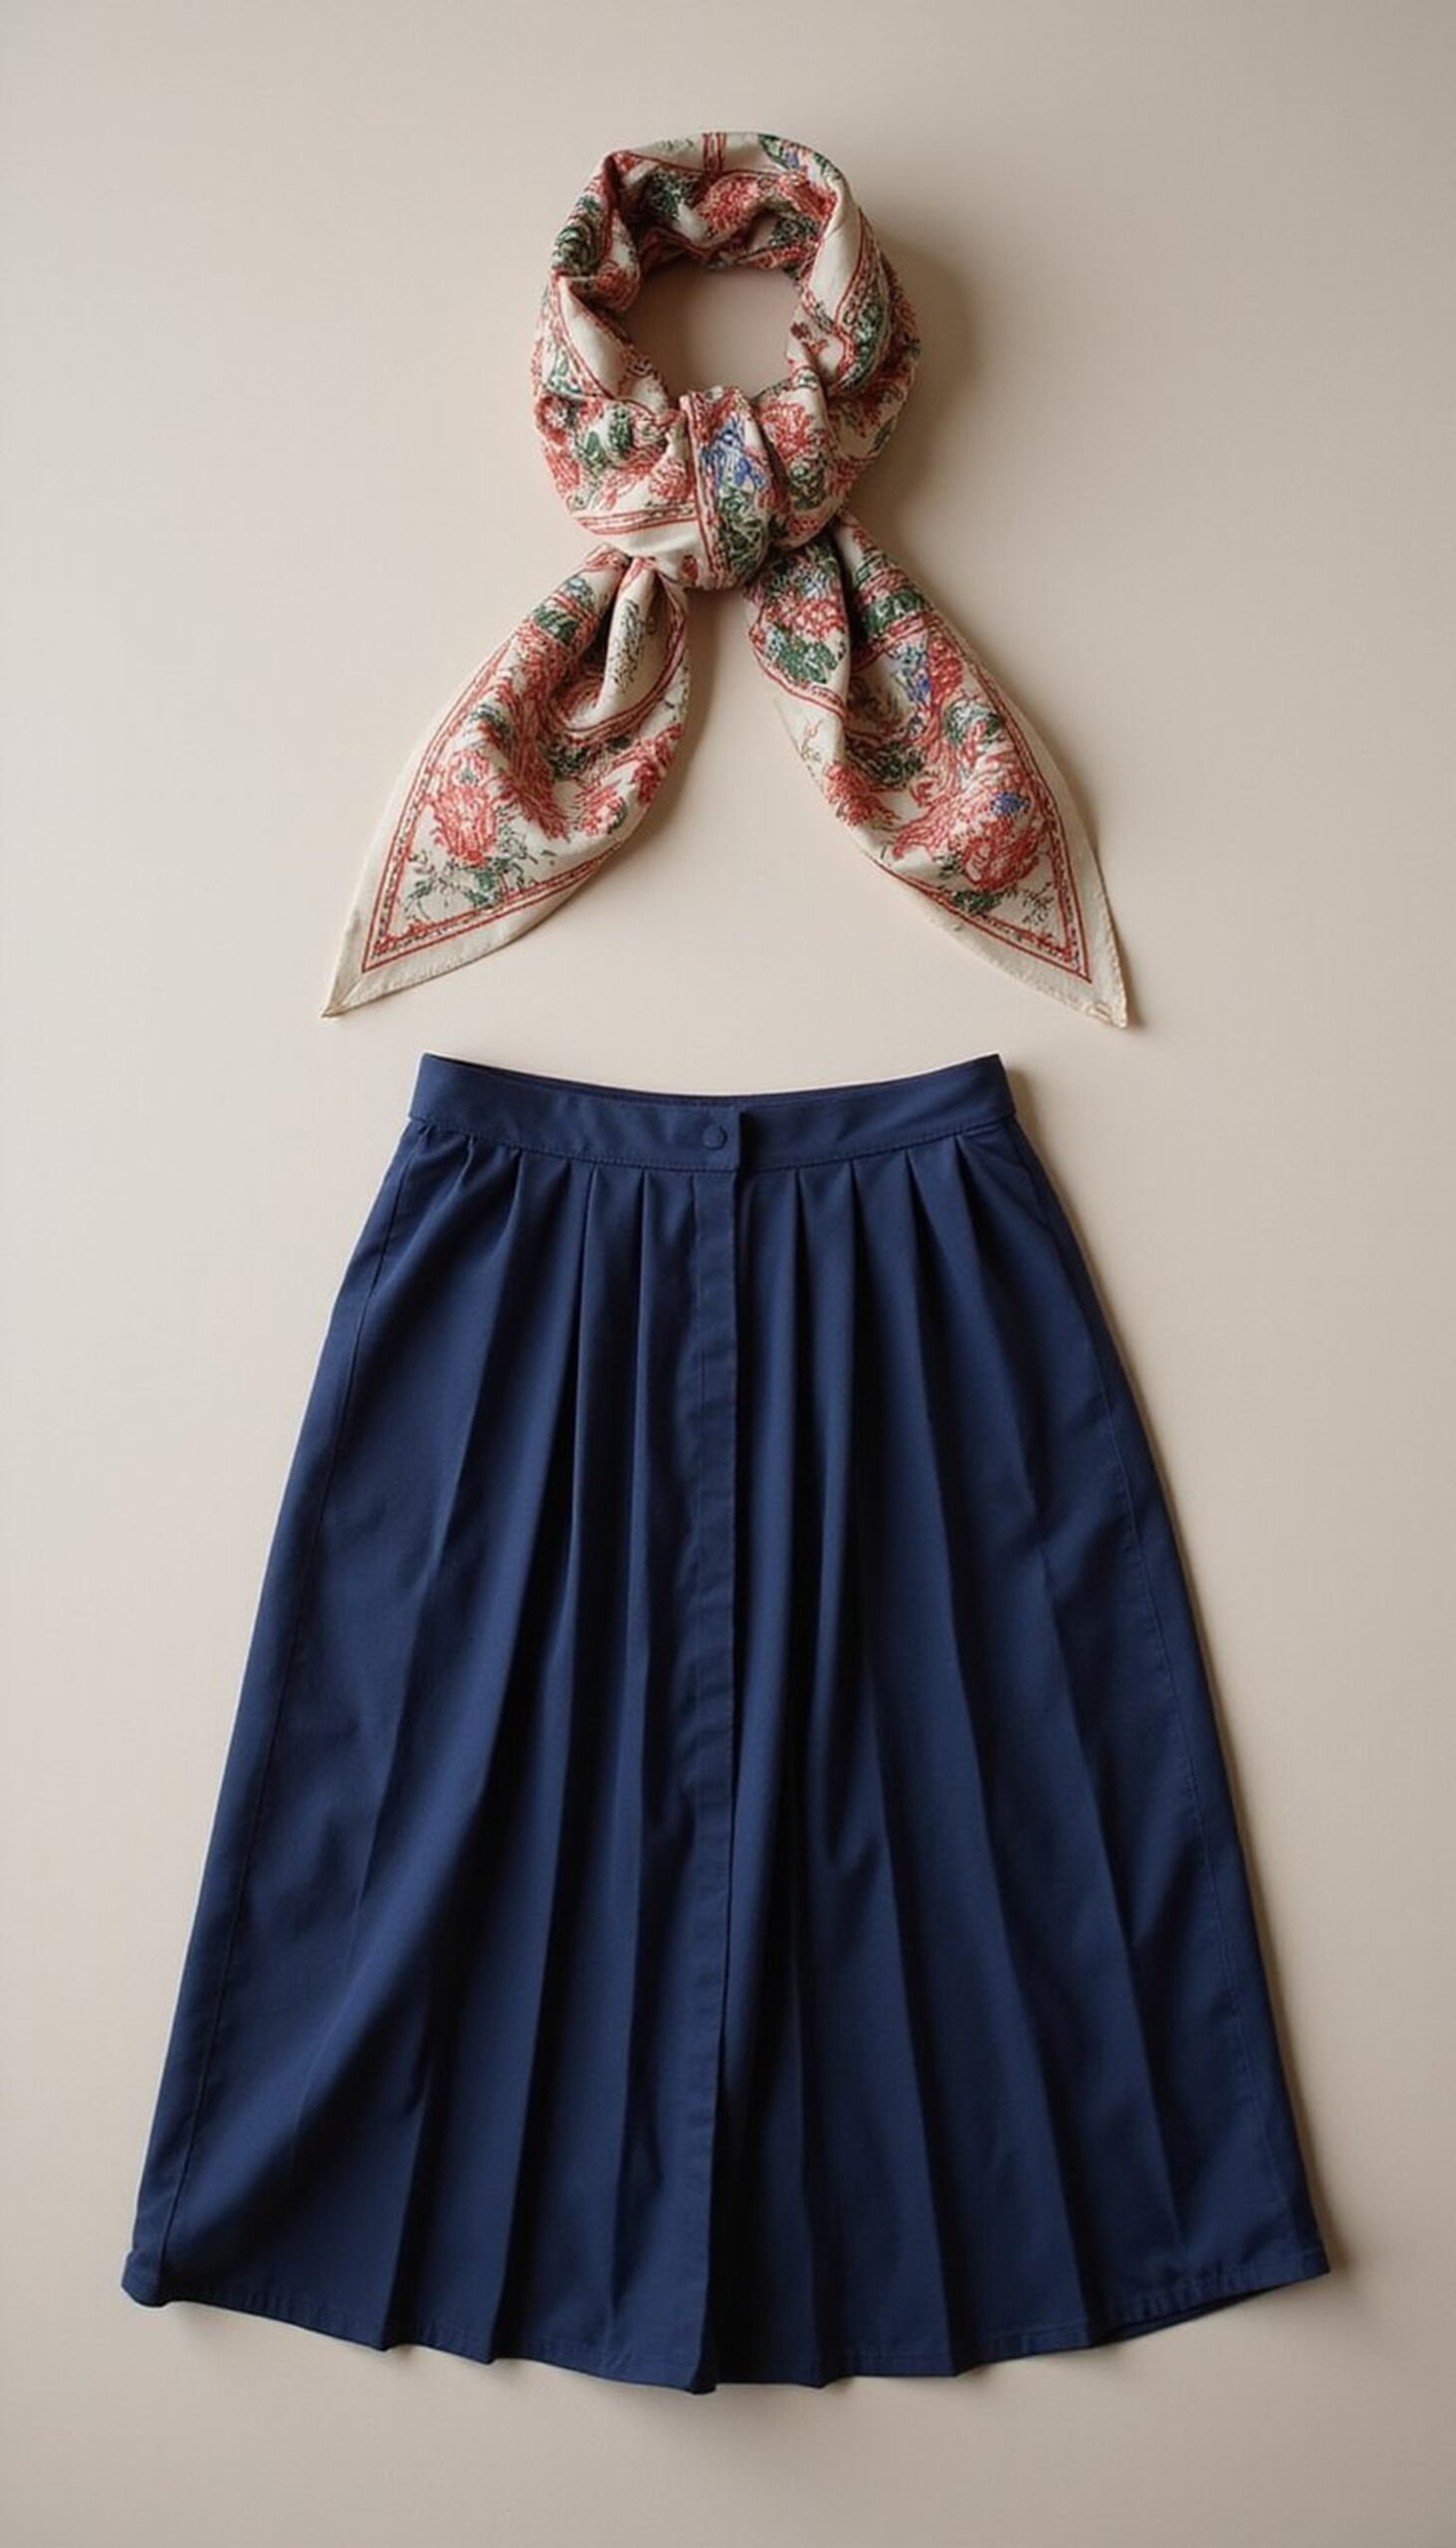
Fold a vintage scarf into a halter top that pairs beautifully with a pleated midi skirt. Use a silk or lightweight square scarf, fold into a long band, and tie behind the neck for a retro silhouette. A pleated skirt in a complementary neutral—navy, camel, or charcoal—balances the halter’s cropped feel. The scarf brings print and sheen, while pleats add refined motion in photos. This combo is lightweight for warm weather ceremonies and makes use of thrifted pieces for a personal touch.
Styling Tips
- Sew a small inner hook at the back to keep the halter secure during activity.
- Choose a scarf with a soft drape to avoid bulk at the knot.
- Use a high-waist skirt to ensure comfortable coverage when seated.
Tailored jumpsuit with sash and brooch
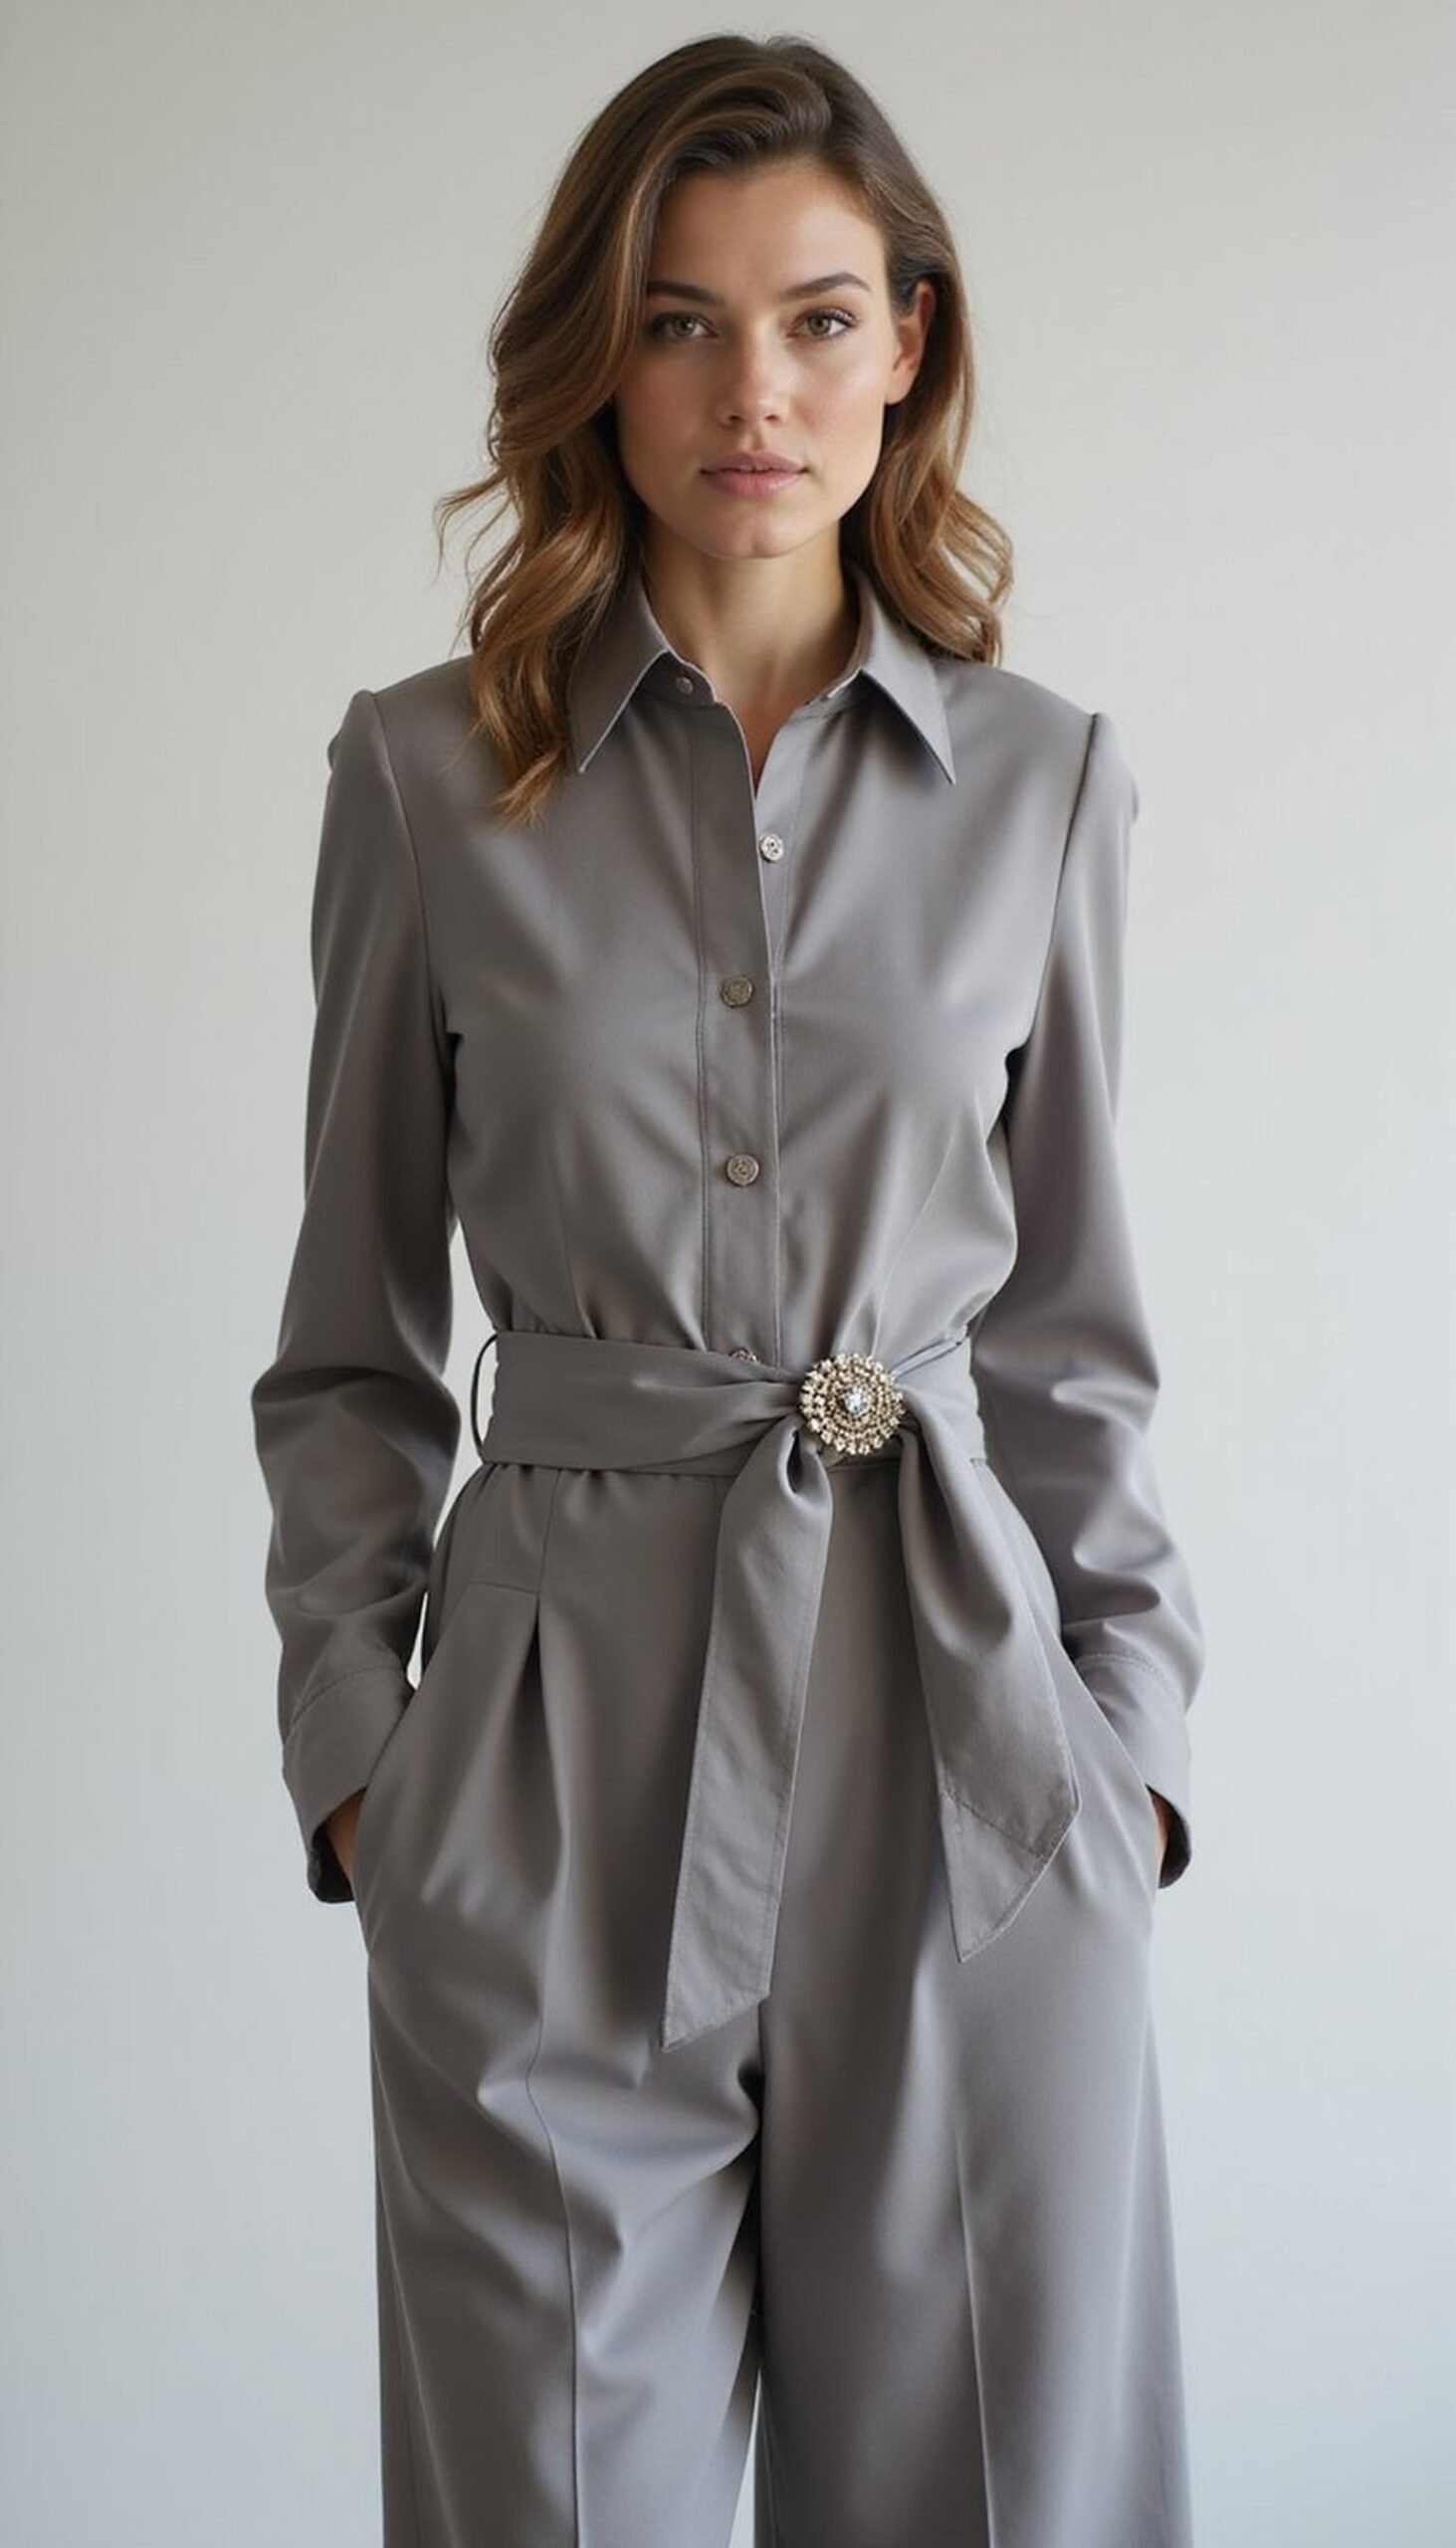
A tailored jumpsuit can be ceremony-ready when softened with a sash and brooch. Choose lightweight crepe, wool-blend, or matte satin in neutral tones like charcoal, navy, or cream. Add a wide fabric sash tied at the waist and secure with a decorative brooch to introduce texture and a point of interest. The jumpsuit’s clean lines photograph well and are comfortable for sitting and moving between photos. Small alterations—slimming a sleeve or hemming to footwear—make the silhouette feel intentional and polished.
Styling Tips
- Use a sash in a contrasting fabric—velvet or silk—for tactile contrast.
- Select a brooch that reflects your personal style, whether floral or geometric.
- Have a tailor adjust pant length to avoid bunching at the ankles.
Statement collar: detachable lace or ruffle piece

A detachable collar in lace or crisp cotton ruffle transforms a plain dress or top without sewing into the garment permanently. Use lightweight lace, organza, or poplin, and attach with small snaps or a ribbon tie hidden beneath hair. Collars frame the face and add a polished focal point for close-up graduation portraits. Pick tonal whites or pastels to coordinate with caps, or go for a gentle contrast like navy trim on ivory lace. Detachable collars are easy to change between ceremony and celebration looks.
Styling Tips
- Place snaps at shoulder points to keep the collar from slipping.
- Choose a collar width that doesn’t cover medal or pin placements.
- Store flat in tissue to keep lace or ruffles crisp before the event.
Leather jacket patched with fabric swatches
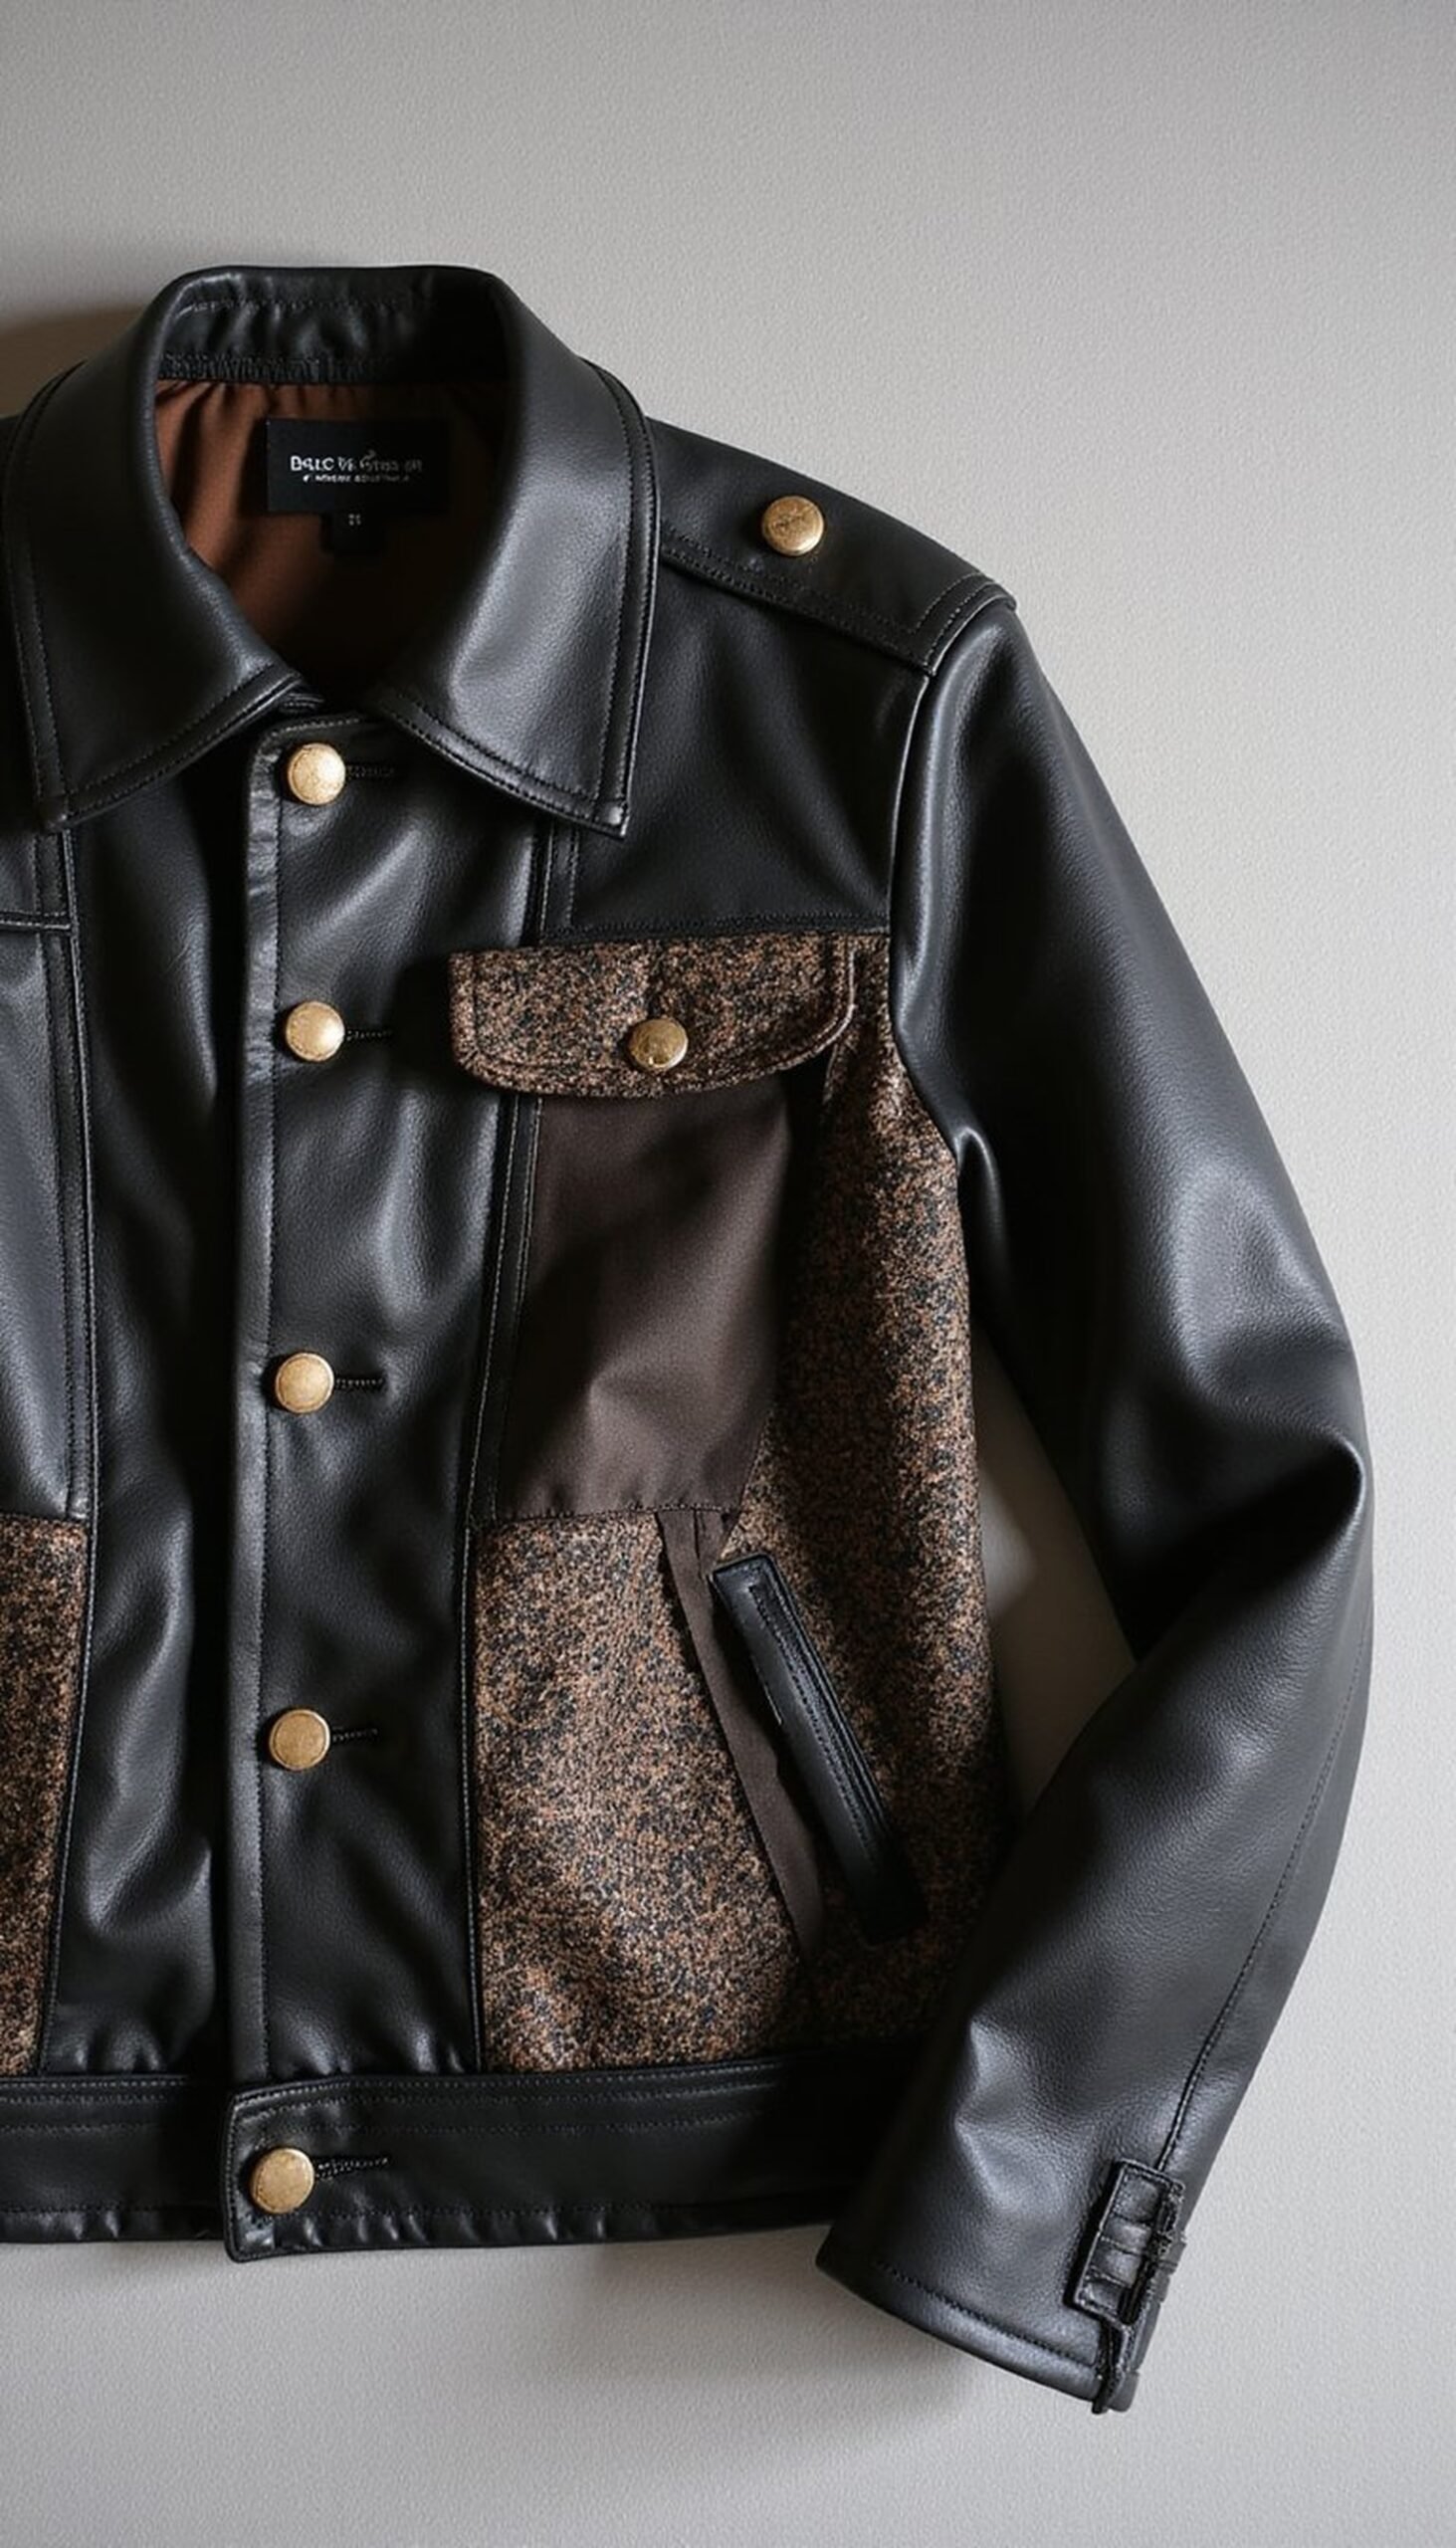
Patch a leather or faux-leather jacket with fabric swatches to blend edginess and softness. Cut contrasting shapes from silk, tweed, or floral cotton and stitch or glue them onto sleeves, shoulders, or the back panel. The mix of smooth leather and soft textiles adds tactile interest and tells a story of thrifted finds. Choose one or two accent colors—mustard, forest green, or rose—to tie the patches together. This DIY keeps the jacket wearable for future outfits while giving graduation attire a personal signature.
Styling Tips
- Use a flexible fabric adhesive for faux-leather to avoid stiff seams.
- Finish raw fabric edges with narrow topstitching for durability.
- Position patches asymmetrically for a modern, casual feel.
Belted cardigan layered over satin slip
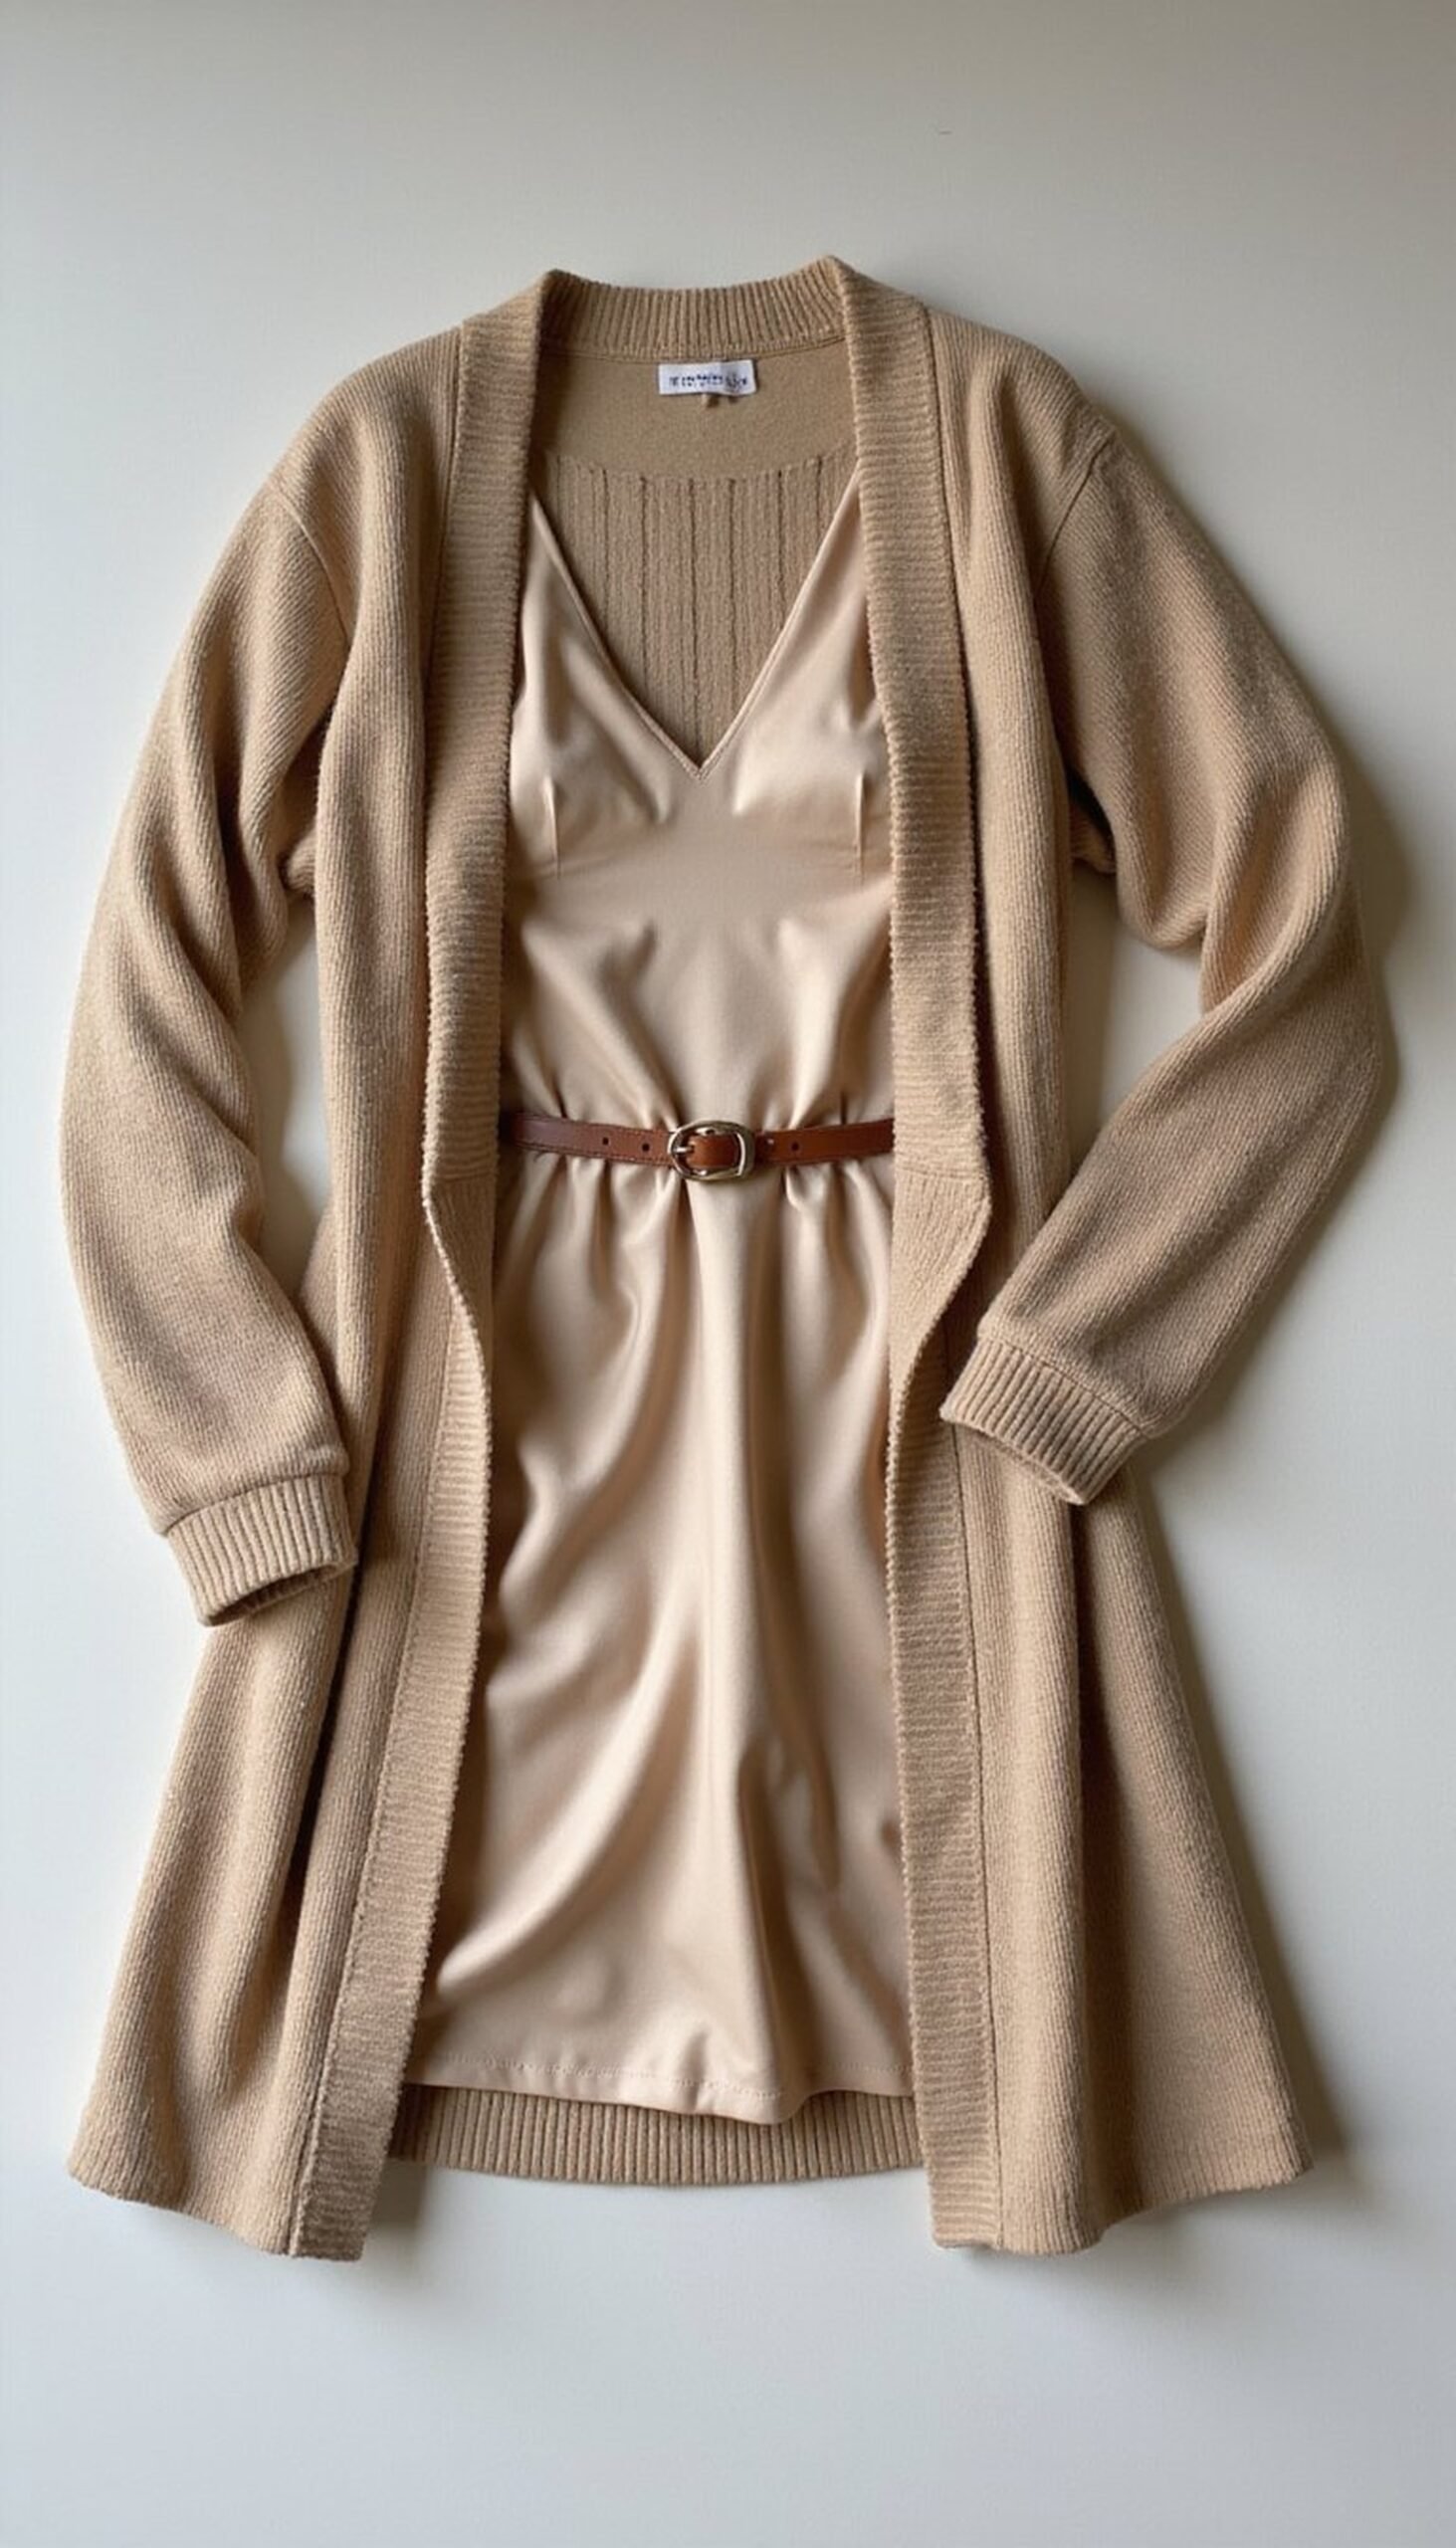
A belted cardigan layered over a satin slip dress makes for a cozy yet elevated graduation outfit. Choose a fine-gauge knit cardigan in oatmeal, charcoal, or dusty rose and cinch it with a slim leather or satin belt to define the waist. The contrast between the cardigan’s knit texture and the slip’s smooth sheen adds dimension in photos and is comfortable for variable weather. This layered look works well for outdoor ceremonies or long days when warmth and ease are priorities without losing style.
Styling Tips
- Pick a belt that complements the cardigan color rather than matching it exactly.
- Consider a cropped cardigan to avoid overwhelming the slip’s silhouette.
- Add simple stud earrings to keep the neckline area tidy in photos.
Hand-painted cap motifs for a cute focal point
Use fabric paint or permanent markers to create small motifs on a mortarboard—constellations, initials, tiny florals, or a short quote. Keep motifs compact and balanced to avoid crowding the cap. Matte paints and metallic accents add a tactile finish that reads well in photos and resists smudging when sealed. Painting is a quick way to personalize without sewing, and doing a few practice designs on scrap board builds confidence. The cap can be stowed safely between events and still look crisp at graduation.
Styling Tips
- Prime the cap surface lightly with fabric medium for smoother paint application.
- Use a clear sealer spray to protect painted areas from scuffs.
- Plan the design layout with pencil before committing to paint.
Sequin trim on pocket edges and cuffs
Adding sequin trim along pocket edges or jacket cuffs gives small glints of shine without overwhelming a whole outfit. Choose flat-backed sequins or sequin ribbon in muted tones—pewter, rose gold, or soft gold—to keep the result refined. Hand-stitched trim along a blazer pocket or cuff provides a custom accent that catches light during photos when the wearer moves. Keep the rest of the outfit simple and let these tiny reflective details do the talking. This is an approachable way to add sparkle without heavy labor.
Styling Tips
- Sew sequins in sections to maintain even tension and prevent puckering.
- Line the pocket interior to protect garments from sequin scratch.
- Coordinate sequin tone with belt hardware or shoe accents.
Lightweight cropped blazer with contrast piping
A cropped lightweight blazer with contrast piping modernizes a graduation outfit while keeping structure. Use linen blends or cotton for breathability and add narrow piping in a complementary color along lapels, hems, and sleeve seams. Contrast piping—ivory on navy, or warm tan on charcoal—creates a clean outline that reads well in full-length photos. Cropped length keeps proportions fresh with high-waisted skirts or trousers. This small tailoring detail elevates a simple blazer and is subtle enough for formal settings.
Styling Tips
- Choose a cropped length that hits at the natural waist for balance.
- Use fusible piping tape for easy application before stitching.
- Pair with high-waist bottoms to elongate the leg line in photos.
Tulle maxi skirt over simple tee and sash
A tulle maxi skirt worn over a simple fitted tee and tied with a sash creates whimsical movement for photos. Select multiple layers of soft tulle in neutral shades—ivory, pale gray, or muted pink—for volume that still feels airy. A fitted cotton tee balances the skirt’s fullness, while a sash at the waist adds definition and a dash of color. This mix gives both a celebratory and relaxed vibe, perfect for taking portraits on campus lawns or by architectural backdrops.
Styling Tips
- Use a low-profile elastic waistband to keep the silhouette smooth under the sash.
- Wear neutral flats or low block heels for comfort during outdoor walks.
- Consider a thin camisole under the tee for extra coverage if the tee is slightly sheer.
Pearl pins on a minimal slip dress neckline
Small pearl pins or clusters pinned near a slip dress neckline add a refined focal point without heavy jewelry. Use faux or real pearls mounted on small pins and place them along a strap or at a corner of a square neckline. The pearls lend a soft reflective detail against satin or silk, and their placement can highlight the face in close-up graduation shots. This is a gentle way to include heirloom pieces or to craft a custom accessory that stays light and comfortable for a long day.
Styling Tips
- Anchor pins through a small fabric loop sewn into the seam to prevent slippage.
- Group pins asymmetrically for a modern, curated effect.
- Secure pin backs with a tiny piece of felt to protect the skin and fabric.