
DIY Home Organization Crafts save space while adding style, and they make everyday routines feel smoother. I’ve tried a handful of home organization DIY projects over rainy weekends, and that satisfying moment when clutter finds a home never gets old.
These organizing crafts and storage hacks blend charm with purpose, turning small corners into hard-working zones. DIY Home Organization Crafts also encourage creativity with materials already on hand.
From pantry makeovers to entryway order, home organization DIY turns stray cords, snacks, and stationery into tidy scenes.
Every piece becomes both décor and system. I keep returning to DIY Home Organization Crafts for their budget-friendliness, personalization, and the pride that comes from a neat, thoughtfully arranged space.
Pegboard Command Center For Busy Family Spaces
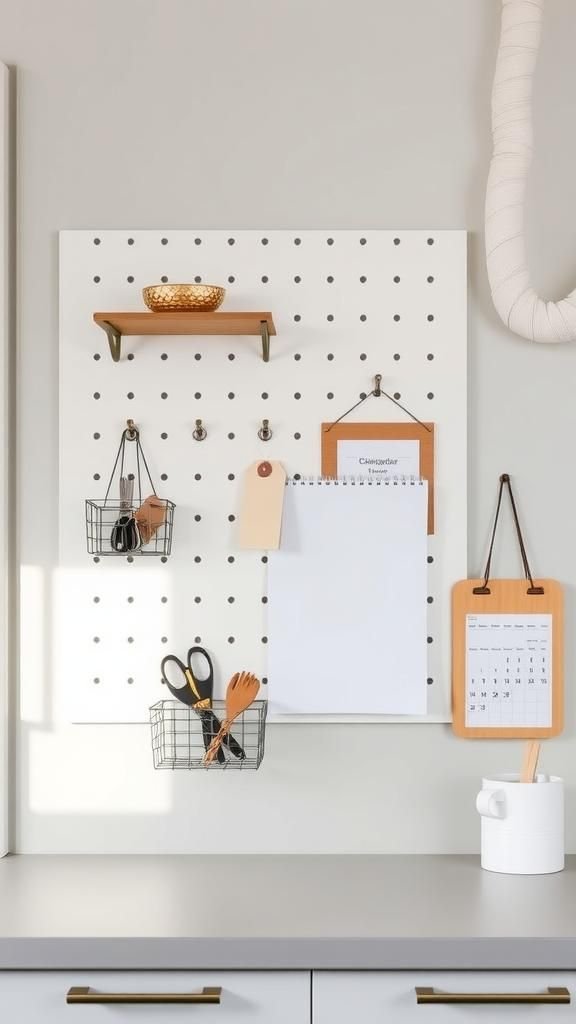
A pegboard command center brings a crisp, modular feel to kitchens, offices, or utility rooms. Perforated hardboard pairs with metal hooks, wire baskets, and small shelves, creating a grid that adapts as needs change.
White, charcoal, or a pop color finish sets the vibe, while mixed metals add an industrial accent. Calendars, keys, scissors, and notepads stay visible yet tidy, preventing countertop piles.
Mounted near doorways, it becomes a quick-stop station for everyday essentials. Wrapped as a housewarming gift, it can arrive with a few starter accessories and a bold frame, presenting both wall décor and a smart organizing hub.
Steps
- Measure the wall space and cut the pegboard to size, then paint or stain the surface and let it dry.
- Install wood furring strips into the studs, then screw the pegboard onto the strips for a standoff fit.
- Add hooks, baskets, and small shelves; arrange zones for mail, keys, and notebooks.
- Frame the edges with molding for a polished look and hang a calendar or cork tile section.
Fabric-Covered Storage Bins With Leather Pulls
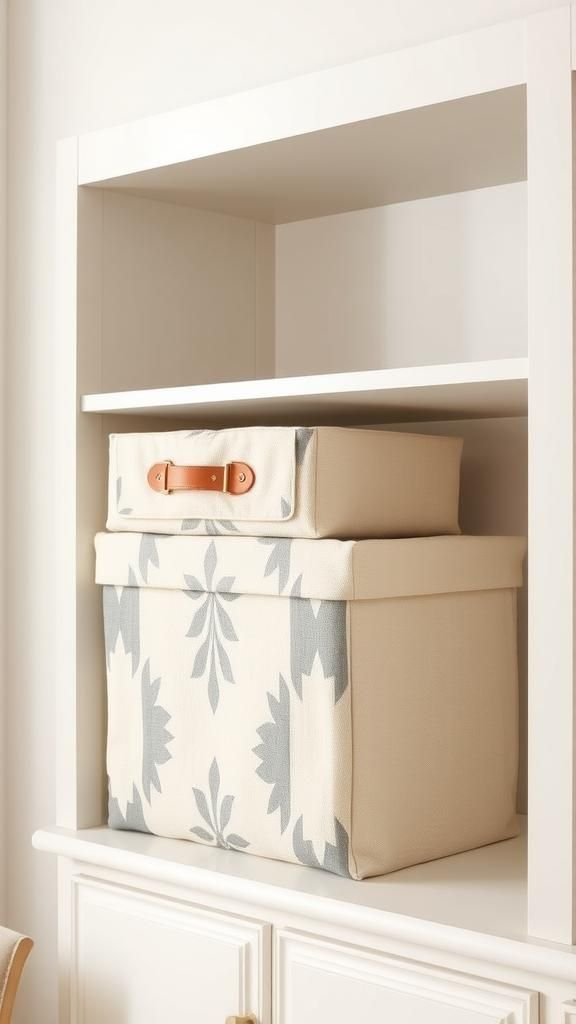
Plain boxes gain a cozy, tailored look when wrapped in woven fabric, canvas, or linen. Neutral textiles pair with warm leather pulls and brass hardware for understated elegance, while patterned cottons bring playful color to open shelving.
These bins tame scarves, toys, or craft supplies without visual clutter, and they slide neatly into cube units or bookcases. Labels stitched on twill tape or clipped tags keep categories clear.
Presented as a dorm or nursery gift, a nested set feels thoughtful and personal. Displayed in rows, they read as soft architecture that warms an otherwise hard-edged storage wall.
Steps
- Cut fabric panels to fit each box with overlap and adhere using spray adhesive, smoothing wrinkles.
- Fold fabric to the inside and secure edges with hot glue or double-sided tape.
- Punch holes and add leather pulls with rivets or screws for a refined handle.
- Finish with label holders or tags to mark contents.
Mason Jar Wall Organizer With Rustic Rail
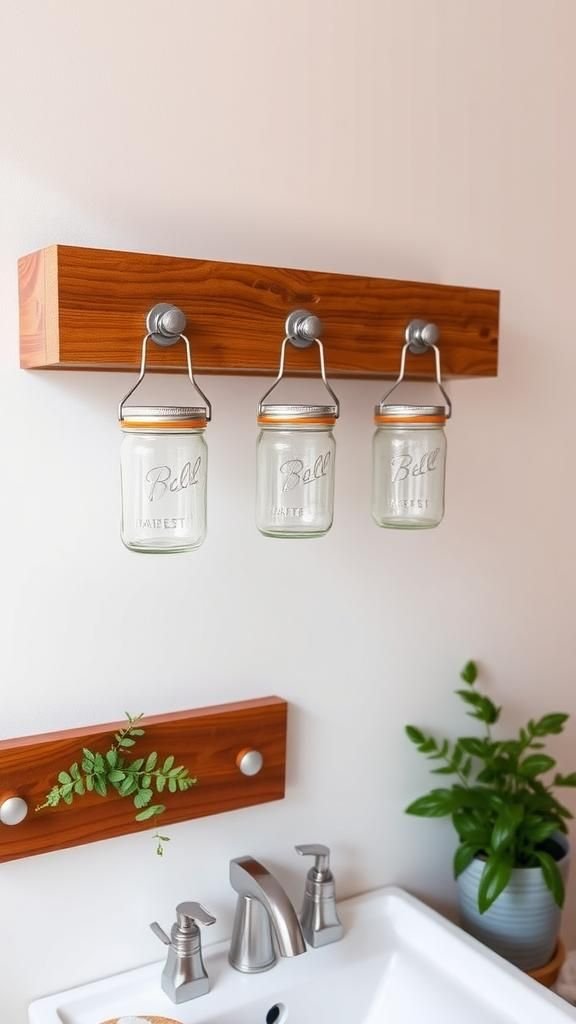
Glass jars transform into a wall-mounted station for brushes, cotton rounds, or desktop odds and ends. A stained wood rail pairs with stainless or black hose clamps for a farmhouse-meets-modern blend.
Clear glass keeps contents visible, while frosted jars lend a softer look. The piece suits bathrooms, studios, and entryways where small items scatter.
A slim silhouette saves counter real estate and turns everyday objects into a curated display. Gift-ready with a small bouquet or bath salts, the organizer doubles as décor and storage, hugging narrow wall spaces where shelves might feel bulky.
Steps
- Cut and stain a wood board; seal it and let it cure.
- Mark jar positions, predrill holes, and screw hose clamps onto the board.
- Insert jars and tighten clamps, ensuring even spacing and alignment.
- Mount the board to wall studs or anchors and load with supplies.
Magnetic Spice Rack For Fridge Or Side Panel

Slim metal tins with clear lids line up like jewelry along a kitchen surface, turning spices into a colorful mosaic. A sheet of steel or a refrigerator side offers an instant gallery, freeing cabinet space and keeping flavors within reach.
Labels can be laser-printed, handwritten, or chalk-style for a casual look. Brushed metal, matte black, and soft white finishes match a range of appliances.
As a gift, a curated set of favorite blends inside the tins makes a thoughtful, aromatic surprise. Displayed near the prep zone, it reads as both art and pantry solution.
Steps
- Cut a thin steel sheet to size and mount it on the fridge side or wall with strong adhesive strips or screws.
- Fill magnetic spice tins and label lids or bottoms for quick identification.
- Arrange tins on the steel surface in rows or color gradients.
- Seal any raw metal edges with edging tape for a clean finish.
Chalkboard-Labeled Pantry Jars For Streamlined Shelves

Glass canisters with airtight lids bring a calm, uniform rhythm to pantry shelves. Chalkboard labels add a friendly, graphic note and make quick relabeling easy as pantry staples change.
Bamboo, black, or silver lids influence the mood, from spa-like to modern industrial. Filled with grains, beans, and snacks, clear sides reduce hunting and keep inventory visible.
Grouped by height, the jars create a tidy skyline that photographs beautifully. Packaged as a kitchen-warming gift, a trio with chalk marker included feels thoughtful and practical, elevating everyday staples into a display worth leaving out on open shelving.
Steps
- Wash and dry jars thoroughly, ensuring lids and seals are clean.
- Cut or apply chalkboard label shapes and burnish edges.
- Fill jars with pantry staples and write names with a chalk marker.
- Arrange by size on shelves for easy scanning.
Under-Bed Rolling Storage Trays For Hidden Stowage
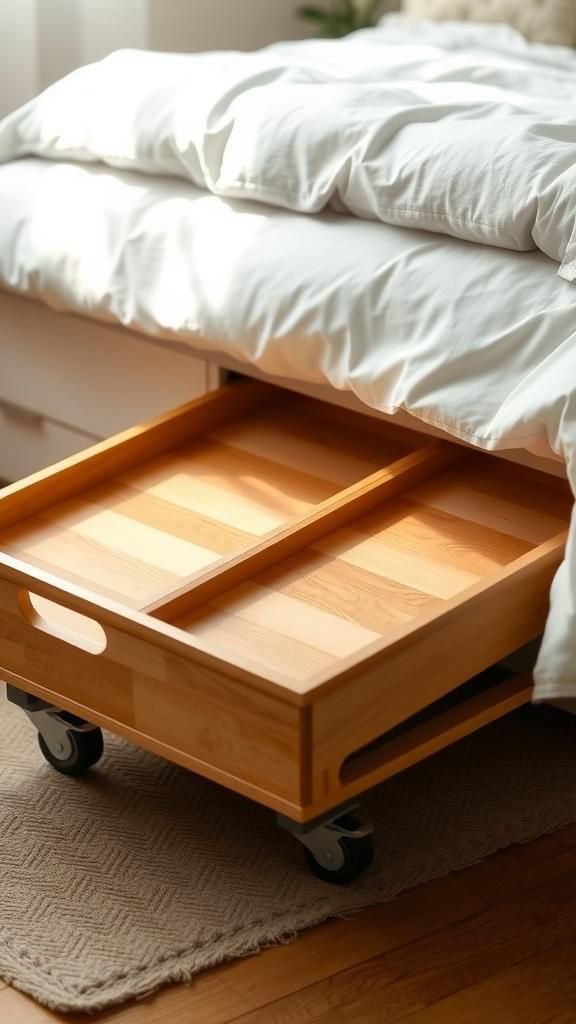
Low-profile wooden trays glide under the bed, rescuing square footage that often sits idle. Smooth casters and shallow sides keep textiles, shoes, or board games tidy and dust-free.
A natural stain highlights grain for a calm, Scandi vibe, while color blocking adds a playful accent. Leather tabs or rope pulls offer easy retrieval.
In small apartments, these trays function like secret drawers and pair nicely with linen bedding and neutral rugs. Gifted to a student or new renter, a set streamlines move-in day.
When tucked away, the room breathes, yet everything remains close at hand.
Steps
- Cut plywood to size for base and sides; screw sides to the base.
- Sand edges, apply stain or paint, and let dry thoroughly.
- Attach low-profile casters at corners and add felt to reduce noise.
- Install leather or rope pulls on the front panel.
Ladder Shoe Rack With Airy Boutique Feel

An upcycled wooden ladder becomes a sculptural shoe display that doubles as décor. Steps transform into tiers for heels and flats, while added slats create platforms for sneakers.
A matte black or natural oak finish suits entryways and bedrooms, and the leaning profile keeps floors open. Woven baskets can rest on lower rungs for socks and care kits.
Styled with a plant and small tray, the rack evokes a boutique vignette at home. As a housewarming present, it appeals to fashion lovers who appreciate storage that showcases a collection without overwhelming the room.
Steps
- Sand the ladder and reinforce joints with screws or brackets.
- Add slats or boards across rungs to create shoe platforms.
- Prime and paint or stain, then seal for durability.
- Place felt pads on feet and lean securely against a wall.
Wooden Mail Sorter With Chalk Strip Label
A wall-mounted sorter corrals letters, flyers, and receipts into tidy slots. Plywood or hardwood dividers combine with a framed body for a clean, architectural look.
A chalk strip along the bottom invites quick notes like due dates or reminders. Natural finishes feel calm and classic, while black painted shells make the chalk pop.
Keys hang from small hooks beneath, turning the entry into a streamlined landing zone. When wrapped as a gift, it pairs well with a set of fun envelopes or stamps, presenting both organization and a touch of personality near the front door.
Steps
- Cut and assemble a shallow box with internal dividers sized for envelopes.
- Sand smooth, apply paint or stain, and add a clear sealer.
- Adhere a chalkboard strip along the bottom edge; attach small hooks.
- Mount to wall studs or anchors and label sections with chalk.
Entryway Hook Rail And Floating Shelf Combo
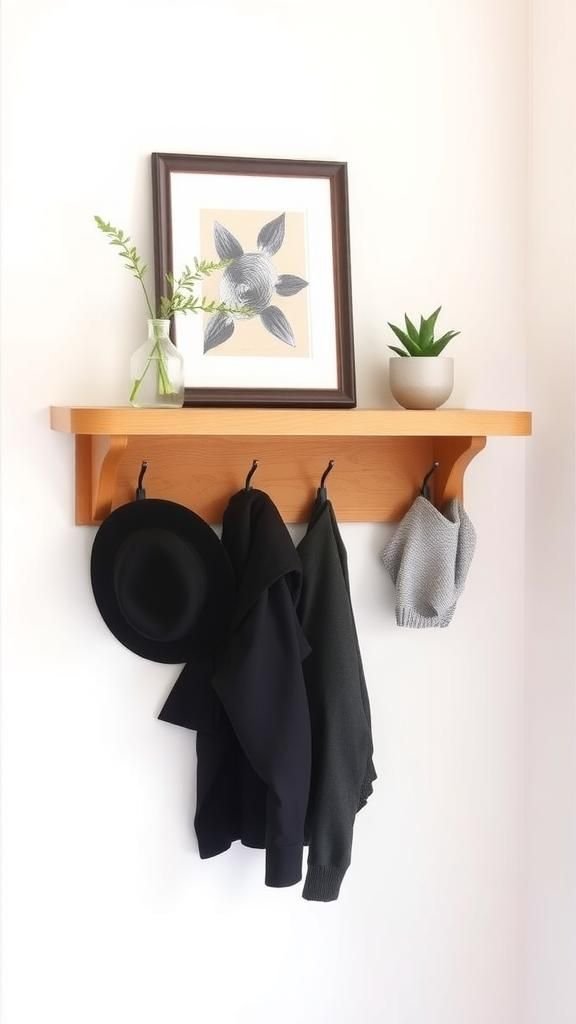
A slim floating shelf paired with a sturdy hook rail keeps jackets, hats, and daily carry items tidy near the door. Solid wood brings warmth, while black powder-coated hooks add a modern edge.
The shelf displays a petite vase, framed art, or sunglasses, creating a welcoming vignette. Lengths can match the wall, and the finish can echo flooring or door trim.
As a practical gift for new homeowners, this combo elevates an entry without crowding it. When aligned with a bench, it forms a mini mudroom that looks intentional rather than improvised.
Steps
- Cut and finish the shelf board; install concealed brackets.
- Mount a separate hook rail below the shelf into studs.
- Add protective finish and let it cure before loading.
- Arrange décor on the shelf and hang daily essentials on hooks.
Cable-Managed Charging Station On A Tray
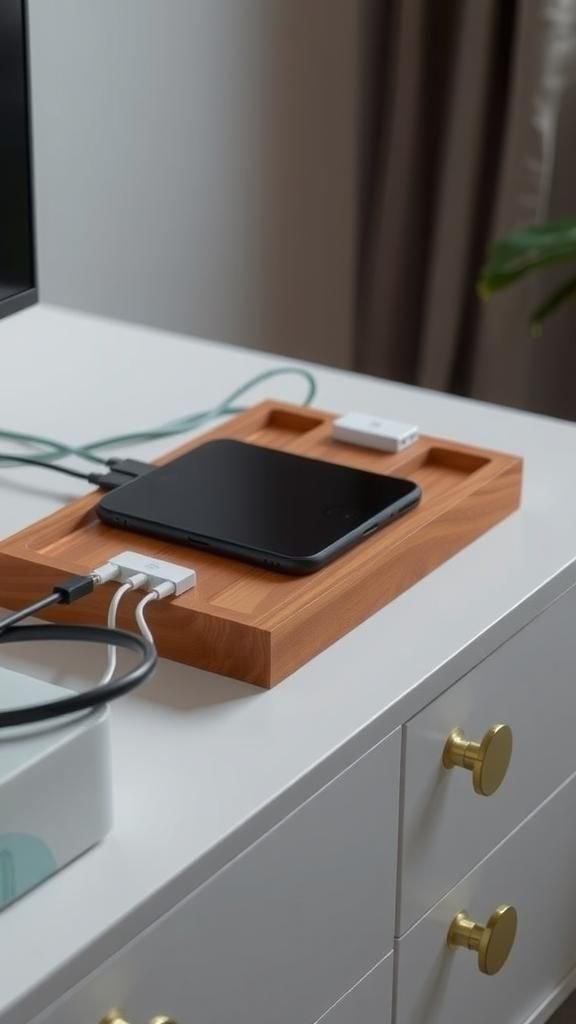
A wooden or acrylic tray transforms into a hub where devices rest neatly while cords hide out of sight. A slim power strip tucks beneath, and grommets or notches guide cables cleanly.
Felt or cork lining protects finishes and softens the look. Colors range from matte black tech chic to pale oak for a softer mood.
Phones, earbuds, and watches gather in one place, ending the nightly cable scramble. Wrapped with a braided cable set and labels, it becomes a thoughtful gift for anyone juggling gadgets.
Perched on a console, it reads as tidy décor rather than tech clutter.
Steps
- Drill cable pass-throughs in the tray and sand smooth.
- Mount a compact power strip underneath with brackets or adhesive.
- Apply felt or cork lining and route cables through grommets.
- Add small dividers or silicone rests for devices and plug in.
Tiered Wire Basket Stand For Produce Storage
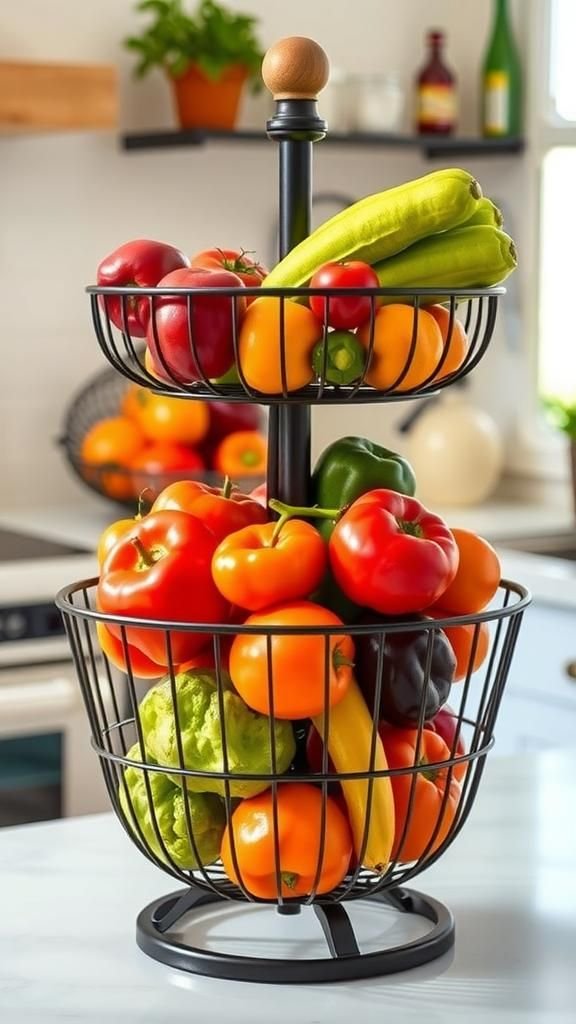
Stacked wire baskets create a vertical market-style display for fruits, onions, and potatoes. The open weave promotes airflow, while the compact footprint frees counter space.
Black iron feels industrial, while brass reads warm and vintage. A wooden finial or handle at the top adds a crafted touch.
Lined with linen or kraft paper, the stand looks styled yet ready for everyday grabs. As a kitchen gift, it pairs well with a handwritten recipe card and a lemon or two.
Parked near light wood boards and ceramic bowls, it brings a cozy pantry vibe.
Steps
- Assemble a central rod with spacers and secure wire baskets at staggered intervals.
- Tighten hardware and ensure the stand remains level and stable.
- Spray paint the metal if desired; let it cure fully.
- Add liners and load with produce, heavier items in the bottom basket.
Adjustable Drawer Dividers From Smooth Balsa Strips
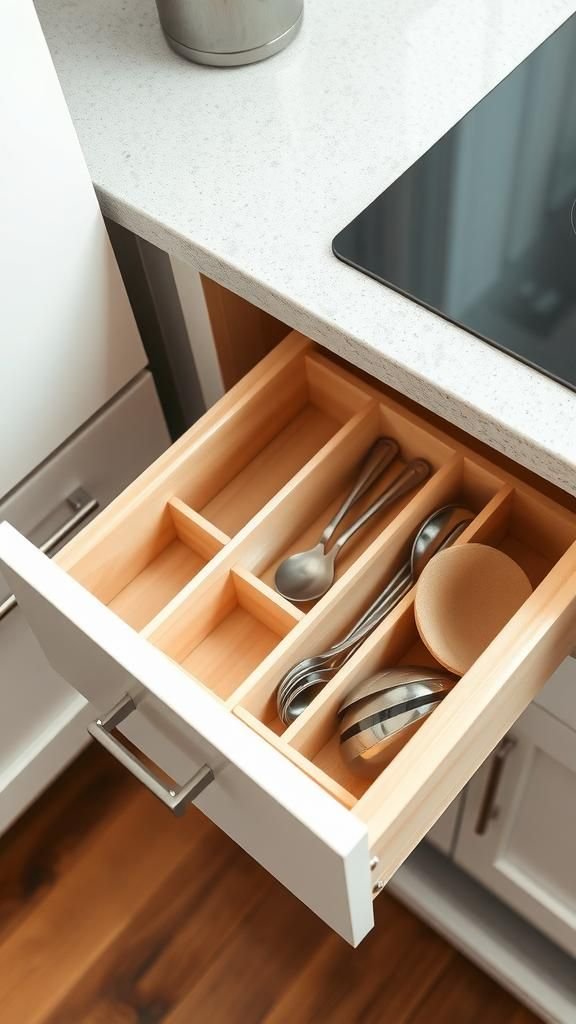
Lightweight wooden strips create customizable compartments that calm chaotic drawers. Balsa or basswood brings a pale, clean look that blends with modern or classic cabinetry.
The grid adapts to utensils, office supplies, or cosmetics, and the natural finish keeps the interior feeling bright. Lined with cork or felt, items rest quietly without sliding.
This project invites playful arrangements and can evolve as contents change. Tied with a ribbon set inside a gift box, the dividers make a thoughtful present for anyone who loves a tidy workspace or kitchen.
The result feels bespoke without turning heavy-handed.
Steps
- Measure drawer dimensions and cut balsa strips to length.
- Notch crossing points to interlock and test the fit inside the drawer.
- Lightly sand edges and apply a clear sealer if desired.
- Line the drawer with cork and drop in the interlocking grid.
Pantry Can Riser For Layered Visibility
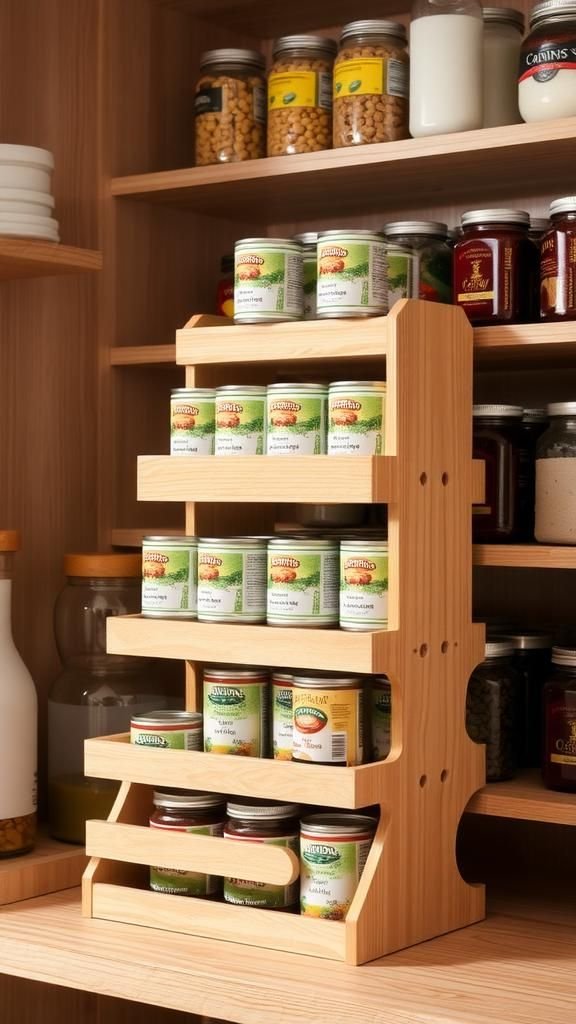
A stepped wooden riser turns a deep shelf into a mini amphitheater where labels are easy to read. Cans, jars, and condiments rise in tidy rows, ending the back-of-shelf mystery.
Natural wood suits farmhouse kitchens, while a satin black finish blends into modern cabinetry. Rubber feet add grip and protect shelves.
Presented with a few pantry staples and charming labels, the riser makes a thoughtful kitchen upgrade. Styled alongside clear bins and a lazy Susan, it becomes part of a cohesive pantry system that keeps items discoverable and reduces duplicates.
Steps
- Cut three boards for tiers and two side supports; assemble into a stepped shape.
- Sand smooth, apply finish, and let it dry completely.
- Add rubber feet underneath for stability and shelf protection.
- Set on a pantry shelf and arrange cans by category.
Narrow Wall-Mounted Bookshelf Ledges For Small Spaces
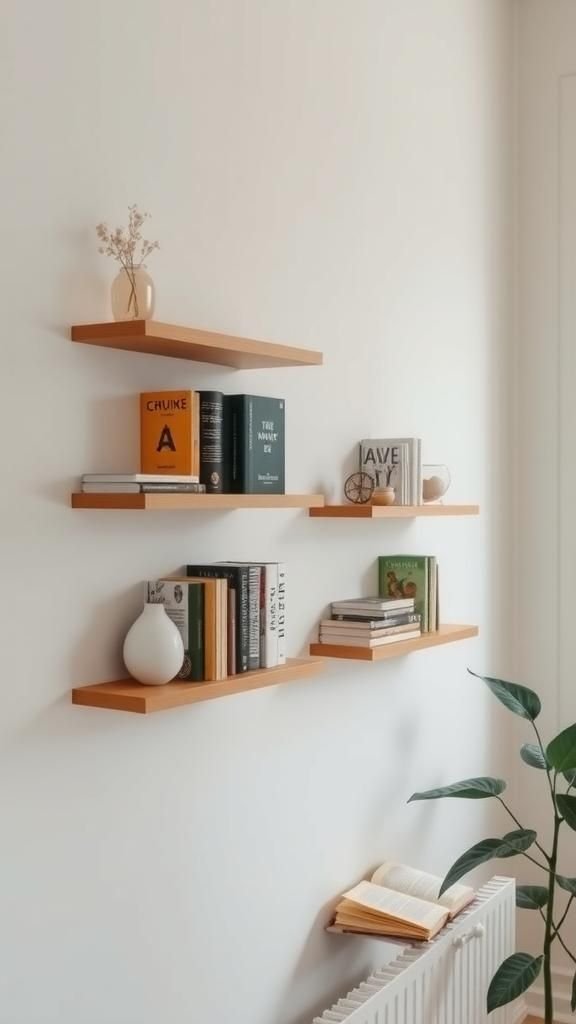
Slim picture ledges reimagined as book perches keep covers facing outward for easy picks in living rooms, nurseries, or hallways. The shallow profile hugs the wall, offering storage without heavy furniture.
A natural oak finish brings warmth, while white reads airy against colored walls. Spaced in a column, the ledges form a gallery of titles and art prints.
This setup invites seasonal refreshes and makes bedtime reading feel curated. Gifted with a favorite novel or illustrated book, the ledges become both storage and art display, adding rhythm and personality to narrow spaces.
Steps
- Rip or purchase narrow shelf stock with a front lip to hold books.
- Sand, finish, and predrill mounting holes along studs.
- Install with long screws and wall anchors where needed.
- Arrange books face-out, varying heights and colors.
Magnetic Fridge Pencil And Notepad Holder
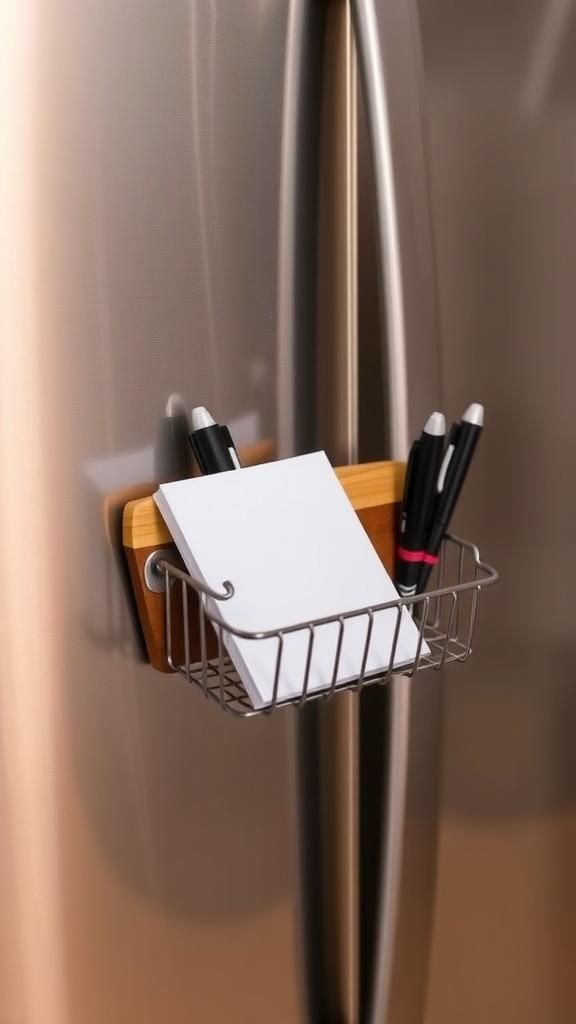
A compact caddy sticks to the fridge and corrals pens, markers, and a grocery list pad. Thin-gauge steel forms the body, with a wood accent front for warmth.
Strong magnets keep everything steady when the door swings. Matte black pairs well with stainless appliances, while powder-coated pastels bring cheer.
The notepad sits front and center, turning meal planning into a quick daily habit. Paired with a set of colorful gel pens, it makes a cheerful gift for busy households.
The tidy form factor leaves room for photos and postcards while keeping writing tools right where they’re needed.
Steps
- Cut and fold thin sheet metal into a small open box shape.
- Epoxy a wood front panel and allow it to cure.
- Add strong rare-earth magnets to the back with adhesive.
- Place a notepad inside and slide pens into side channels.
Rotating Lazy Susan For Pantry Corners
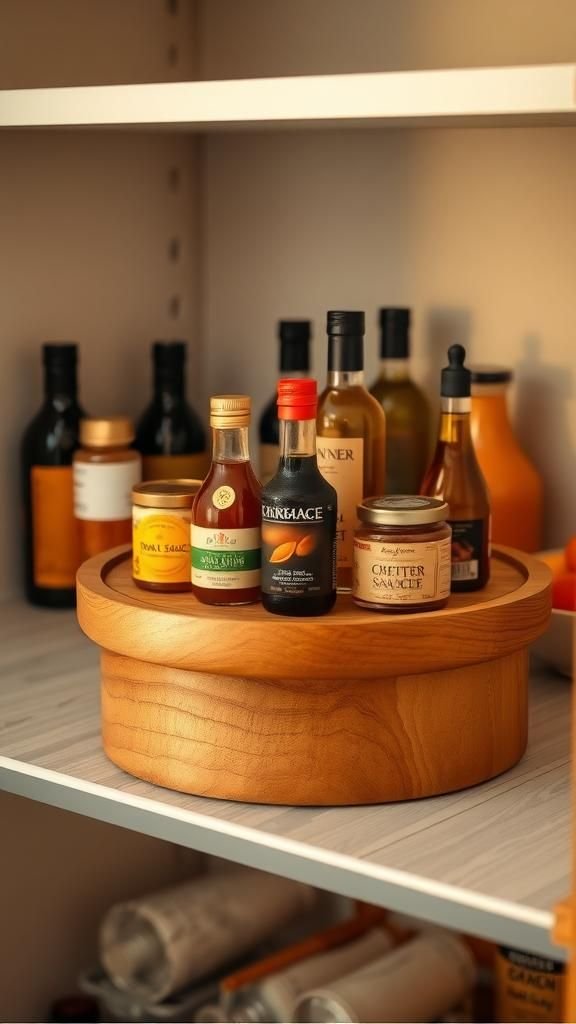
A smooth-turning platter conquers tough shelf corners by bringing items forward with a gentle spin. Birch or bamboo rounds feel warm and natural, while a marble-look top adds a luxe note.
A rim keeps bottles from tipping, and a quiet bearing delivers an elegant glide. Oils, sauces, and small snacks gather without hiding behind each other.
As a pantry gift, paired bottles of vinegar and olive oil look extra special placed on top. Styled in multiples, the shelves read orderly and bright, letting labels present themselves rather than getting lost in the shadows.
Steps
- Cut a round from plywood or bamboo and sand edges smooth.
- Attach a turntable bearing centered on the underside.
- Add a low rim around the top with a thin strip of wood.
- Finish with food-safe oil or clear coat and allow to cure.
Desk Caddy From Repurposed Tin Cans And Wood
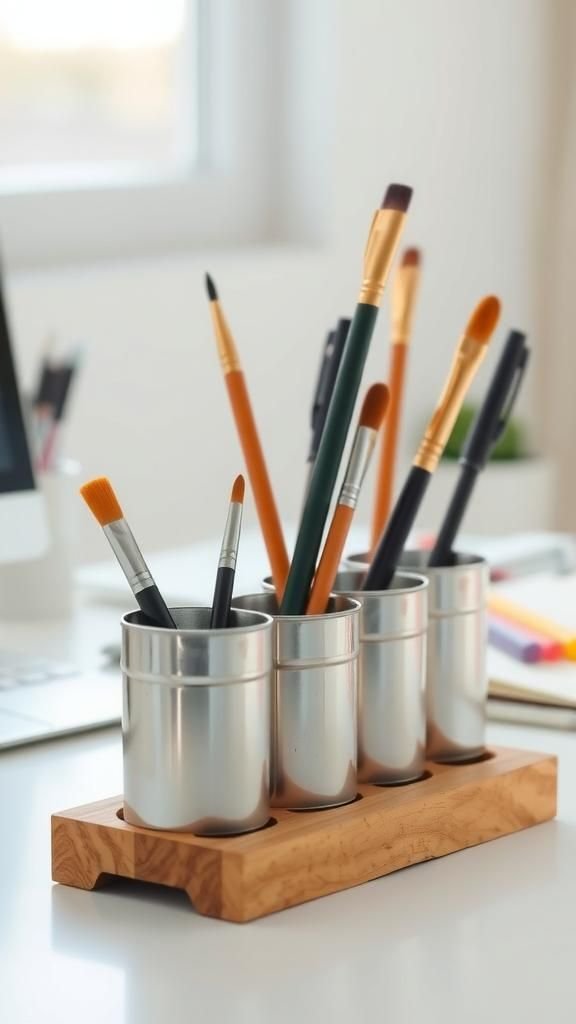
Tin cans and a small wooden base merge into an industrial-chic desk organizer. The metal brings subtle texture and reflects light, while the wood warms the palette.
Grouped in different heights, the compartments sort pens, brushes, and clips, creating order with a playful skyline effect. Painted cans add color, while raw metal suits minimalist workspaces.
Small felt dots underneath prevent scratches. For gifting, include stationery and a ribbon around the base.
On a shelf or desktop, the caddy looks intentional and creative, proving everyday materials can become a stylish storage solution with minimal fuss.
Steps
- Clean cans thoroughly and remove labels; sand any sharp edges.
- Cut a wood base, sand smooth, and finish with stain or paint.
- Arrange cans on the base and secure with epoxy or screws and brackets.
- Add felt pads underneath to protect surfaces.
Bathroom Towel Ladder With Handy Shelf Top

A leaning ladder with a slim shelf keeps towels aired and ready while adding spa-like charm. Smooth rungs hold textiles without creasing, and a top board accommodates candles or a small plant.
Natural oak or teak enhances moisture resistance, while matte black brings a modern edge. The vertical form saves floor space and suits apartments or guest baths.
Presented with plush hand towels and a lavender sachet, it becomes a thoughtful bath upgrade. The simple geometry pairs well with stone tiles and woven baskets, creating a calm, organized corner that feels welcoming to guests.
Steps
- Cut side rails and rungs; assemble with dowels and wood glue.
- Attach a shallow top shelf board across the rails.
- Sand thoroughly, apply water-resistant finish, and let cure.
- Add rubber feet and lean against the wall securely.
Hanging Closet Shelf Organizer From Canvas Panels
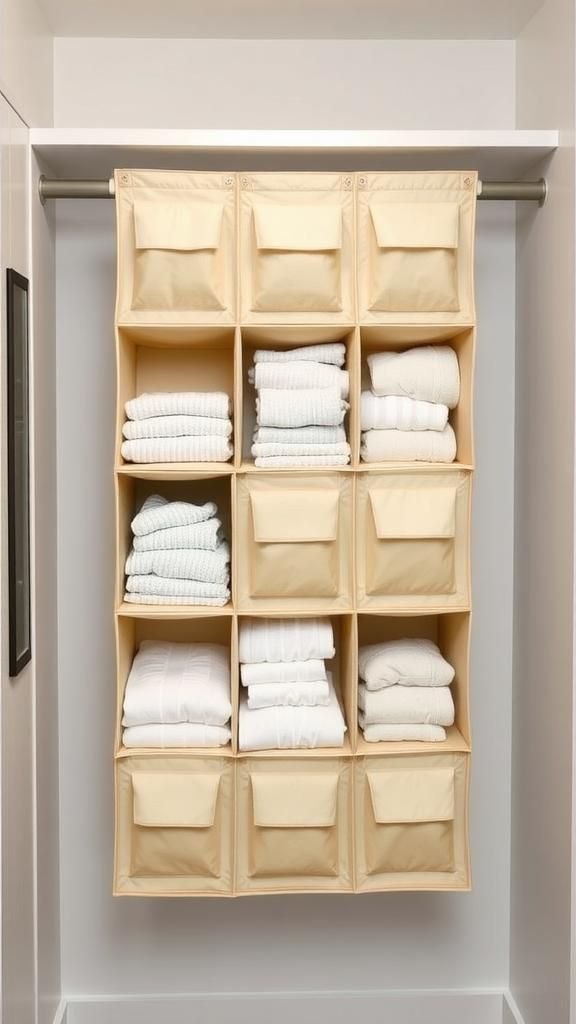
A canvas hanging tower turns closet airspace into structured cubbies for sweaters, bags, or folded tees. Reinforced seams and insertable stiffeners keep the shape crisp.
Natural canvas delivers a calm, textural vibe, while charcoal or navy options blend with modern wardrobes. Leather or webbing tabs add a refined finish.
The vertical design slots onto a closet rod and pairs with slim hangers for a clean, boutique look. Packaged with cedar blocks or sachets, it becomes a thoughtful wardrobe gift.
When matched with labeled bins, the closet feels airy and ordered without bulky furniture.
Steps
- Cut heavy canvas panels and sew into a long rectangular sleeve.
- Insert reinforced shelves using cardboard or plastic sheet stiffeners.
- Add webbing straps with snaps or Velcro to hang from a rod.
- Topstitch edges and slide into the closet, then load items.
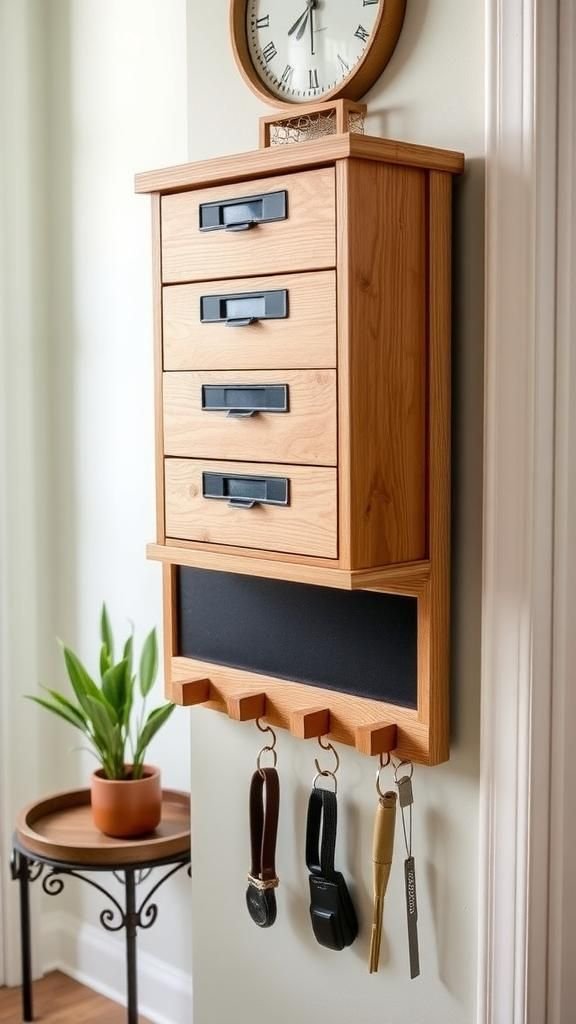
Key And Leash Holder Plaque With Mini Shelf
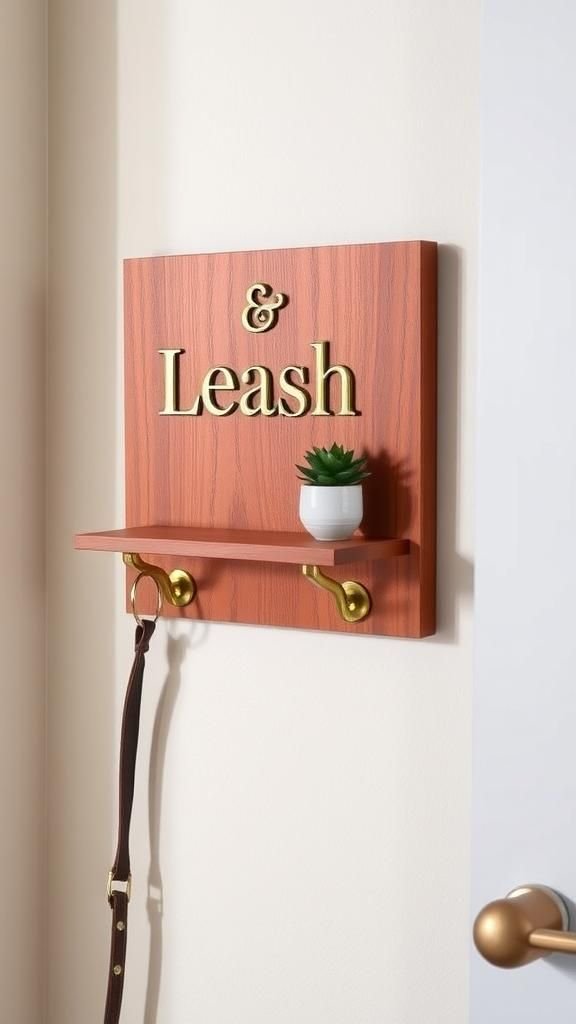
A compact wall plaque near the door keeps keys, fobs, and pet leashes gathered in style. A row of small hooks lines the bottom, while a tiny shelf above holds sunglasses or a tiny plant.
Solid wood offers warmth; painted finishes blend into trim. Brass, black, or nickel hardware guides the mood.
Personalized engraving or a stencil adds character, making it a charming gift for a new apartment. Positioned beside a mirror, the piece forms a simple grab-and-go station that clears the console table and reduces last-minute searching on busy mornings.
Steps
- Cut a wood board to size and sand smooth.
- Mark and drill pilot holes for hooks; install hardware securely.
- Add a small shelf using brackets or dowels and glue.
- Finish with stain or paint, seal, and mount by the door.
Over-The-Door Cleaning Supply Caddy Upgrade

A slim over-the-door frame carries bins and pockets that corral sprays, sponges, and dusters in a compact footprint. Wire baskets and fabric pouches mix textures, while labels keep categories clear.
White frames blend into doors; black reads modern and graphic. The setup frees under-sink space and keeps supplies within reach yet out of sight.
Presented with eco-friendly cleaning concentrates and amber bottles, the caddy feels gift-worthy and stylish. The vertical layout suits utility closets, laundry rooms, or small apartments where every inch counts without sacrificing a clean, airy look.
Steps
- Hang an over-the-door rack and adjust hooks for a snug fit.
- Attach wire baskets and fabric pockets in a balanced arrangement.
- Decant cleaners into labeled bottles and place heavier items low.
- Add clips for gloves and microfiber cloths on the side tabs.