
DIY Snowflake Paper Crafts turn a quiet afternoon into a flurry of creativity. Paper snowflakes, snowflake paper crafts, and tiny snowflake cutouts scatter across the table like frost, and the simple rhythm of snipping and unfolding feels soothing.
I still remember taping my first lopsided paper snowflakes to a chilly window and loving the way the light made them glow.
Now the same DIY Snowflake Paper Crafts fill gift wrap, windows, and centerpieces with wintry charm. Whether delicate paper snowflakes or bold layered snowflake crafts, every pattern carries a little sparkle.
The tradition travels from notebooks to mantels, from crisp white sheets to shimmering foils, always catching that cozy, snowy mood.
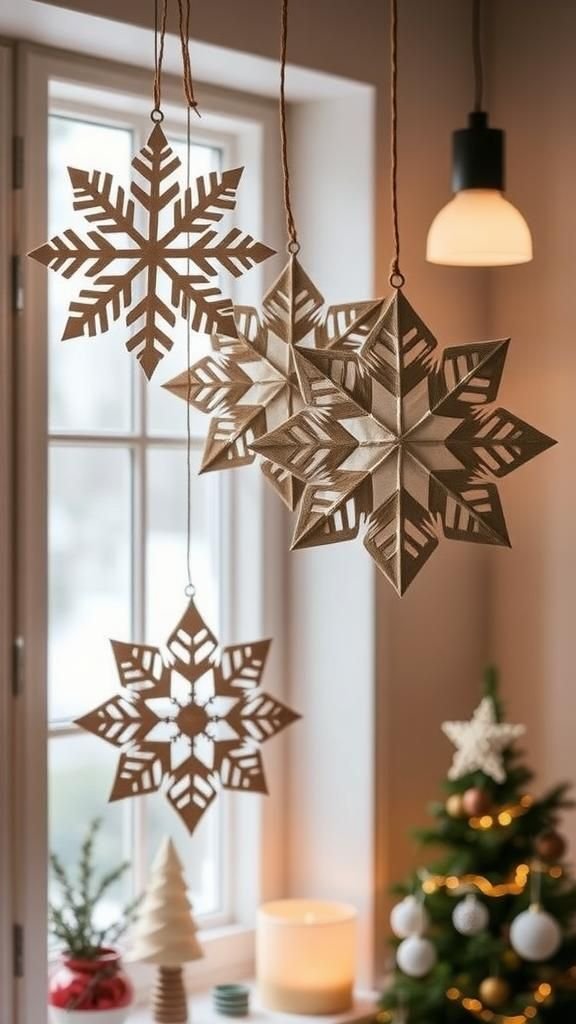
Classic Six-Point Paper Snowflake Window Garland
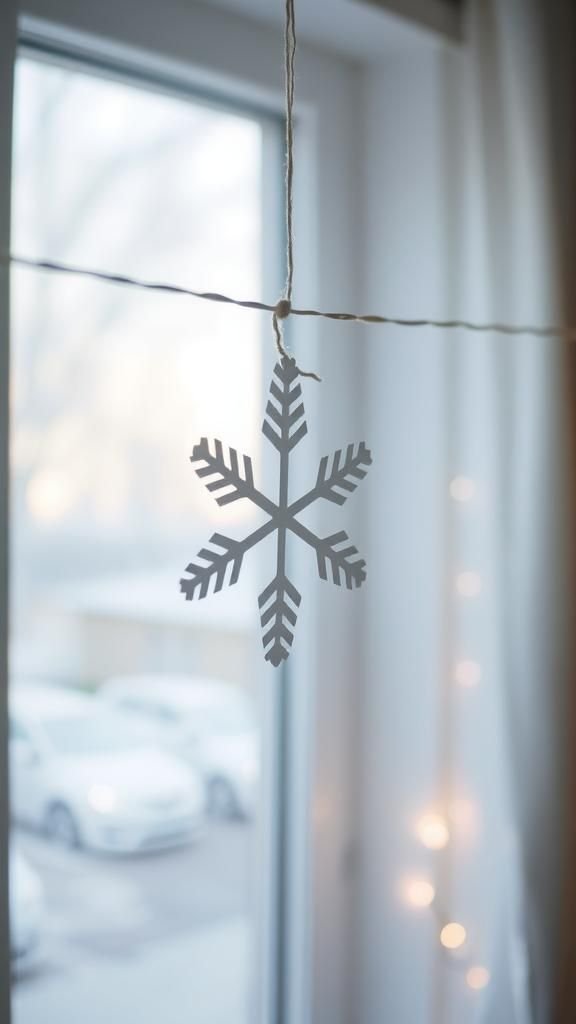
This garland gathers a row of six-point paper snowflakes into a breezy ribbon of winter charm. Lightweight printer paper or crisp origami sheets keep edges sharp, while metallic thread or baker’s twine lends a gentle shimmer.
White brings a frosty glow; soft blues, blush tones, and silver accents add depth without overpowering the scene. Hung across a mantel or draped in a window, the garland frames candlelight and twinkle lights with cool geometry.
As a gift, it nestles neatly in a slim envelope, ready to unfurl across dorm rooms, office nooks, or holiday photo backdrops.
Steps
- Fold a square sheet into sixths to create a wedge, keeping edges aligned.
- Sketch radiating cutouts along the wedge, including tips and negative spaces.
- Cut along the lines, open the snowflake, and repeat for more pieces.
- Tie or tape each snowflake along a length of twine at even intervals.
- Secure the ends of the garland to hooks or removable window tabs.
Layered Kirigami Snowflake Wall Art Panel
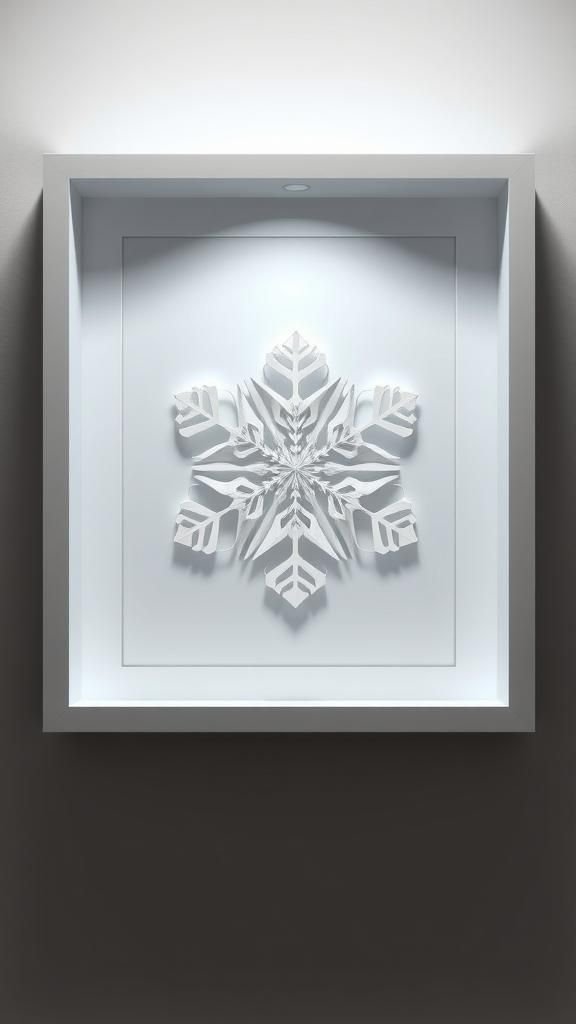
Kirigami layering transforms simple sheets into a dimensional snowburst framed as wall art. Smooth cardstock forms a sturdy base, while vellum and pearlescent papers create floating layers with airy translucence.
A monochrome palette in white and ivory feels serene; navy, charcoal, and champagne accents push the pattern forward with gentle contrast. The finished panel leans toward gallery style when placed in a shadowbox frame, catching side light that amplifies the cutwork.
Presented as a seasonal host gift, the piece slips into a protective sleeve and perches on a shelf beside winter greenery and candles.
Steps
- Fold a square cardstock base and sketch a six-fold snowflake template.
- Cut interior shapes while the paper is folded, keeping margins balanced.
- Repeat on vellum and pearlescent sheets, each slightly larger or smaller.
- Layer the pieces with small foam dots or spacers for dimension.
- Mount the layered snowflake onto a backing board and frame it.
Oversized Window Rosette Snowflake Display
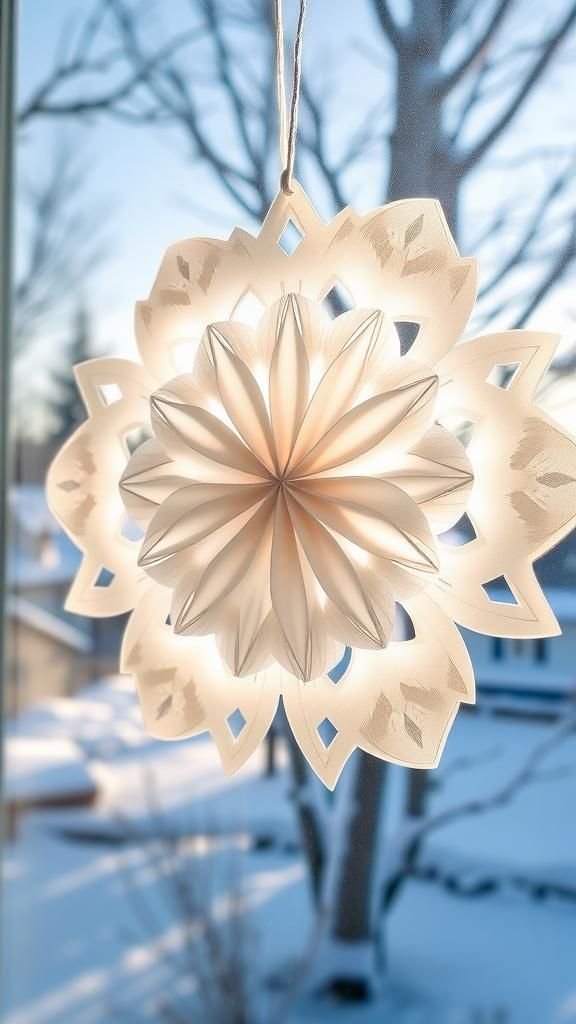
An oversized rosette brings a theatrical snowflake moment to windows or entryways. Heavyweight paper fans out into pleated circles, with hexagonal cutouts forming icy spokes.
Bright white looks crisp against glass, while pale gray or powder blue softens the silhouette. A single rosette makes an impact above a console or buffet; grouped pieces create a grand backdrop for gatherings.
Edges shimmer with a hint of iridescent glitter or mica if sparkle calls. Wrapped flat between tissue layers, the rosette travels easily as a festive housewarming surprise.
Steps
- Accordion-fold wide strips of heavyweight paper into even pleats.
- Cut triangular and curved shapes along folded edges for snowflake spokes.
- Join pleated segments into a full circle and secure the center.
- Add a hanging loop at the top and mount on a window or wall.
Shimmering Foil Paper Snowflake Mobile

A mobile spins with quiet sparkle as foil paper snowflakes catch light from every angle. Mirror silver, satin gold, and opalescent white add modern sparkle, balanced by matte cardstock for contrast.
Thin fishing line gives a floating effect, while a wooden hoop or minimalist ring anchors the composition. Hung above a reading nook or in a hallway, the piece sends glints across walls and ceilings.
Packed in a slim box with tissue and a small note, it becomes a polished seasonal gift that keeps the room glittering past the first thaw.
Steps
- Cut snowflakes from foil and matte papers in several sizes.
- Punch tiny holes in tips and thread lengths of clear line.
- Tie strands to a wooden hoop, spacing them evenly.
- Add a central hanging cord and balance the mobile by trimming lengths.
Quilled Paper Snowflake Ornament Set
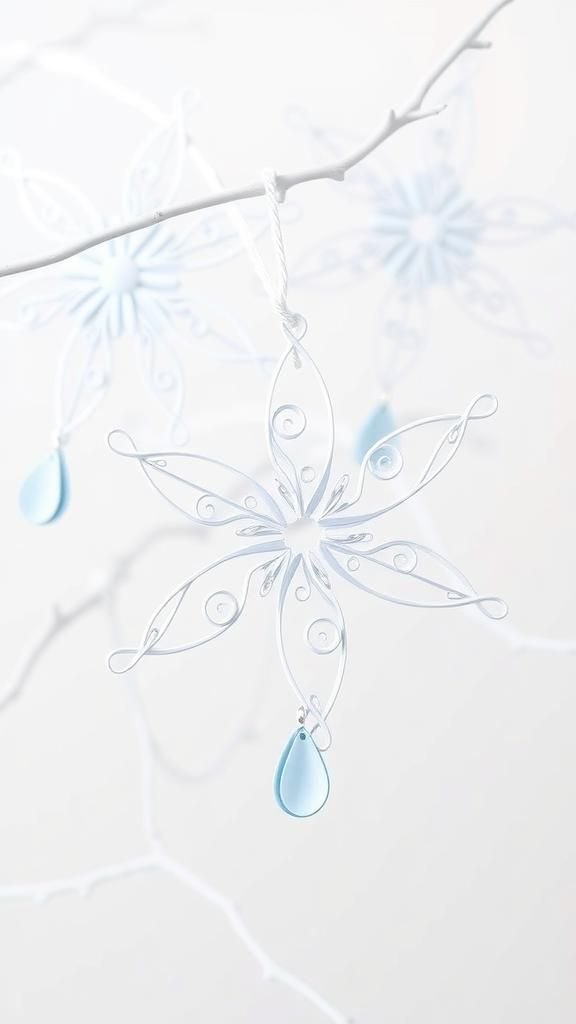
Quilling transforms slender paper strips into delicate coils and teardrops that radiate like frost crystals. Cool whites and blues feel wintry, while pearl accents and micro beads add a frosty finish without stealing the spotlight.
The ornaments weigh almost nothing, so branches, garlands, or gift bags support them easily. A small display tree on a shelf shows off their filigree detail, especially near a lamp that highlights the edges.
Packaged in a little tin or clear box lined with cotton, the set becomes a treasured keepsake for yearly decorating rituals.
Steps
- Roll narrow paper strips into coils and shape teardrops and marquise forms.
- Arrange six arms on a circle guide and glue coils into each arm.
- Fill gaps with smaller coils and tight circles for a lace effect.
- Attach a hanging loop and let the ornament dry flat.
3D Honeycomb Paper Snowflake Centerpiece

Honeycomb paper opens into a three-dimensional snowflake that steals attention at the center of a table. Tissue sheets in alpine white or icy mint create a cloudlike volume, while a cardstock base steadying the core keeps the form round.
Subtle glitter spray on the tips adds glints without overwhelming the texture. The piece rests on a mirror tile with scattered faux snow or glass pebbles for a frosty vignette.
Folded flat, it slips into a gift box, ready to bloom on a friend’s dining table or office reception desk.
Steps
- Trace a snowflake shape onto stacked tissue and cut identical halves.
- Glue a honeycomb pattern of dots, alternating rows across the interior.
- Join the halves along the spine and let dry completely.
- Open the honeycomb, secure the edges, and mount on a sturdy base.
Vintage Book Page Snowflake Collection

Old book pages give snowflakes a literary patina, with warm ivory tones and tiny text peeking through delicate cutouts. Mixed sizes fill a gallery wall, glass-front cabinet, or wrapped gifts without feeling heavy.
A tea-stained wash adds depth for those who like antique flair, while kraft backing circles frame each flake with contrast. Tucked into a brown envelope tied with twine, the collection charms teachers, librarians, and avid readers.
Clustered around candles and pinecones, the paper textures mingle with natural elements for an inviting winter tableau.
Steps
- Turn book pages into squares and fold into six segments.
- Sketch delicate wedge cutouts and trim away negative spaces.
- Open the snowflakes and flatten under a heavy book.
- Mount on kraft circles or hang with thread for display.
Coffee Filter Lacy Snowflake Window Cluster

Coffee filters bring an airy, lacy texture with featherlight edges that glow against daylight. Their natural round shape suits circular snowflakes, while a few hexagonal trims suggest crystalline symmetry.
Watercolor washes in pale indigo and lavender tint the fibers for a soft aurora effect. A cluster on a sunny window turns morning light into a gentle show, and a single piece taped to a mirror brightens small spaces.
Packed flat in a kraft sleeve with a ribbon, these delicate pieces travel well as a sweet seasonal surprise.
Steps
- Flatten coffee filters and fold into sixths.
- Cut small shapes along folded edges to create lace patterns.
- Add a light watercolor wash and let dry completely.
- Stick to windows with removable dots or washi tape.
Watercolor Resist Snowflake Art Prints

Wax or masking fluid preserves crisp snowflake lines while watercolor washes flow across the page. Thick cold-press paper prevents warping and shows soft granulation, while a palette of indigo, ultramarine, and icy turquoise evokes winter skies.
Salt sprinkles create crystalline blooms that echo the theme. Framed under glass, the piece adds seasonal art to an entry table or bedroom wall without overwhelming the decor.
Packaged with a backing board and sleeve, the print slides into a standard frame for an easy gift that brightens long evenings.
Steps
- Draw snowflake lines with white crayon or masking fluid on watercolor paper.
- Brush a gradient wash across the sheet and drop in additional color.
- Scatter salt while damp for texture, then let dry fully.
- Remove masking and flatten the sheet before framing.
Paper Bag Scandinavian Snowflake Stars
Lunch-size paper bags transform into bold starry snowflakes with dramatic negative spaces. Kraft brown suggests Nordic simplicity, while white bags feel airy and bright.
A quick dusting of mica powder along the edges catches candlelight in evening settings. These stars hang in windows, hover above buffet tables, or cluster over a bed for seasonal charm.
Packed flat with a ribbon tie and a small tag, they pass easily to neighbors as cheerful doorstep gifts that open into large, satisfying shapes.
Steps
- Stack paper bags and glue centers in a neat pile.
- Cut geometric tips and interior shapes through the stack.
- Fan open the stack into a star and secure the edges.
- Add a loop and suspend from a hook or window tab.
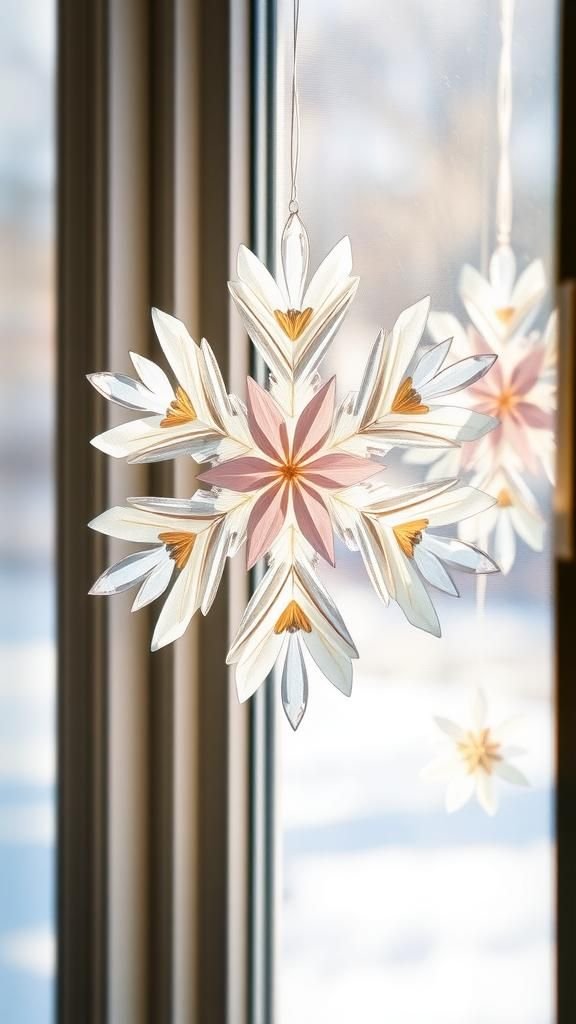
Modular Origami Snowflake Medallion
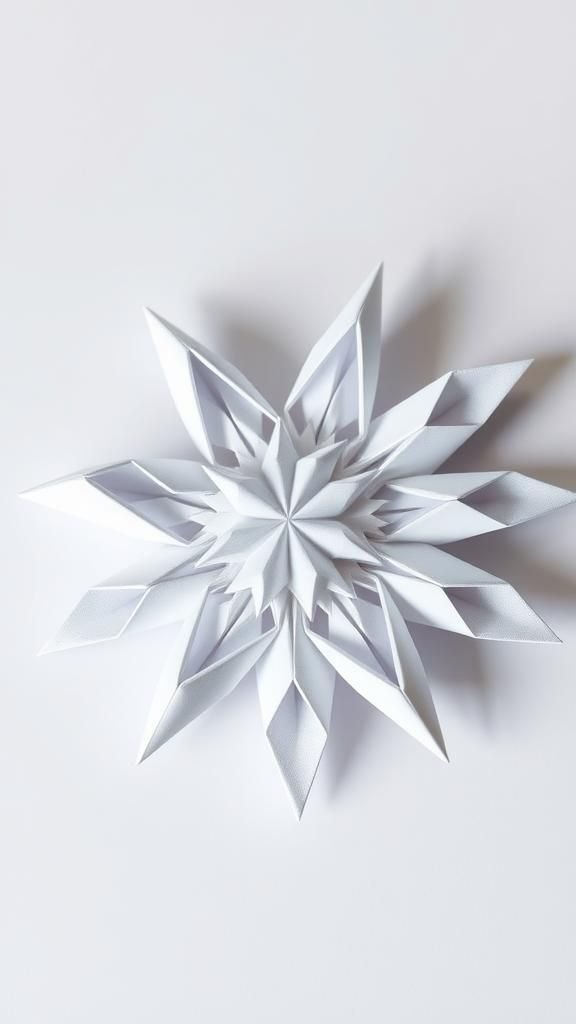
Multiple origami units interlock into a crisp, radial snowflake medallion. Lightweight origami paper enables precise creases without bulk, and a limited palette of white, silver, and pale blue keeps the pattern cohesive.
The assembled medallion rests in a frame, hangs as a statement ornament, or lies flat as a place-setting accent under clear plates. A touch of micro glitter or metallic gel pen edging adds quiet sparkle along the seams.
Presented in a rigid mailer, the medallion survives travel while maintaining pristine points.
Steps
- Fold identical origami units from square sheets following a modular pattern.
- Slot units together to form six arms, locking tabs as you go.
- Add extra units between arms for a denser look if desired.
- Mount the medallion on cardstock or add a hanging loop.
Lacy Paper Doily Snowflake Bunting

Paper doilies provide instant lacework, turning into airy snowflakes with a romantic twist. White doilies feel bridal and bright; tea-dyed versions bring vintage warmth.
Threaded along satin ribbon or twine, the bunting sweeps across shelves, wedding backdrops, or cozy reading corners. Tiny rhinestones or pearl stickers elevate the scalloped edges without heavy sparkle.
Folded and nested, the bunting stows flat in a small keepsake box, ready for yearly decorating traditions or a winter bridal shower surprise.
Steps
- Fold round paper doilies into wedges and snip small shapes.
- Open each flake and flatten gently under a book.
- Clip or tape the tops along ribbon or twine at intervals.
- Hang the bunting across a mantel, window, or headboard.
Shadowbox Collage Of Layered Snowflakes
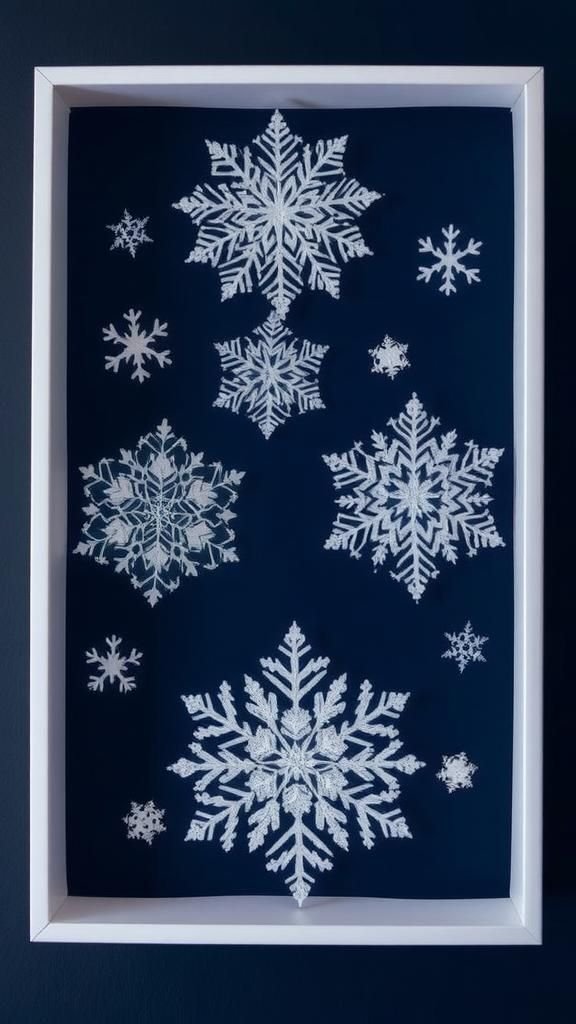
A shadowbox turns paper snowflakes into a curated collage with depth and movement. Mix cardstock, vellum, and glitter paper in a cool palette, spacing layers on foam dots to cast gentle shadows.
Backgrounds in navy or charcoal push white flakes forward, while mirrored paper chips scatter light. The piece leans modern or classic depending on frame style, making it versatile for entryways or office shelves.
Wrapped with a satin ribbon around the frame, it presents as a polished seasonal gift that endures beyond the holidays.
Steps
- Cut a range of snowflakes from papers with different textures.
- Arrange a composition on the backing board to balance sizes.
- Mount layers with foam dots to create separation and shadows.
- Close the shadowbox and add a wall hanger or easel stand.
Vellum Luminary With Snowflake Cutouts
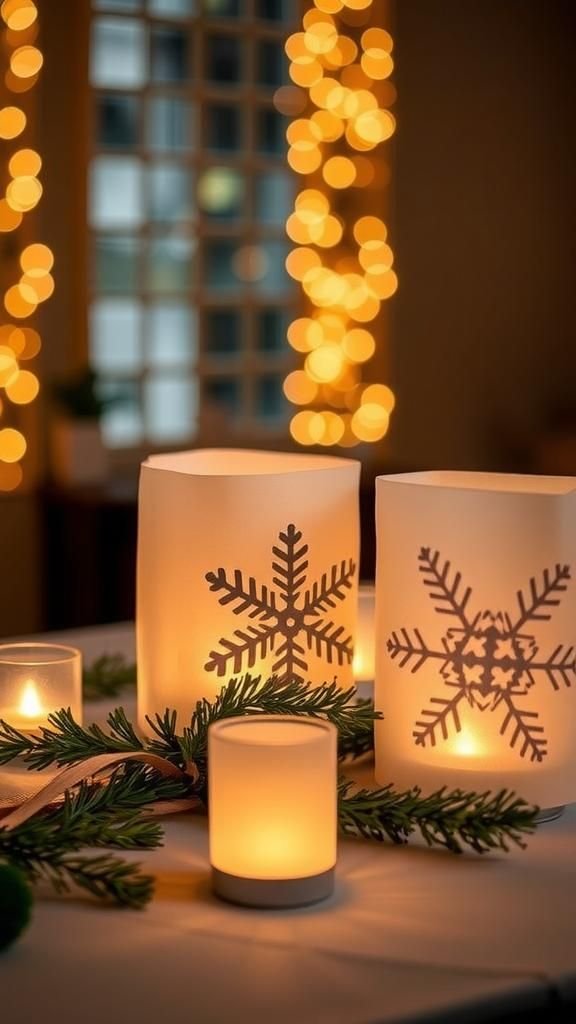
Translucent vellum turns candlelight into frosty glow when patterned with snowflake cutouts. The material softens edges and diffuses light for calm evening ambience on a mantel or dining table.
A subtle ink edge or micro glitter along the flake tips adds a delicate highlight. Slipped over an LED candle or a glass cylinder, the sleeve creates a safe, cozy sparkle.
Presented as a pair in a small box with tissue, the luminaries make a charming host gift for winter dinners and weekend gatherings.
Steps
- Measure vellum to wrap around a glass and mark overlap.
- Cut snowflake patterns within the rectangle, leaving borders intact.
- Form a cylinder and seal the overlap with clear tape or double-sided tape.
- Slide over an LED candle or glass holder for glow.
Embossed Cardstock Snowflake Gift Toppers
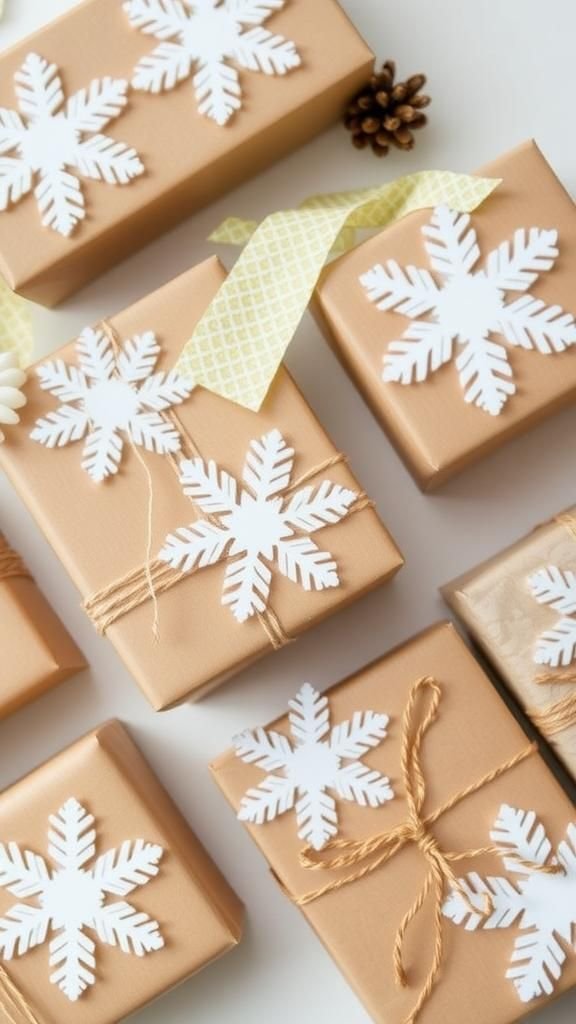
Embossed cardstock brings tactile charm to gift wrap, with raised snowflake veins that catch side light. White on kraft feels modern rustic; muted metallic cardstock adds a refined sheen.
Edges finished with a fine-line pen or glitter glue provide a gentle sparkle. The toppers perch on ribbons, tuck into bows, or slip under baker’s twine for tidy parcels.
Stored in a small tin by size, they stay crisp season after season and double as quick tags when a last-minute present appears.
Steps
- Run cardstock through a snowflake embossing folder or emboss by hand.
- Punch or cut snowflake shapes from the embossed sheet.
- Add a tiny hole for twine if turning pieces into tags.
- Layer onto wrapped packages with adhesive dots or ribbon.
Alcohol Ink Snowflake Cutouts On Yupo Paper
Vivid alcohol ink on synthetic paper creates swirling aurora backgrounds that transform snowflake cutouts into mini artworks. Teals, violets, and icy blues dance across glossy surfaces, while metallic ink veins glint in low light.
The finished flakes hang as ornaments, accent a wreath, or cluster in a shadowbox. Glossy finish pairs well with satin ribbon for a modern look, and black cardstock behind the shapes heightens their glow.
Packed in a clear sleeve, these pieces feel like tiny galaxies captured in winter form.
Steps
- Drop alcohol inks onto Yupo and tilt to flow colors together.
- Add rubbing alcohol for blooms and let the sheet dry.
- Cut snowflakes from the colorful sheet using a craft knife or dies.
- Punch holes and add ribbon loops for hanging or mounting.
Stitch-Pierced Paper Snowflake Gift Tags
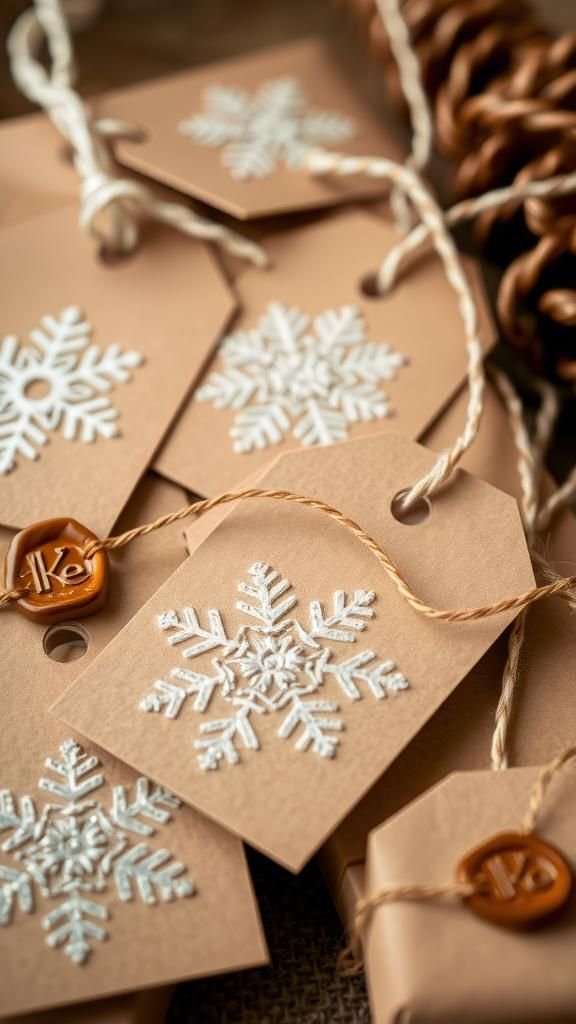
Tiny needle piercings trace a snowflake diagram across thick tags, creating a stitched look with elegant restraint. White thread on kraft reads cozy, while metallic thread brings subtle sparkle without weight.
The perforated pattern catches light and adds tactile interest alongside baker’s twine and wax seals. Tags elevate wrapped parcels, wine bags, and treat boxes, and later slip into journals as keepsakes.
Bundled in a small glassine bag with a label, they make a thoughtful add-on for homemade cookies or holiday cards.
Steps
- Draw a snowflake pattern on a tag and pierce holes along lines.
- Sew through the holes with short backstitches to form the design.
- Tie off threads neatly and trim excess.
- Add twine and loop onto gifts or bottles.
Paper Lace Edge Snowflake Door Wreath
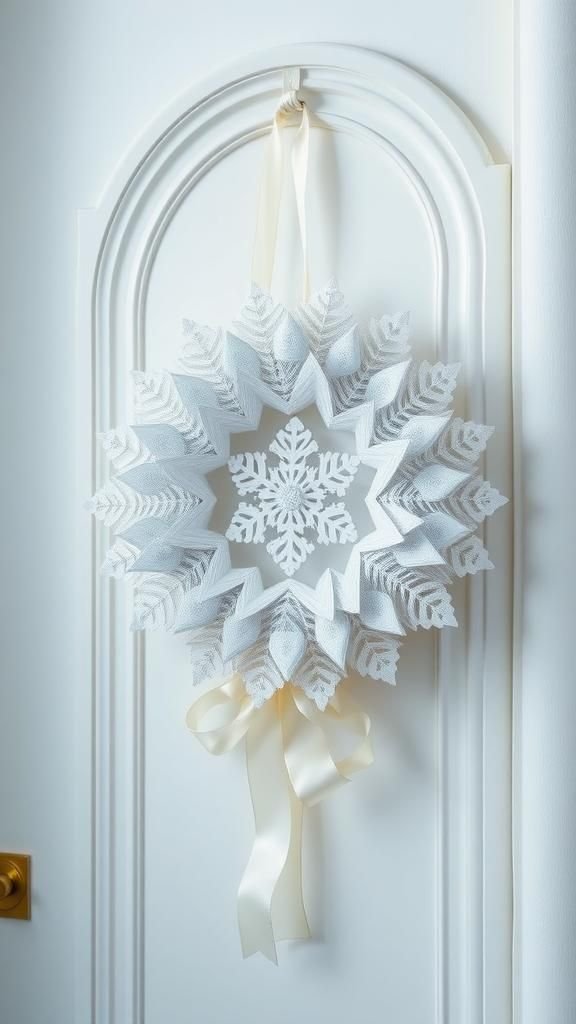
A circular wreath brims with layered paper snowflakes that climb from small lacey bits to broad spokes. Cardstock forms the durable base, while vellum and glitter papers introduce texture and shimmer.
Monochrome white reads quietly elegant, and gradients from pale blue to steel gray add subtle dimension. Hung on an interior door or mirror, the wreath frames winter greenery or ribbon tails with a crisp silhouette.
Packed in a shallow box with tissue and a protective ring, it stores flat and reappears fresh each season.
Steps
- Cut a sturdy wreath ring from chipboard or thick cardstock.
- Create snowflakes in multiple sizes and textures.
- Layer and overlap onto the ring with foam dots for depth.
- Add a ribbon hanger and a small bow if desired.
Negative Space Snowflake Stencil Posters
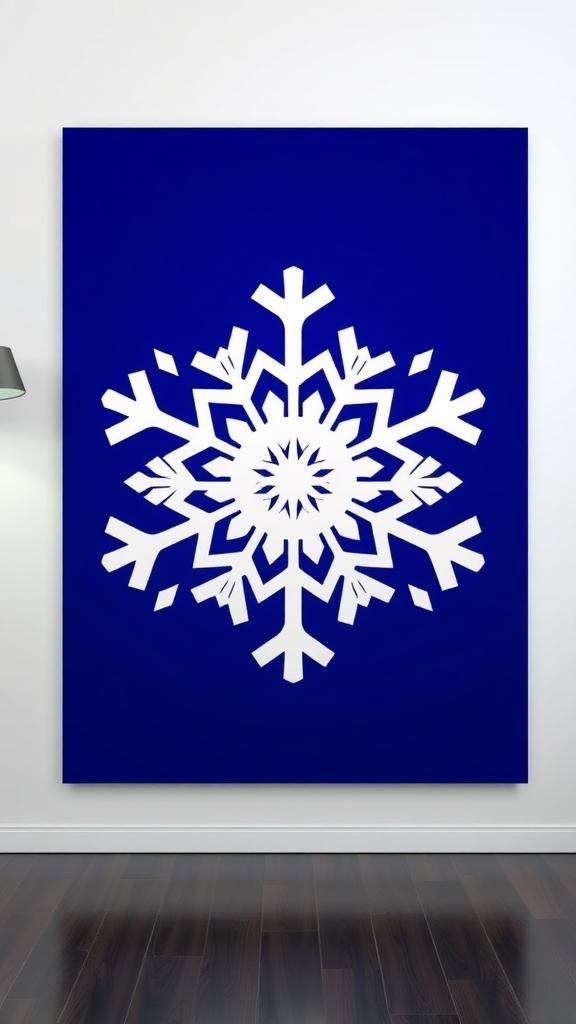
Crisp poster boards reveal snowflake silhouettes through masked negative space, delivering bold graphic impact. A high-contrast palette, such as white against midnight blue or charcoal, lends gallery vibes, while subtle gradients keep the look soft.
Stenciled areas frame typography or seasonal quotes when desired. The posters hang in narrow hallways, sit on mantels, or pair with minimal frames for an artful winter statement.
Rolled into a kraft tube with a ribbon seal, they travel safely as a modern seasonal gift.
Steps
- Cut snowflake stencils from acetate or thick paper.
- Place stencil on poster board and apply paint in light layers.
- Lift the stencil to reveal a clean silhouette.
- Let dry and flatten under weight before framing or hanging.
Cascading Tissue Paper Snowflake Suncatcher
A column of translucent tissue snowflakes glows like stained glass in bright windows. Light pastels and frosty white overlap to create gentle color mixing, while a clear filament line preserves the floating effect.
The column works in narrow spaces, framing kitchen sinks or stair landings with cheerful brightness. A slender hoop or dowel at the top gives structure without bulk.
Wrapped on a tall card inside a protective sleeve, the suncatcher slides into a gift bag and brightens small apartments with easy charm.
Steps
- Cut multiple tissue snowflakes in varied sizes and colors.
- Stack and glue layers lightly at the centers for stability.
- Thread onto clear filament in a cascading arrangement.
- Tie the strand to a small hoop or dowel and hang in a window.
Iridescent Acetate Snowflake Window Clings
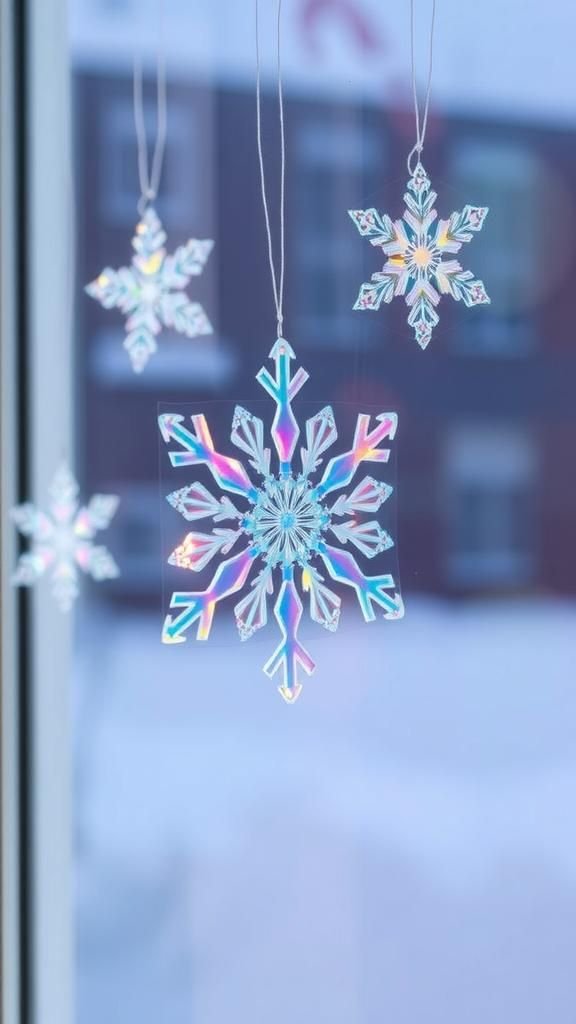
Thin iridescent acetate catches rainbow flashes and clings to glass with minimal effort. Cut into snowflakes, the material reads modern and crystalline, especially against sleek interiors or frosted windows.
Colors shift from lavender to sea green as light changes throughout the day. The clings arrange into constellations across large panes or cluster in corners around plants and candles.
Slipped into a flat mailer with parchment for protection, they arrive ready to sparkle on a friend’s favorite window.
Steps
- Trace snowflake patterns onto iridescent acetate sheets.
- Cut along the lines with sharp scissors or a craft knife.
- Lightly mist the window and press the clings into place.
- Squeegee bubbles out with a soft cloth.