
I have a soft spot for the little things that come from leftover wine nights, and DIY Wine Cork Crafts became my favorite way to keep memories from bottles I loved. Turning a handful of corks into tactile objects felt oddly satisfying, like giving tiny pieces of evenings a second life.
Over time I tried a dozen projects and kept the ones that smelled faintly of oak and held a story.
These DIY Wine Cork Crafts are a mix of cozy desk items, cheerful decor, and small gifts that always spark conversations when friends notice the texture and warmth.
Cozy cork coasters with warm, rustic texture
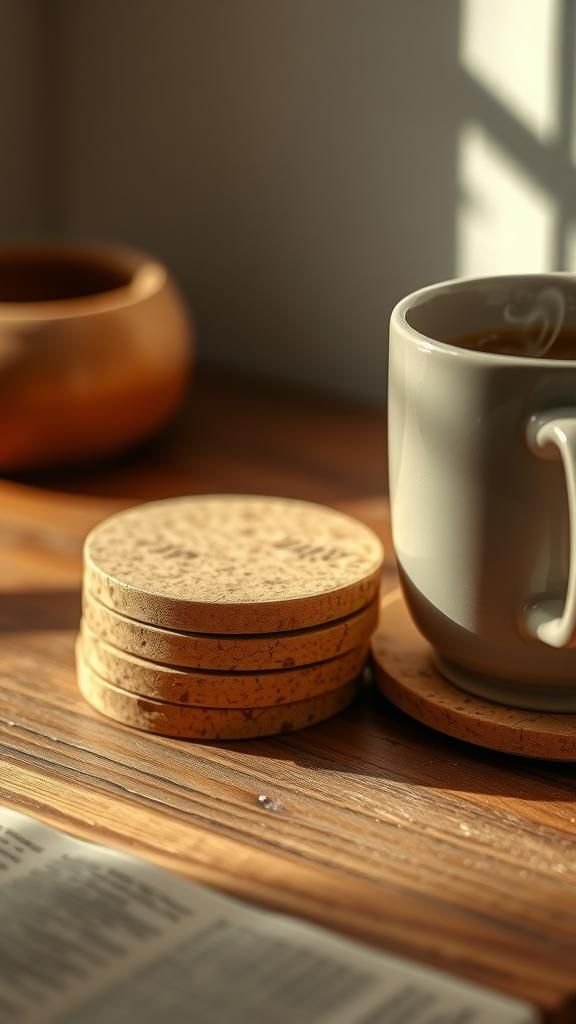
I keep a stack of these cork coasters by the kettle; they have a friendly, down-to-earth feel that matches a rainy afternoon. The cork carries a soft, woody scent and a gentle spring under a mug, which makes every sip feel more intentional.
When I run a hand over them the tiny pits and seams catch the light in a way that feels handmade. The color range from pale honey to toasted tan gives a comforting, sunlit look on a kitchen table.
Steps
- Gather a dozen wine corks and a square piece of cork-backed felt.
- Slice the corks lengthwise into flat halves if needed and lay them in a tight grid atop the felt.
- Apply adhesive along the felt backing between corks and press to secure the layout.
- Trim any uneven edges of the felt to match the coaster dimensions.
- Let the adhesive cure fully before placing hot mugs on the coaster.
A cheerful cork bulletin board for notes
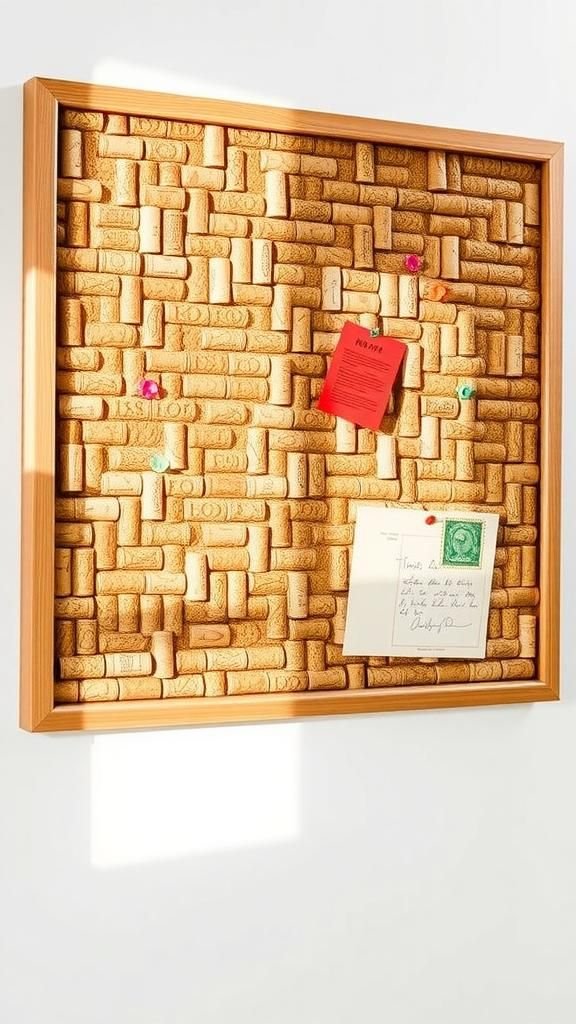
There’s something genuinely satisfying about a cork bulletin board covered in tiny mementos. The little cylinders create a textured, patchwork surface that loves thumbtacks and grocery lists equally.
I remember pressing a faded ticket stub and a postcard into one corner and enjoying the little relief of remembering where they came from. The warm tan tones give a comfortable backdrop to colorful notes and photos, and the subtle scent of cork feels like a quiet reminder of gatherings.
Steps
- Collect enough corks to cover the chosen frame backing and prepare a rectangular board.
- Slice corks lengthwise for a flatter surface and arrange them tightly on the backing to determine placement.
- Apply a strong adhesive across the board and press corks in place, maintaining a snug mosaic.
- Allow the adhesive to set fully, then insert the mosaic into a frame or trim the edges neatly.
- Hang the board on a wall and pin notes or photos onto the cork surface.
Trivet made from corks: gentle under hot dishes
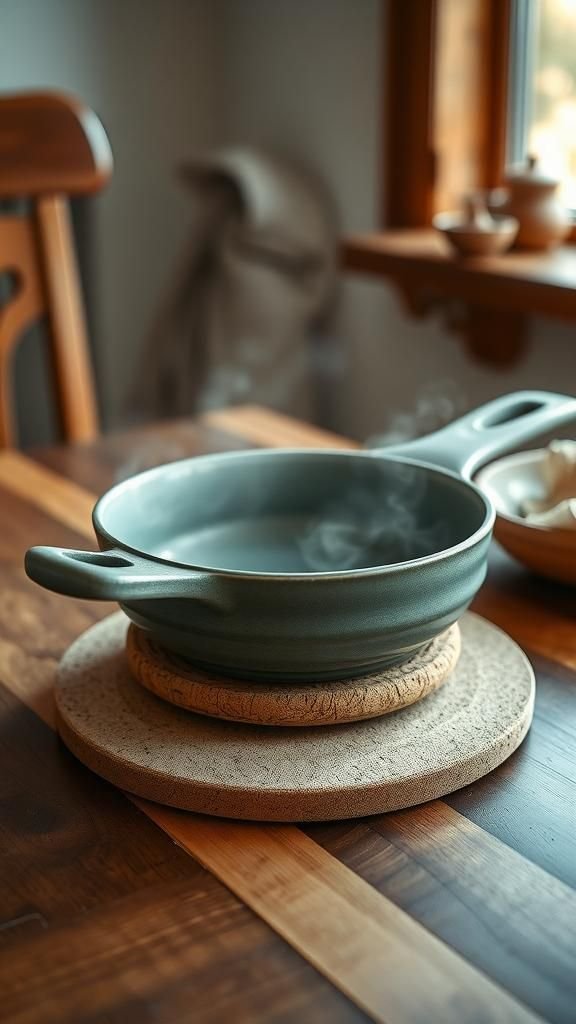
When dinner parties spill into late nights, this cork trivet becomes indispensable. The rounded ends of the corks give a little cushioned rise beneath heavy pans, and the earthy smell mingles with kitchen steam in a comforting way.
The pattern of cork circles creates visual rhythm across the table, and the muted browns sit nicely alongside enamelware and ceramic. It always draws a few compliments for its tactile appeal, and I enjoy how it softens the clang of serving spoons against a tabletop.
Steps
- Gather wine corks and a heat-resistant backing board sized to the trivet dimensions.
- Arrange the corks in a compact circular or rectangular pattern atop the backing to test fit.
- Apply high-heat adhesive or epoxy to the backing and press corks firmly into place.
- Once cured, sand edges for uniformity and optionally apply a heat-resistant finish on the backing.
- Rest hot cookware on the trivet and store it flat when not in use.
Warm wreath of corks for seasonal front-door charm
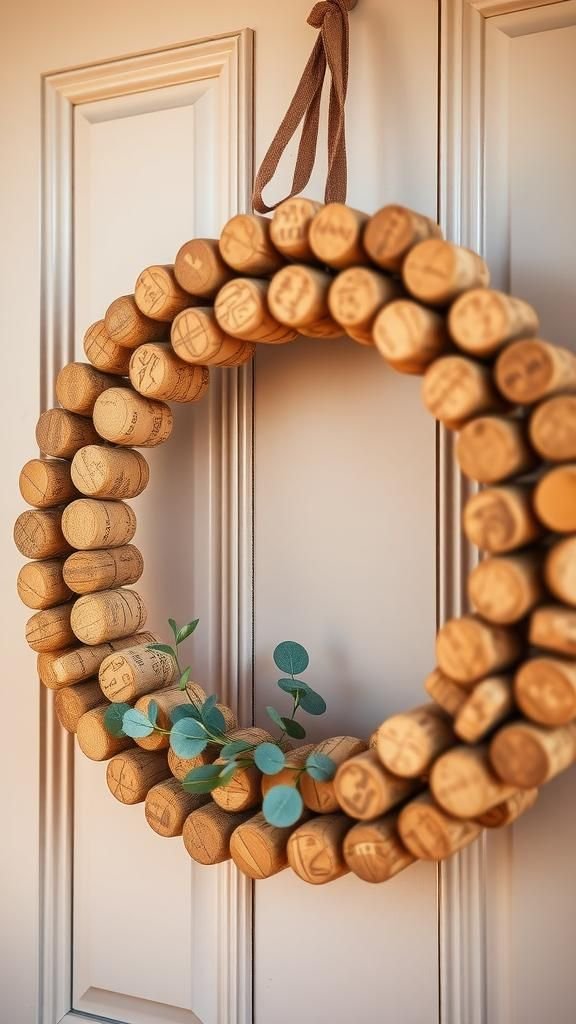
A cork wreath hangs on my door during cozy months, greeting guests with a tactile, approachable look. The round cork ends make a lively, almost floral pattern, and their neutral tones allow seasonal accents to shine.
I enjoy the subtle contrast when a sprig of eucalyptus or a ribbon gets tucked in; the cork’s matte surface absorbs light softly and never competes with other decor. Touching it feels sturdy yet pleasantly springy, a welcome change from shiny holiday ornaments.
Steps
- Select a sturdy wreath form and gather wine corks by the handful.
- Arrange corks around the form to visualize an even coverage and pattern.
- Attach corks to the form using a strong adhesive, working row by row to ensure stability.
- Add a few decorative accents like dried foliage or a fabric bow and allow everything to set.
- Hang the wreath on a protected front door or interior wall.
Playful cork keychains with rustic charm
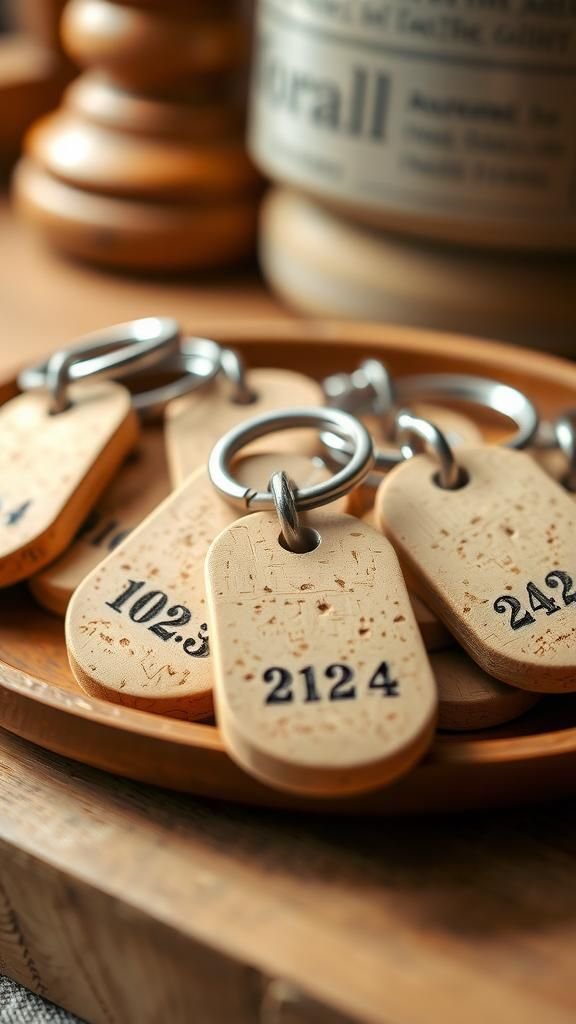
I made a few cork keychains that I keep in a catchall dish by the door; they feel light in the hand and have a pleasantly textured grip. The little cylinders bob on key rings and wear tiny patinas from pocket warmth.
Cork takes ink and stamps in a soft way, so initials and small motifs feel cozy and personal. The sound of keys chinking against cork is muffled and gentle, which is a small comfort when rifling through a bag.
Steps
- Select wine corks and small eye screws or metal pins suitable for key rings.
- Securely insert the eye screws into one end of each cork and attach a split key ring.
- Optionally decorate the corks with ink or small charms and allow any ink to dry completely.
- Test each keychain for durability and make adjustments to ensure the ring is snug.
- Store keychains in a bowl near the door or gift them to friends.
Mini cork planters for tiny succulents or cuttings
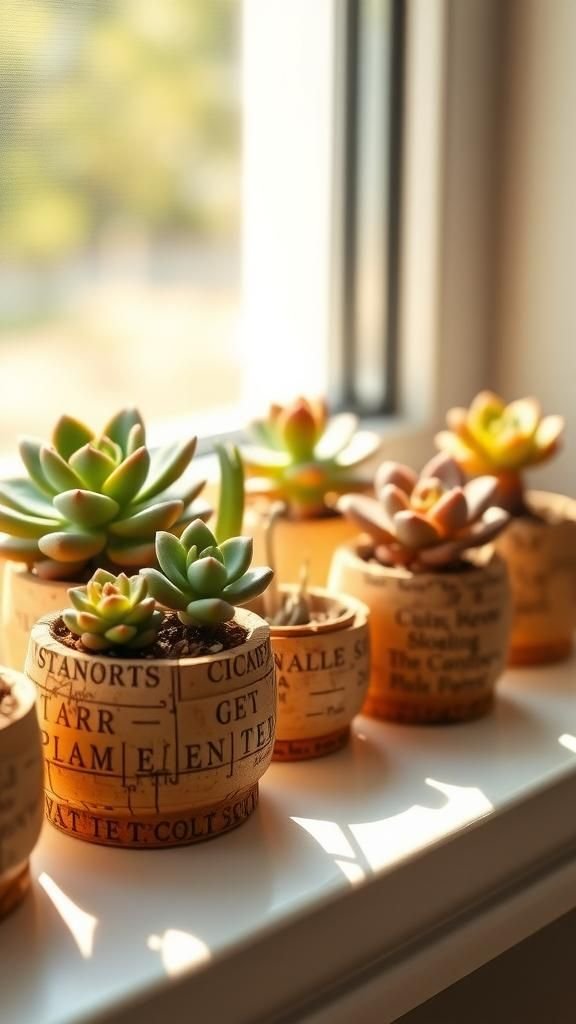
Tiny cork planters live on my windowsill, holding small succulent leaves and rescue cuttings. The contrast between smooth green leaves and the matte tan cork is visually calming, and the porous surface of cork feels earthy and organic.
When sunlight hits the vessels the natural texture becomes more pronounced, casting gentle shadows on the sill. I enjoy how each cork tells a story; some have faint wine stains, others are pale and pristine, and all of them carry a soft woody scent that hints at evenings past.
Steps
- Hollow out the center of each wine cork to create a shallow cavity for soil or a cutting.
- Fill the cavity with a small amount of succulent soil mix and gently place a cutting or baby succulent inside.
- Mist lightly and place the cork planters on a sunny windowsill with indirect light.
- Water sparingly and monitor the succulents for rooting and growth.
- Move planters occasionally to rotate exposure to sunlight.
Cork napkin rings adding cozy table personality
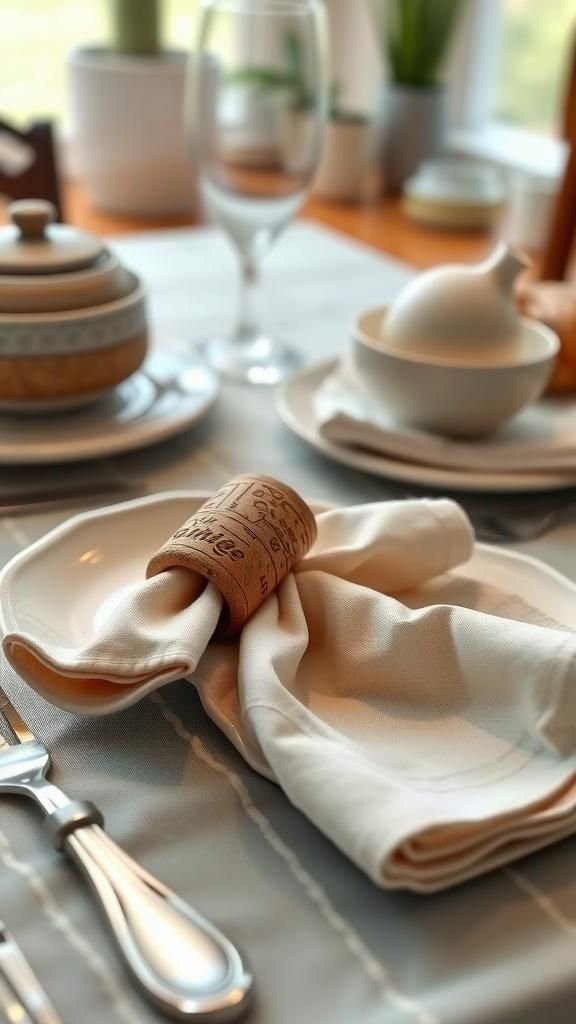
I like how cork napkin rings bring a subtle, tactile detail to a weekend brunch table. The natural warmth of cork contrasts nicely with crisp linen and porcelain, and the rounded shapes feel pleasant against fingertips when setting plates.
Light grazes the textured ends and pulls out gentle color variations across a place setting. Often a single cork with a tiny notch or ribbon adds a homemade look that guests comment on, turning a simple table into something that feels collected and lived-in.
Steps
- Gather wine corks and measure them to determine ring placement for napkins.
- Create a slit or channel in each cork wide enough for napkin fabric and test the fit.
- Thread a ribbon or elastic through the slit if desired, tying securely to form a loop.
- Slide napkins into the cork rings and arrange them on each place setting.
- Store rings flat to maintain shape between uses.
Charming cork place card holders for dinners
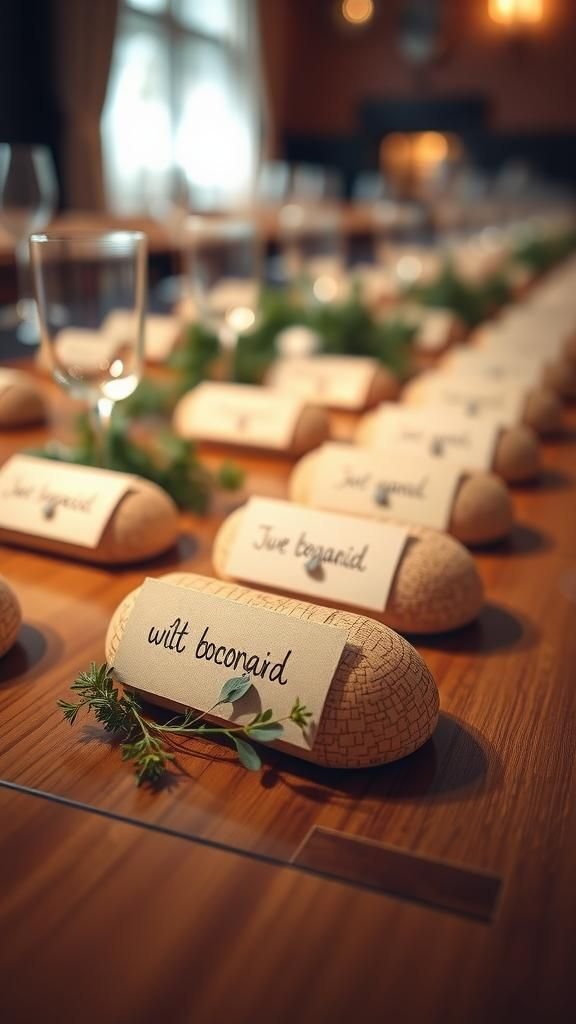
For intimate dinners I arrange cork place card holders along the table; they read a bit like tiny stones that anchor a name. The slit in a cork holds a paper card at a pleasant angle, and the tactile nature invites guests to adjust their cards with curiosity.
The neutral hues blend gently with table linens while the tiny imperfections in each cork feel human and approachable. I always smile when someone picks up their card to examine the stamp marks or faint wine ring.
Steps
- Prepare wine corks and cut a narrow slit across the top of each to hold paper cards.
- Insert small place cards into the slits and test stability so cards stand upright.
- Arrange the cork holders along the center of the table, spacing them evenly for each guest.
- Optionally add a small sprig of greenery tucked alongside each card for decorative flair.
- Remove cards after the meal and store holders flat for reuse.
Cork bath mat that welcomes bare feet
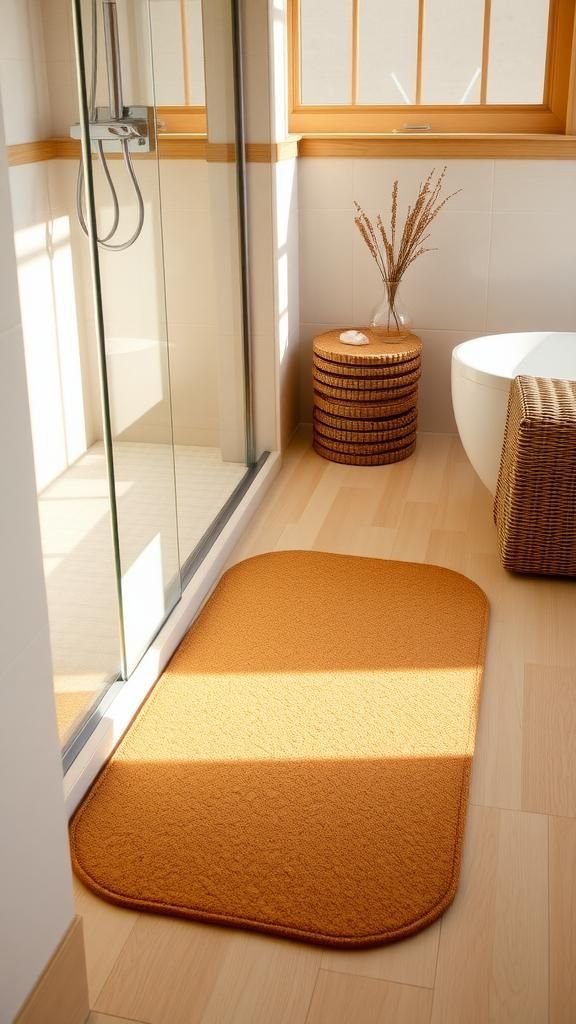
A cork bath mat sits outside my shower and carries a reassuring firmness underfoot. Its textured surface has tiny bumps that feel pleasantly grounding against toes, and the natural tone keeps the bathroom feeling calm and spa-like.
I enjoy the muted crunch when stepping onto it after a warm shower; the cork absorbs warmth and doesn’t feel cold in the slightest. Over time the mat develops a lived-in patina that I find comforting, like a well-loved towel or wooden stool.
Steps
- Arrange wine corks in a tight grid on a waterproof backing sized for bathroom use.
- Secure corks with a strong waterproof adhesive, ensuring full contact with the backing.
- Trim edges so the mat has a neat border and allow the adhesive to cure completely.
- Place the mat outside the shower or tub and rotate periodically for even wear.
- Dry the mat between uses to prolong its lifespan and freshness.
Delightful cork magnets for fridges and boards
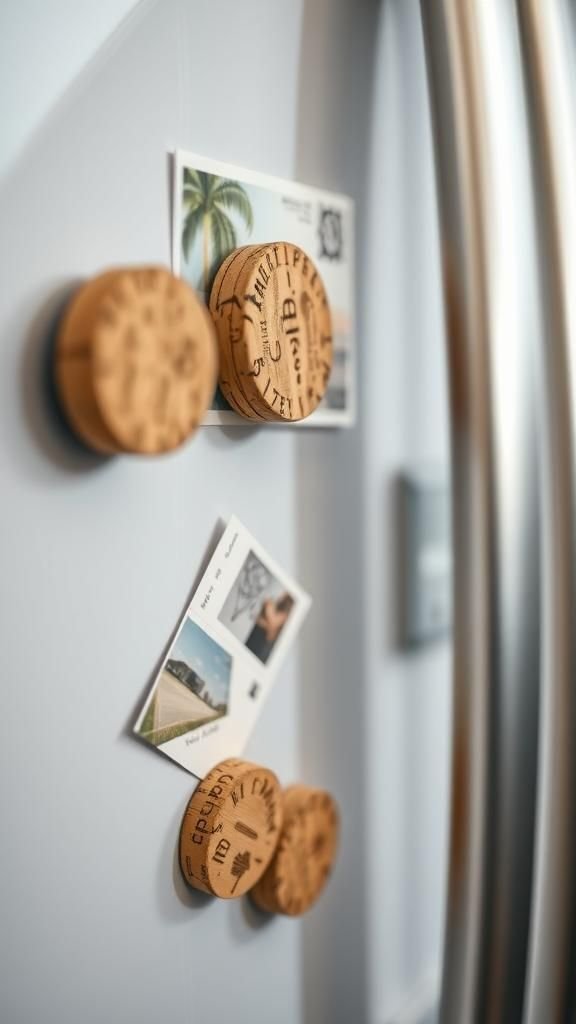
My fridge has a handful of cork magnets that keep postcards in place and soften the visual clutter of bills. The little cork disks are pleasantly light and add a tactile, almost acoustic break to a hard metal surface.
When I touch them the texture feels familiar and soothing, and tiny ink or wine marks give each magnet a quiet personality. They absorb the room’s light in a soft way, and simple wooden beads or stamped letters on top make each one feel like a small artifact.
Steps
- Slice wine corks into thin rounds and flatten each to create magnet faces.
- Affix small disc magnets to the back of each cork round with a strong adhesive.
- Decorate the front of each magnet with ink, stamps, or tiny embellishments and let dry.
- Test the magnets on the fridge to ensure a secure hold.
- Rearrange or add new magnets as needed for fresh displays.
Textured cork candle holders with soft glow
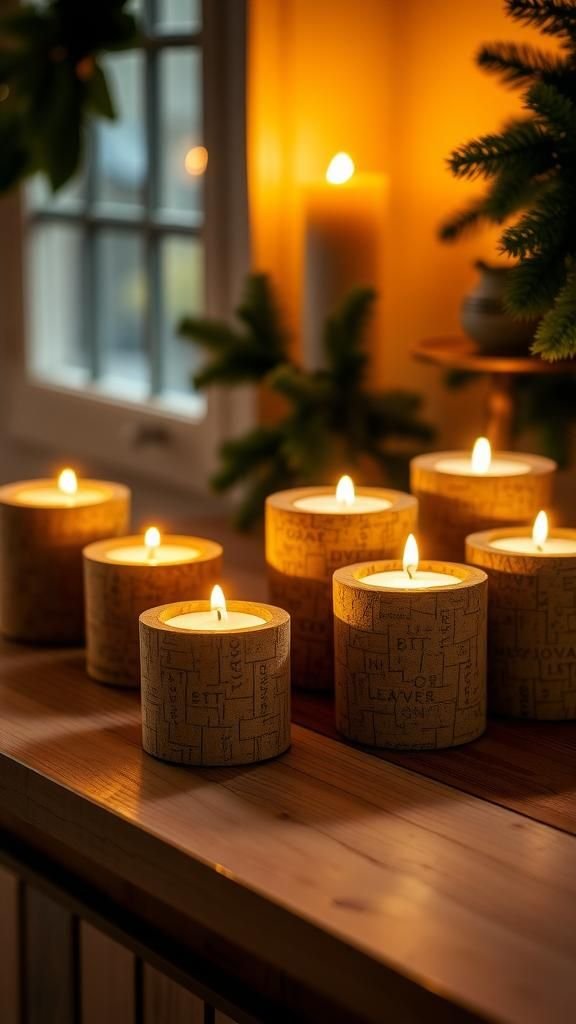
A row of cork candle holders on a mantel throws warm, muffled light across the room. The cork’s matte surface gently absorbs the candle glow, creating soft halos rather than harsh reflections.
I like the way the scent horizon shifts when candles are lit; the air carries a faint woody echo beneath the wax. The uneven tops and slight wine stains add character, and the vessels seem quiet and lived-in, inviting slower conversation and warm evenings with dim lights.
Steps
- Hollow out the center of each wine cork to fit a small tealight or LED candle snugly.
- Smooth the interior cavity and test-fit the candle to ensure stability.
- Arrange the cork holders on a non-flammable tray or surface, spacing them safely.
- Light candles one at a time, keeping them attended while burning.
- Extinguish candles before leaving the room and store holders away from heat sources.
Cork wind chime with mellow, muted tones
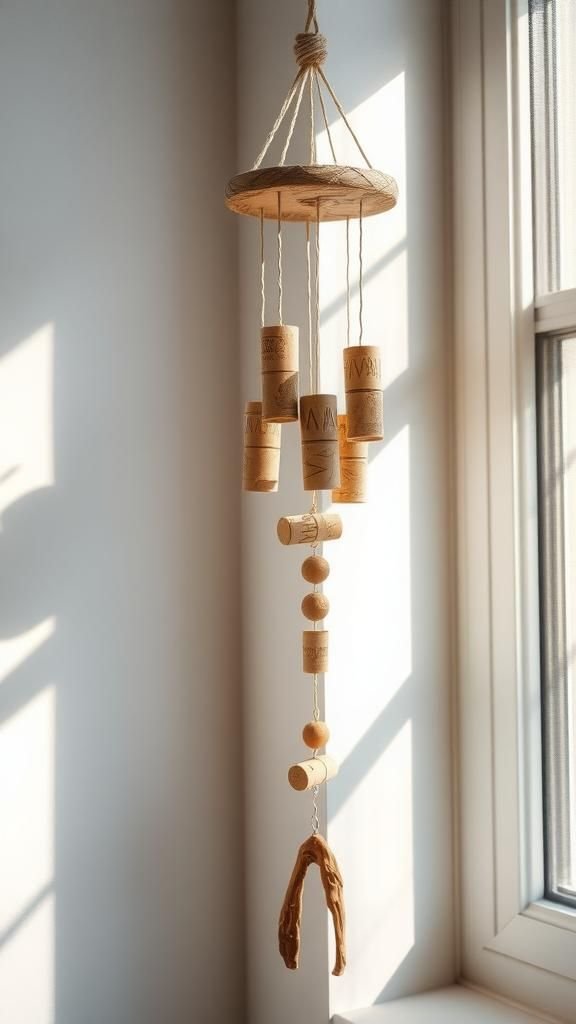
A cork wind chime hangs by my kitchen window and rattles with the gentlest breeze. The sounds are softer than metal, a muted clack that feels calming rather than intrusive.
Each cork moves independently, showing slightly different grain and marks, and the whole piece casts playful shadows on sunny afternoons. The weathered look that develops over months gives the chime a casual, collected charm, and I find the movement unexpectedly soothing when making tea or standing at the sink.
Steps
- Drill small holes through a collection of wine corks for threading.
- Thread corks onto durable twine or string in varied lengths and secure knots beneath each cork.
- Tie the strings to a wooden hoop or driftwood base and balance the arrangement.
- Hang the chime in a sheltered spot where breezes create gentle movement.
- Occasionally check knots and replace any worn string to maintain stability.
Mosaic cork frame for photos and memories
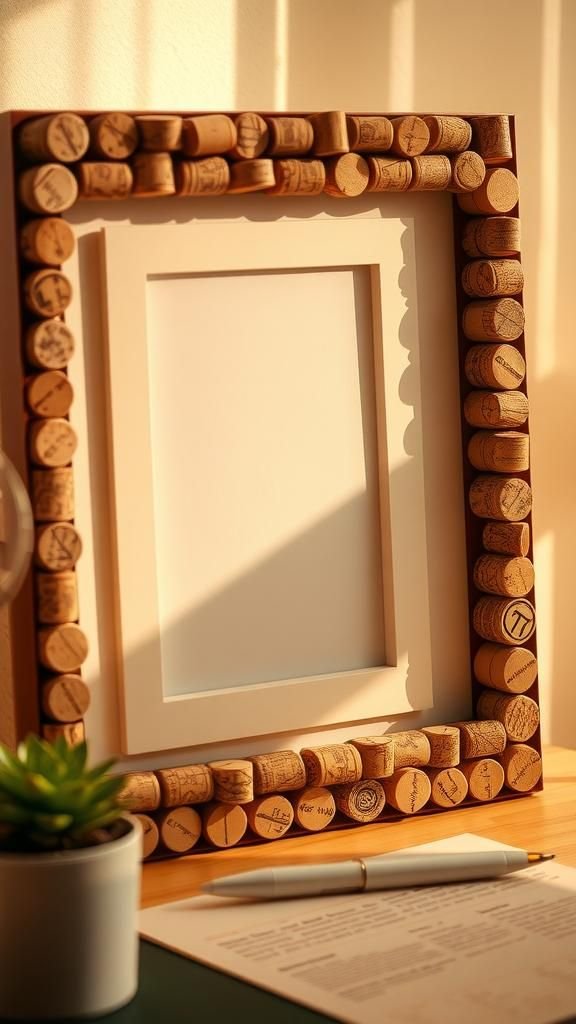
I made a cork mosaic frame that now holds a cherished snapshot on my desk. The tiny cork rounds create a warm border that feels tactile and comforting whenever I glance up.
The surface catches light in small, irregular highlights, and the gentle color shifts make the photo pop without overshadowing it. I like how the frame invites touching—fingers lingering on the little cylinders—and how the cork carries a faint echo of shared meals and laughter, which feels like an added layer of memory around the picture.
Steps
- Select a plain picture frame and gather wine corks cut into thin rounds.
- Lay out the cork rounds around the frame to establish a pleasing pattern and coverage.
- Adhere the rounds to the frame edge-by-edge, pressing firmly to ensure solid contact.
- Allow the adhesive to dry fully, then clean any stray glue from the frame edges.
- Insert a photo and place the finished frame on a desk or shelf.
Cork jewelry: small pendants and earthy beads
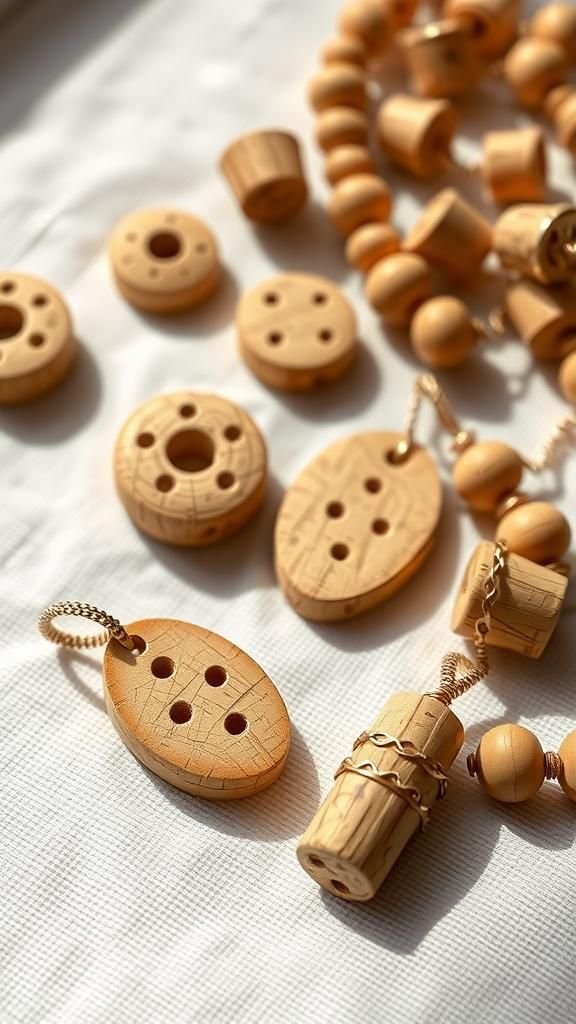
I crafted a few cork pendants that rest lightly against the chest and feel pleasantly buoyant compared to heavier metals. Their matte surfaces accept simple stamped shapes and tiny paints with a soft look that ages gently.
Wearing one feels casual and comfortable, with the cork warming slightly against skin temperature. The range of tones from pale to honeyed adds depth to a necklace cluster, and the slight irregularities in each piece make every pendant feel personal and familiar, like a small story carried close.
Steps
- Slice wine corks into thin pendant shapes and sand edges for smoothness.
- Drill a small hole at the top for threading and insert a jump ring or cord.
- Add beads or charms to the cord and adjust lengths for balance.
- Seal any painted or inked surfaces with a clear finish if desired and allow to dry.
- Wear the jewelry and store it flat to preserve its shape.
A whimsical cork garland for mantel or shelf

A cork garland draped across the mantel brings a relaxed, handcrafted energy to the room. The repeating cylinders create rhythm and a gentle silhouette, and the neutral hues pair nicely with candles and books.
I enjoy how the garland softens the hard lines of a fireplace and casts small, soft shadows in candlelight. Occasionally I tuck tiny paper stars between corks, and the combination feels like a little celebration without fuss.
It’s the kind of detail that invites a second look without shouting for attention.
Steps
- Thread wine corks onto a length of twine or thin rope, spacing them as desired.
- Tie secure knots between corks to maintain spacing and prevent slippage.
- Add small decorative elements between corks if desired, such as paper shapes or beads.
- Drape the garland across a mantel, shelf, or over a mirror and adjust layout.
- Periodically check knots and refresh decorative accents for seasonal updates.
Cork table runner: casual, tactile centerpiece strip

A narrow cork table runner runs down the center of my dining table for relaxed meals. The tactile feel under fingers is delightfully grounded, and the muted palette lets dishes and candles take center stage.
Light brushing across the cork reveals tiny pitted textures and subtle color shifts that are oddly soothing. During a long lunch I found myself tracing the pattern with a fingertip while listening to friends talk, which turned out to be a small, calming habit that made the meal feel slower and more comfortable.
Steps
- Arrange wine corks in rows on a fabric backing to visualize the runner length and pattern.
- Adhere corks to the backing using a strong adhesive, pressing to secure each piece.
- Trim edges of the backing for a clean finish and allow the adhesive to cure fully.
- Center the runner on the table and layer with dishware and candles as desired.
- Store the runner rolled or flat when not in use to maintain shape.
Cork coasters with stamped accents and texture
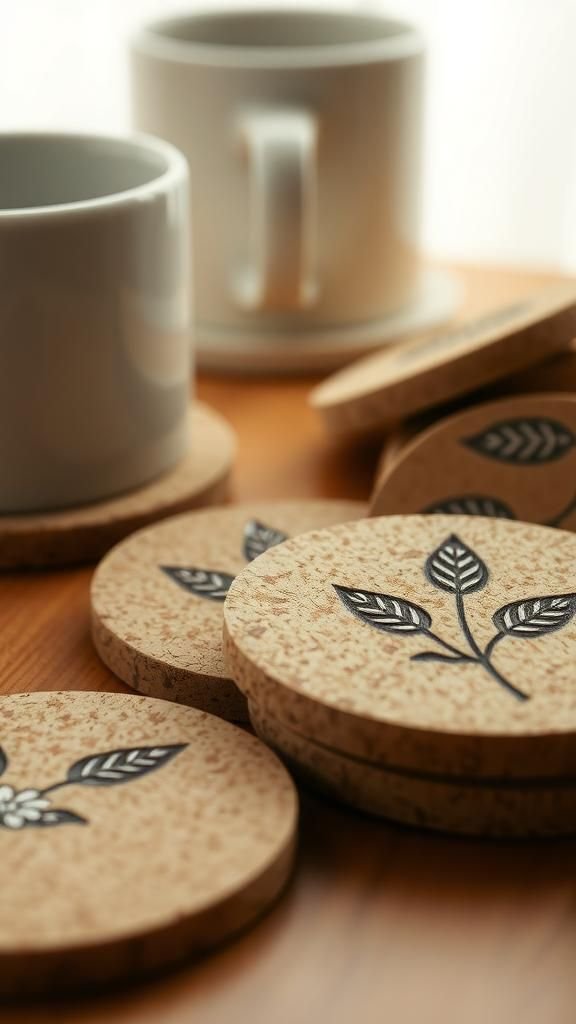
I tried stamping small motifs into cork coasters, and the result felt pleasantly handmade. The ink sinks softly into the porous surface, yielding a muted, vintage-like impression that reads as intimate rather than flashy.
When cups rest on them the stamped design peeks out just enough to add personality, and the edges pick up tiny wear marks over time that make each coaster feel lived-in. Coffee stains become part of the story, and I sometimes trace the stamped lines while thinking about the morning ahead.
Steps
- Cut wine corks into thin rounds or flatten halves for coaster faces.
- Lightly press rubber stamps with ink onto each cork surface, testing pressure for a clear imprint.
- Allow the ink to dry thoroughly and optionally seal with a clear matte finish.
- Arrange coasters in a stack and keep them near beverage stations for everyday use.
- Replace any coasters that become overly stained or worn.
Cork framed mirror with tactile, soft border
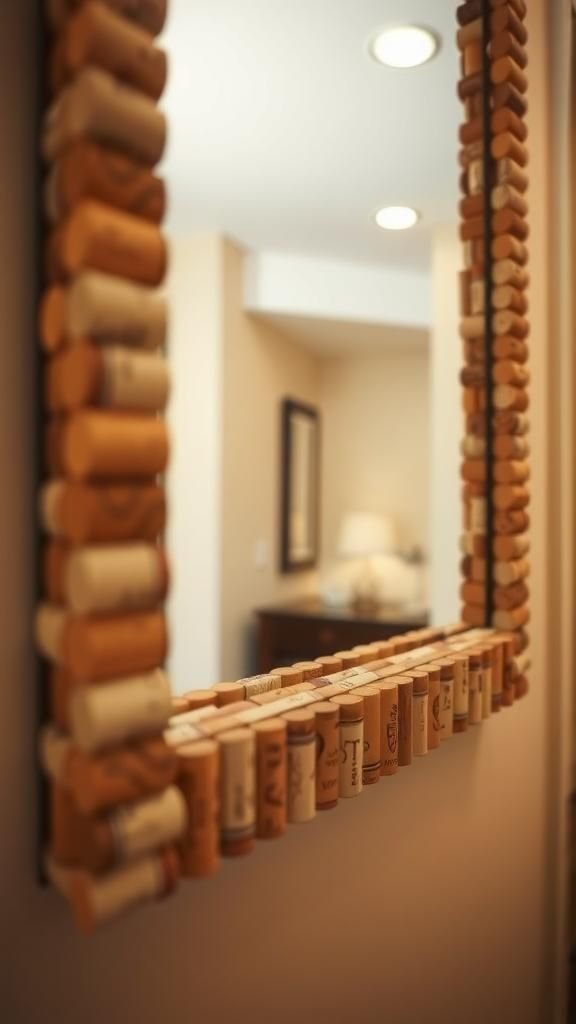
A mirror bordered in cork hangs by the hallway and reflects a cozy slice of the home. The cork rim mutes reflections and adds a tactile frame that invites a quick touch on the way out.
The warmth of the cork contrasts with the cool glass in a pleasing way, and tiny imperfections in each cork make the frame feel handmade and approachable. When sunlight hits it the border softens the light around the mirror, creating a calm vignette that suits a quiet morning routine.
Steps
- Measure the mirror frame and prepare wine corks to fit around the perimeter.
- Cut corks into halves or rounds to create a smooth bordering surface.
- Adhere the cork pieces around the mirror frame, ensuring even spacing and a snug fit.
- Allow adhesive to dry and hang the mirror securely on the wall.
- Clean the mirror surface while avoiding contact with the cork border.
Cork shadow box of tiny keepsakes and textures
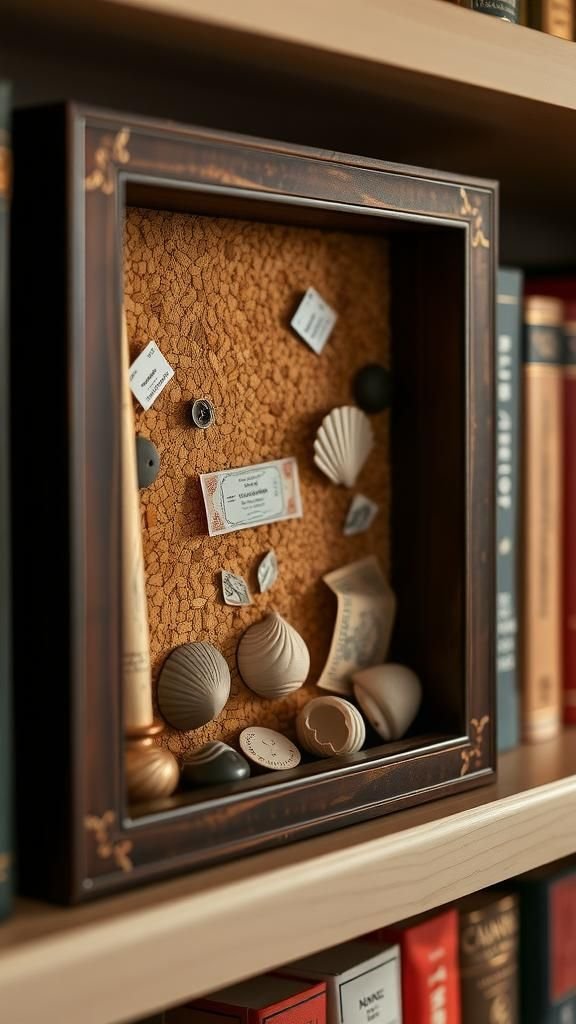
A shadow box lined with cork holds ticket stubs, tiny shells, and a pressed leaf, creating a small archive of quiet memories. The cork background gives everything a soft stage, and the texture of the cork contrasts with smooth paper and glossy shells.
I like running my finger along the edge of the display and finding tiny color variations that hint at the items’ origins. The whole composition feels intimate, a gentle reminder of small adventures and evenings shared, quietly anchored on a bookshelf.
Steps
- Line the back of a shallow shadow box with a sheet of cork or cork tiles.
- Arrange keepsakes inside the box to find a pleasing composition without overlapping items.
- Attach items to the cork backing using small pins or adhesive as needed to secure them.
- Close the box and mount it on a shelf or wall where it can be admired.
- Refresh the arrangement over time as new small mementos accumulate.
Cork plant markers for cheerful garden labeling
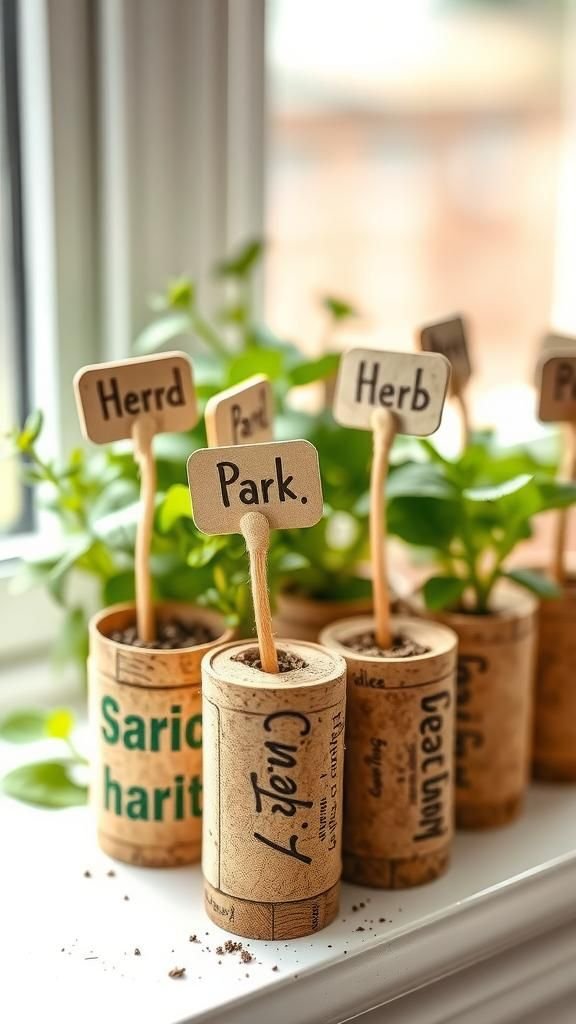
I keep cork plant markers tucked into a windowsill herb garden; they are cheerful little signposts that don’t overpower the plants. The soft tan of cork pairs well with green leaves, and the porous texture takes handwriting in a gentle way that feels handcrafted.
When watering, the markers bob slightly and soak in a faint dampness that fades quickly, leaving a lived-in look. I enjoy how the set grows a little character each season, and scribbling names on them feels like a small, private ritual.
Steps
- Push a thin wooden skewer or metal pin into one end of each wine cork to form a stake.
- Write plant names on the cork surface with a permanent marker and allow to dry.
- Insert the markers into soil near the corresponding plants, adjusting depth for stability.
- Replace or refresh labels as plants are moved or replanted.
- Store spare markers in a small pot on the windowsill for future use.
Cork drawer liners that whisper against cutlery

I once lined a shallow drawer with cork and appreciated how the interior suddenly felt quieter. The cork surface softens the clink of utensils and cushions small items, while giving a subtle warm tone when the drawer opens.
Running a palm across the liner reveals tiny pits and a comforting spring, and the cork resists scratches in a friendly way. It makes the drawer feel intentionally finished, as if someone paid attention to the small moments of daily life, where touch and sound can be gently redesigned.
Steps
- Measure the drawer interior and cut a sheet of cork to match the dimensions.
- Place the cork inside the drawer to confirm fit and trim edges if necessary.
- Apply a thin layer of adhesive to the drawer bottom and press the cork panel in place evenly.
- Allow the adhesive to cure before returning utensils or objects to the drawer.
- Replace the cork liner if it becomes worn or stained over time.