I still remember the slow, happy patience of my first hoop project: petals pressed between tissue, a soft afternoon light catching glass and thread. Embroidery Hoop Home Decor Crafts quickly became a way to keep small moments of texture and color on the wall, turning ordinary materials into cozy, framed memories.
There is a simple comfort to hoops hung in a cluster or standing alone on a shelf.
Embroidery Hoop Home Decor Crafts feel like paper letters from friends, each piece carrying a personal rhythm and little surprises in stitch, cloth, and shadow.
Pressed flowers in a hoop under glass

I have an old wooden hoop that holds a patchwork of dried petals beneath a thin glass pane, and it has a hush about it. Sunlight warms the petals to honey tones while the glass throws soft reflections across the wall.
The scent of dried lavender drifts faintly on warm afternoons, and close inspection reveals delicate veins and tiny flecks of pollen preserved like handwriting. This kind of hoop feels like a tiny window into a single afternoon, an intimate keepsake that invites quiet lingering and a gentle smile.
Steps
- Select flattened flowers and a backing fabric slightly smaller than the hoop diameter; arrange the petals into a pleasing composition on the fabric.
- Center a piece of conservation glass over the arranged flowers and secure it with the inner hoop; tighten the outer hoop to clamp the layers firmly.
- Trim any excess backing fabric and secure the hoop edges with a neat line of thin ribbon or decorative lace around the outer rim.
- Add a hanging loop made from twine or ribbon at the hoop screw and display the finished piece on a wall hook or shelf.
Rustic fabric stretch for cozy wall corners
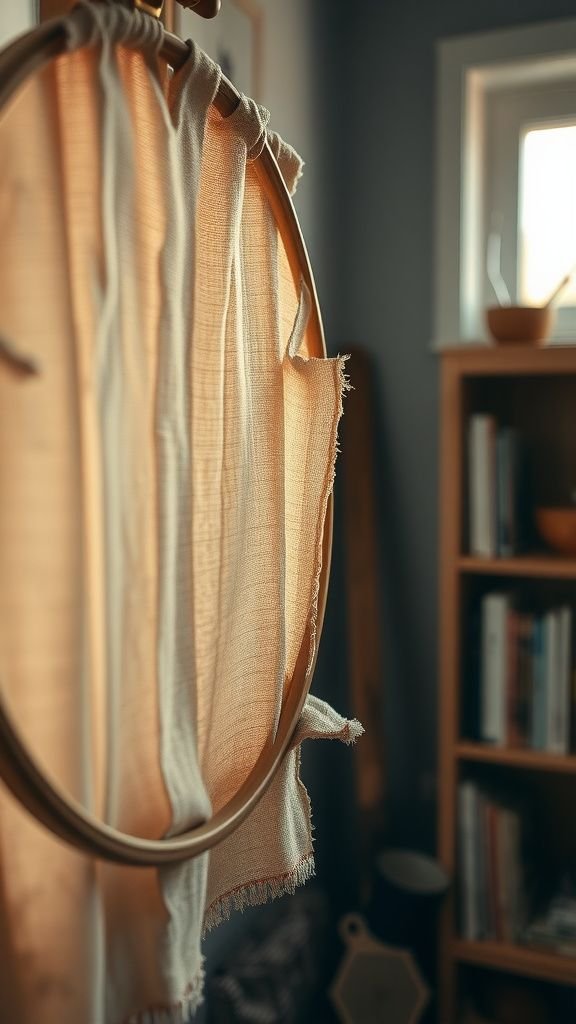
There is a comforting weight to a hoop wrapped in heirloom fabric, the kind that came from old shirts and tablecloths. When I placed one in a corner near my reading chair, the texture seemed to soften the light there.
The weave catches a morning glow and the subtle patterns create a calming rhythm on the wall. Threadbare edges and tiny embroidered motifs bring an honest, lived-in charm that invites hands to linger if allowed.
This kind of hoop becomes a quiet witness to slow mornings and cups of tea.
Steps
- Choose a piece of favorite fabric larger than the hoop and press it smooth; place the inner hoop beneath and center the fabric over it.
- Lower the outer hoop and tighten the screw until the fabric is held taut like a drum head with even tension across the surface.
- Trim the excess fabric leaving a neat overhang and tuck it under the hoop or secure with fabric glue towards the back.
- Finish the back with a felt circle for a tidy look and attach a jute loop at the screw for hanging.
Mini hoop garland across a mantel
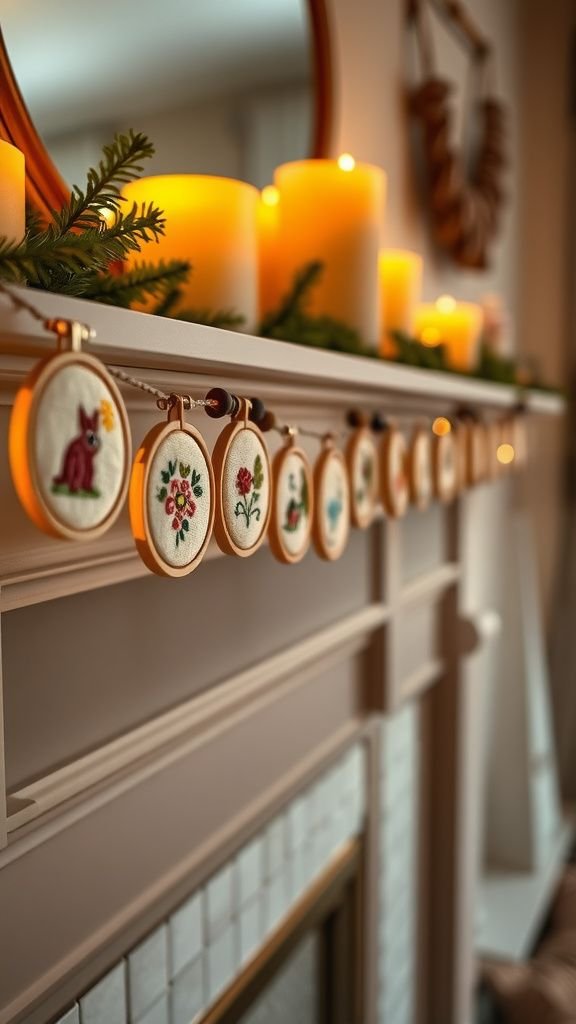
I strung a string of small hoops across a mantel last winter and the scene quickly felt festive without being loud. Tiny motifs peek through frames of wood and painted metal, each one contributing a gentle rhythm of color and pattern.
The garland moves slightly when the heat kicks on, making a soft clinking sound against the mantel trim. At night candlelight plays across beads and stitches, creating a warm shimmer.
The scale of these mini hoops makes them feel like playful punctuation along a shelf rather than a single bold statement.
Steps
- Prepare a handful of small hoops and create simple designs on each using embroidery stitches or small fabric motifs, keeping the color palette cohesive.
- Attach a small loop of twine or ribbon to each hoop screw and thread them along a longer length of cord spaced evenly.
- Add small decorative elements between hoops such as wooden beads, tiny bells, or felt balls to add texture and rhythm.
- Secure the garland across the mantel with removable hooks or small nails, adjusting spacing until the composition feels balanced.
Hoop frame with a vintage lace overlay
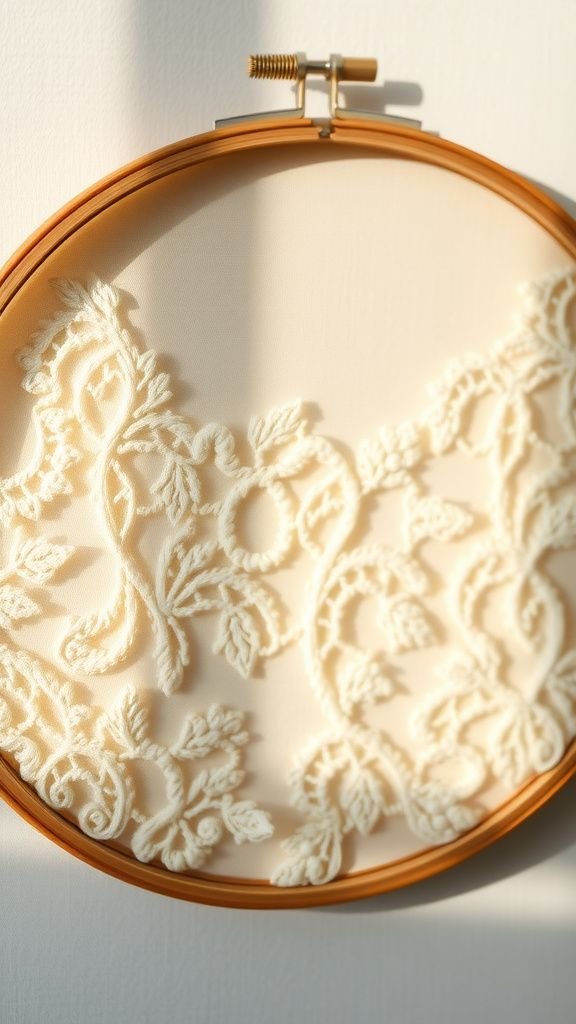
I love a hoop that holds a swath of lace; it reads like quiet jewelry for the wall. The lace drapes and flutters slightly in a soft breeze, casting filigree shadows on the paint below.
Up close, tiny embroidered loops and raised threads reveal the handiwork of another time, and the pearly sheen of old threads catches the light like memory. Paired with a muted background fabric the lace becomes a silhouette, delicate and unexpectedly strong.
This approach feels like borrowing an heirloom for a small, everyday celebration of texture.
Steps
- Select a piece of vintage lace larger than the hoop and lay it over a neutral backing fabric; smooth out wrinkles and center the design.
- Sandwich the lace and backing between the inner and outer hoop and tighten the screw until the layers sit flat and secure.
- Trim the backing fabric around the hoop edge, leaving a neat border and securing any loose lace threads toward the back.
- Add a small decorative trim around the outer hoop rim if desired and attach a hanging loop at the top.
Bold geometric embroidery for modern rooms
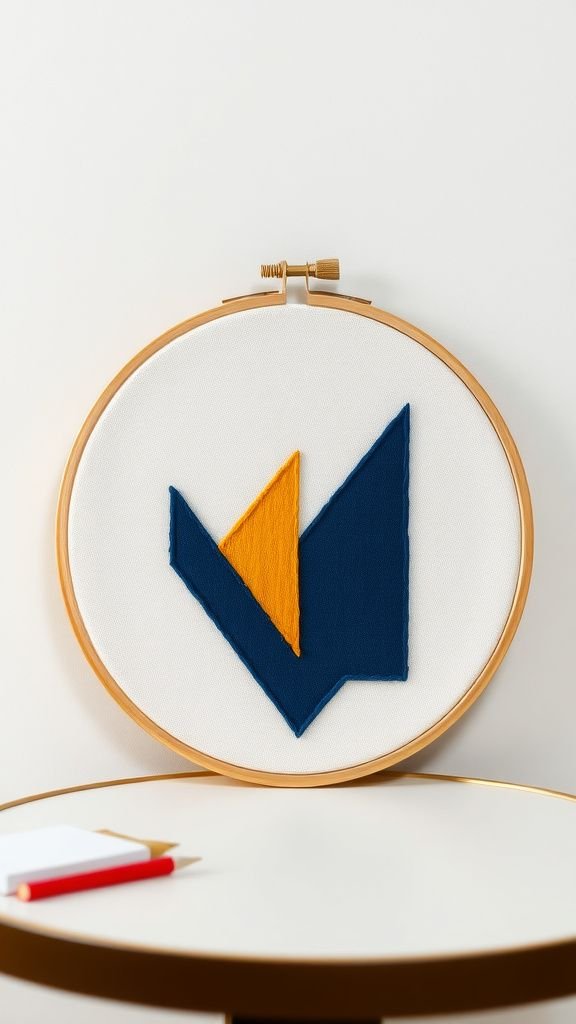
There is a satisfying clarity to hoops stitched with clean geometric patterns. I remember stitching a series of sharp triangles in saturated thread and feeling instantly more composed around my desk.
The contrast of crisp lines against a natural fabric brings a modern energy without needing bright accessories. Metallic thread catches morning sun in a playful way while matte wool offers a muted counterpoint.
These pieces read well in a minimalist space, where a single hoop can anchor a wall and create a point of visual rest amid open surfaces.
Steps
- Transfer a geometric pattern onto a taut fabric in the hoop using a washable pen, ensuring lines are centered and balanced.
- Select threads in a limited palette and employ satin, back, and split stitches to build crisp shapes and defined edges.
- Maintain even tension and stitch density for uniform coverage, trimming any stray threads at the back as you work.
- Finish the hoop edge with a painted rim or natural wood stain and add a simple hanger at the screw.
Hoop wreath with dried herbs and twine
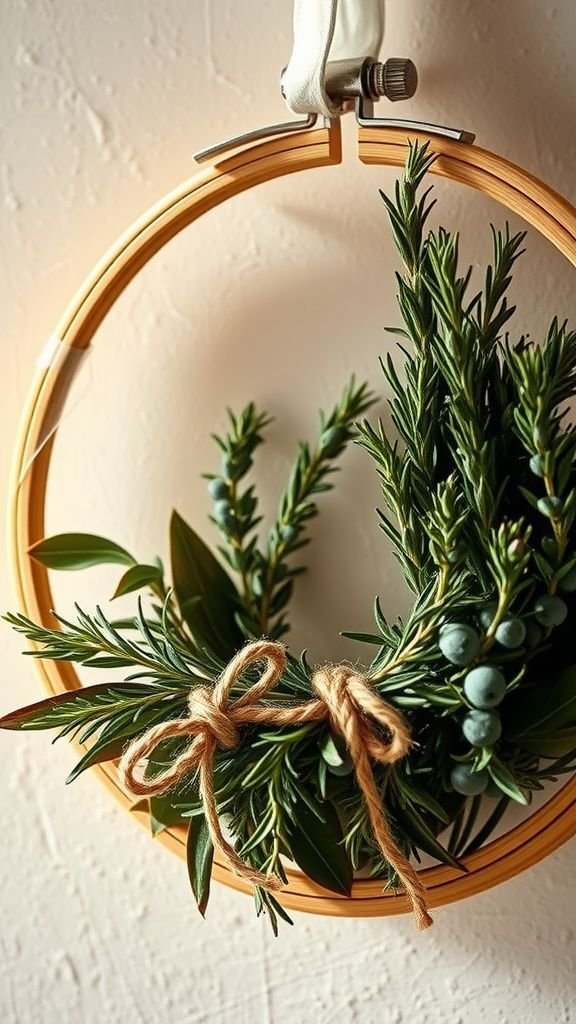
A hoop wreath scented with rosemary and thyme hangs near my kitchen window, and the aroma changes the mood of the space. The herbs dry into muted greens and silvery browns, and their stems create a gentle irregularity that feels handcrafted.
When sunlight hits the leaves it brings out a faint gloss and the twine binding adds a tactile, rugged note. The whole piece feels kitchen-ready and comfortable, like a small ritual for everyday cooking.
Layers of greenery soften the round frame and invite casual attention without demanding it.
Steps
- Gather bundles of dried herbs and arrange them around the embroidery hoop, overlapping stems to create fullness and a natural silhouette.
- Secure each small bundle to the hoop with twine, winding tightly and knotting under the arrangement to hold stems in place.
- Continue adding bundles until the desired coverage and shape is achieved, trimming any excess stem ends for a neat profile.
- Add a hanging loop of twine at the top and press the completed wreath against a wall hook or over a cabinet peg.
Layered hoops for depth and shadow
I once layered three hoops of different sizes on a narrow wall and watched how afternoon light created a moving conversation between shadow and form. Each layer held a different textile or stitch, and together they built a subtle relief that felt more like sculpture than fabric.
The gaps between hoops cast thin crescent shadows that shift across the day, and the overlapping edges create pockets of concentrated color. When passing by, the arrangement invites a second glance as stitches and materials reveal themselves from new angles.
Steps
- Select hoops in complementary sizes and decide on a staggered layout; prepare each hoop with distinct fabric or embroidery to create contrast.
- Attach the hoops together at strategic contact points on the back using small brackets or stitching, ensuring a stable layered structure.
- Mount the layered assembly on the wall with secure hooks or anchors positioned to support the combined weight.
- Adjust spacing and alignment until the layered composition casts pleasing shadows and the visual balance feels right.
Felt appliqué forest for a child’s nook
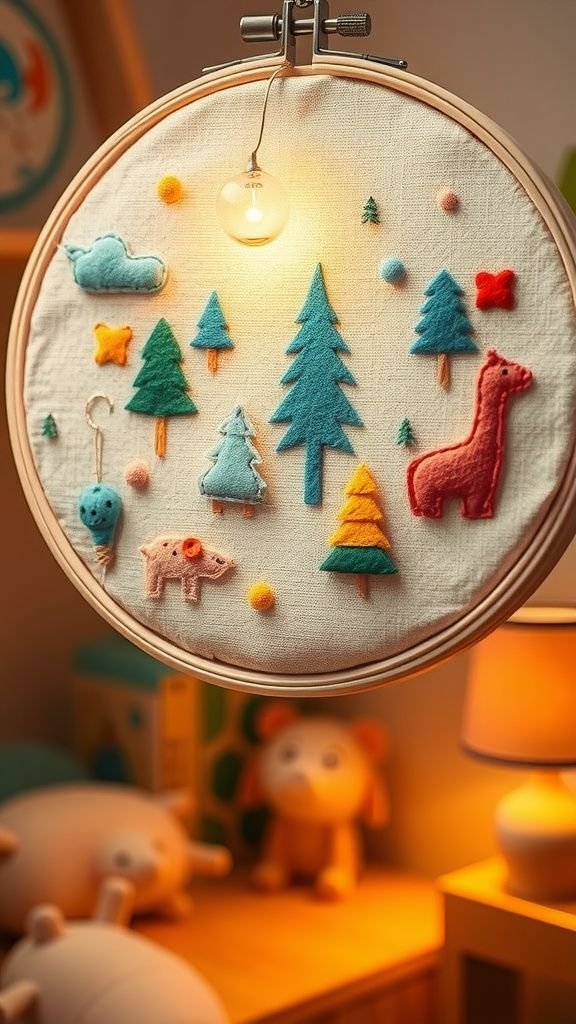
There is a particular softness to felt trees clustered inside a hoop hanging near a child’s bed. The felt offers a plush touch and the colors—sage, mustard, and warm brown—read as small woodland memories.
I noticed how the shapes encourage storytelling; tiny stitched accents become eyes or doors in imaginative play. The hoop feels friendly and slightly whimsical, with edges that beg to be traced by small fingers.
Paired with a soft bedtime lamp it becomes part of a calm ritual, a gentle guardian watching over evening stories.
Steps
- Cut felt shapes for trees, hills, and small animals slightly smaller than the hoop diameter to fit comfortably on the backing fabric.
- Arrange the felt pieces on the backing and secure them with small running or blanket stitches, anchoring larger elements first.
- Add embroidered details such as tiny stitches for tree bark or French knots for berries to bring the scene to life.
- Trim the backing, finish the hoop edge neatly, and attach a soft ribbon for hanging near the child’s nook.
Yarn fringe hoop with saturated color bands
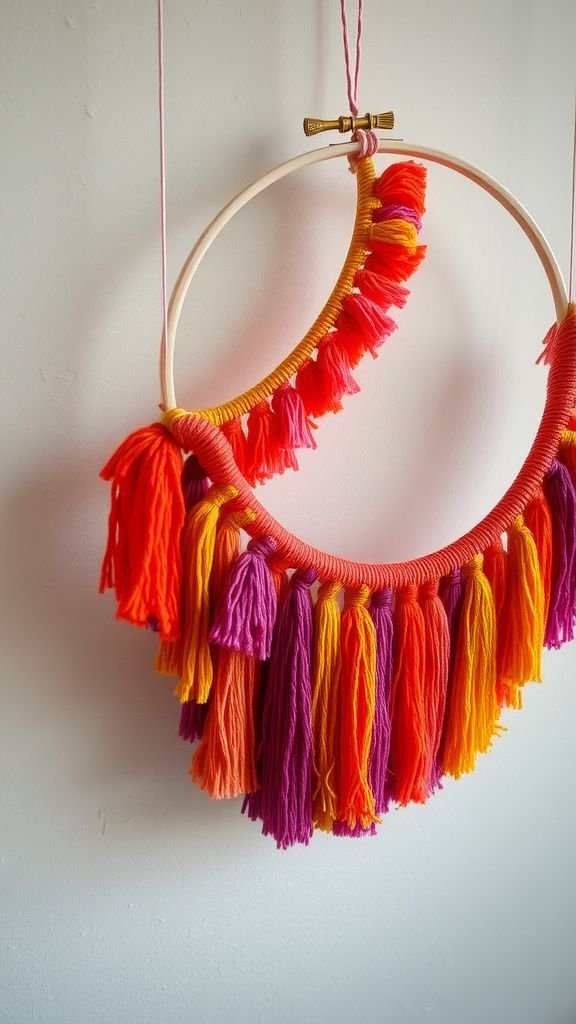
A hoop wrapped with bands of yarn fringe adds a playful, tactile energy to a room. I remember a piece where each band shifted slightly in hue, creating a sunset effect that felt joyful and bold.
The fringe moves gently when air circulates, creating a satisfying whisper of fiber. It invites touch without asking for it, and the bright strands make a lively counterpoint to wood tones and neutral walls.
Hung low above a console, it acts like a small flag that announces personality without shouting.
Steps
- Wrap the hoop rim with coordinating yarn to create color bands, securing the yarn at intervals with tight knots or a dab of fabric glue.
- Cut lengths of yarn for the fringe and fold each length in half, looping them around the hoop rim to create consistent fringe placement.
- Trim the fringe to the desired length, shaping the bottom edge into a straight line or a gentle curve.
- Add a hanging cord at the top and fluff the fringe for full, even coverage.
Hoop mirror trimmed with ribbon and beads
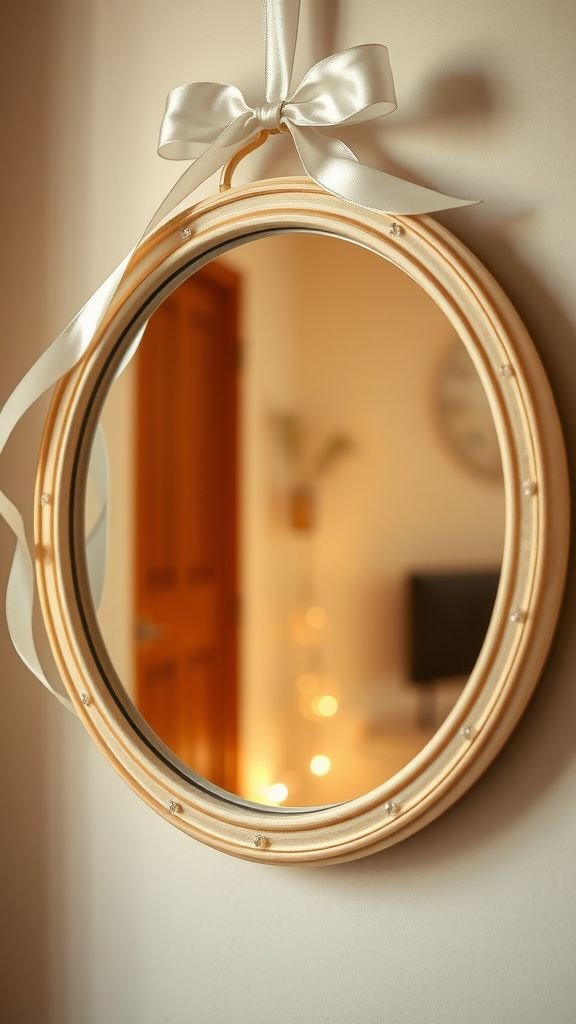
A small round mirror held inside an embroidery hoop feels like a tiny island of reflection. I have one trimmed with narrow ribbon and scattered glass beads that catch the light and throw little glints across a hallway.
The contrast between reflective surface and soft rim creates a pleasant interplay of hard and soft textures. Passing by I often notice a flash of sparkle that makes me pause, and the simplicity of a hoop keeps the mirror feeling intimate rather than utilitarian.
It brings a playful glimmer to narrow entryways.
Steps
- Cut a round mirror slightly smaller than the inner hoop and place it on the backing material centered within the hoop frame.
- Secure the mirror with small adhesive pads or mirror clips, ensuring the reflective surface sits flush and stable.
- Embellish the outer hoop rim with ribbon wrapped around the edge and attach beads with a strong jewelry adhesive or sewn beads if the rim allows.
- Add a sturdy hanging loop and mount the mirror on a wall hook at eye level for hallway or entryway placement.
Seasonal hoop with tiny pine cones
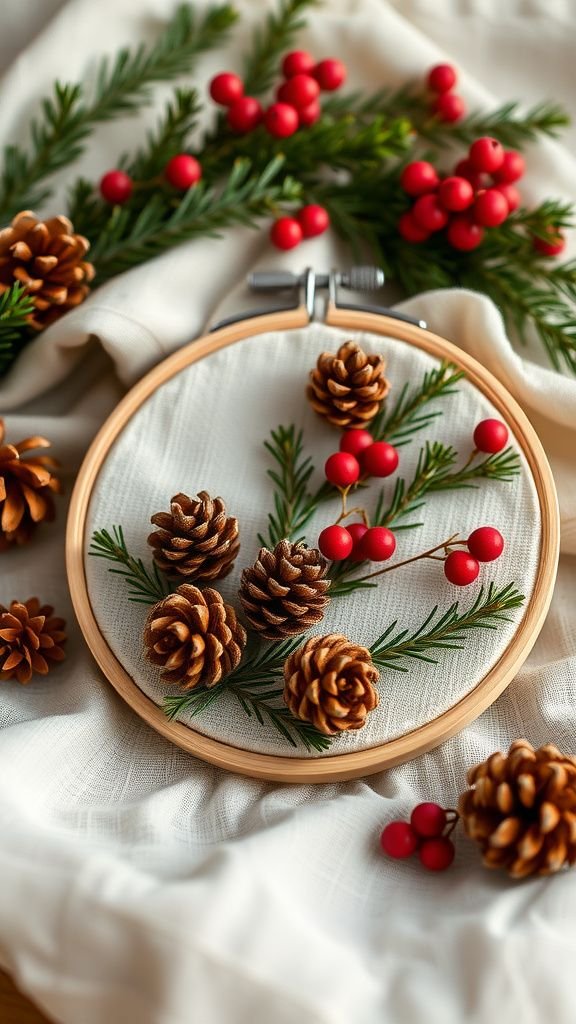
A hoop dotted with tiny pine cones and soft berries feels like a small seasonal portrait. I placed one above a side table and the natural aroma of wood and resin made the corner feel grounded.
The cones add sculptural weight and the berry clusters bring a pop of muted red against evergreen sprigs. Textural contrast between smooth fabric and rough cone scales creates a pleasant tension, and the piece reads as approachable and familiar.
It becomes a little marker for the season, changing the mood of a room with natural whisperings.
Steps
- Gather miniature pine cones, faux berries, and small evergreen sprigs and arrange them around the hoop to establish a balanced composition.
- Attach each element securely to the hoop rim with floral wire, wrapping neatly at the back to avoid visible loops.
- Fill gaps with small clusters of moss or ribbon for texture and secure them in place.
- Add a hanging loop of twine at the top and display the hoop in a prominent seasonal spot.
Macramé tassel hoop with soft cotton cord
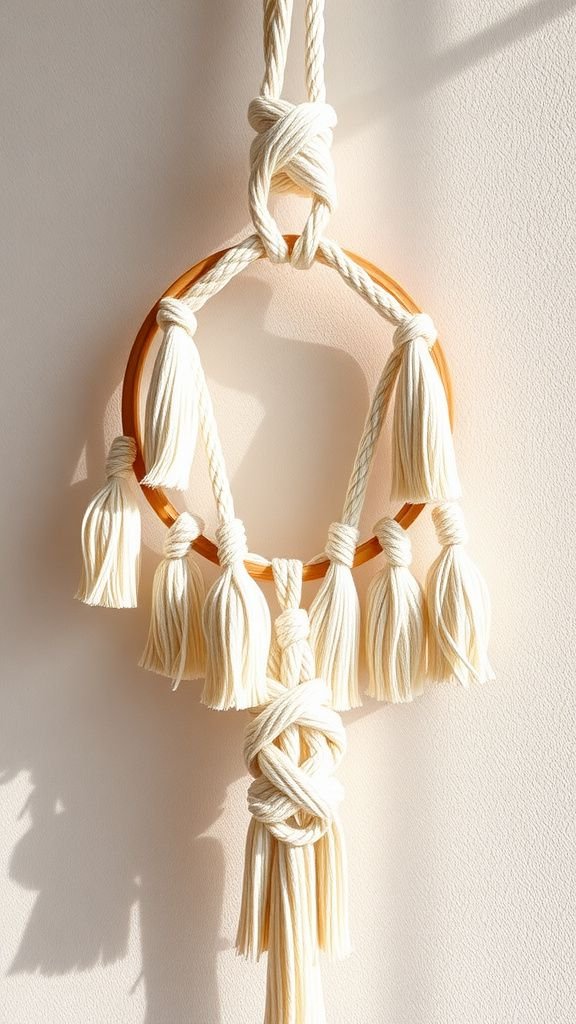
I enjoy the relaxed rhythm of macramé tassels spilling from a hoop. The cotton cords have a soothing matte softness and the knots create a tactile language that feels friendly and handmade.
When hung near a window the tassels sway with a slight breeze, casting soft linear shadows across the wall. The neutral cream or warm sand tones read as calm and approachable, while a hint of color at the tips can lift the whole piece.
It blends well with woven furniture and layered rugs for a quietly textural corner.
Steps
- Cut several lengths of cotton cord and fold them over the hoop rim, forming tassels of even length and density.
- Create simple macramé knots at the top of each tassel to secure them and add decorative knot patterns for interest.
- Trim the tassel ends to create a uniform bottom edge or a staggered silhouette according to preference.
- Attach a sturdy loop at the hoop screw for hanging and adjust tassels to achieve a balanced drape.
Abstract stitched lines on raw linen
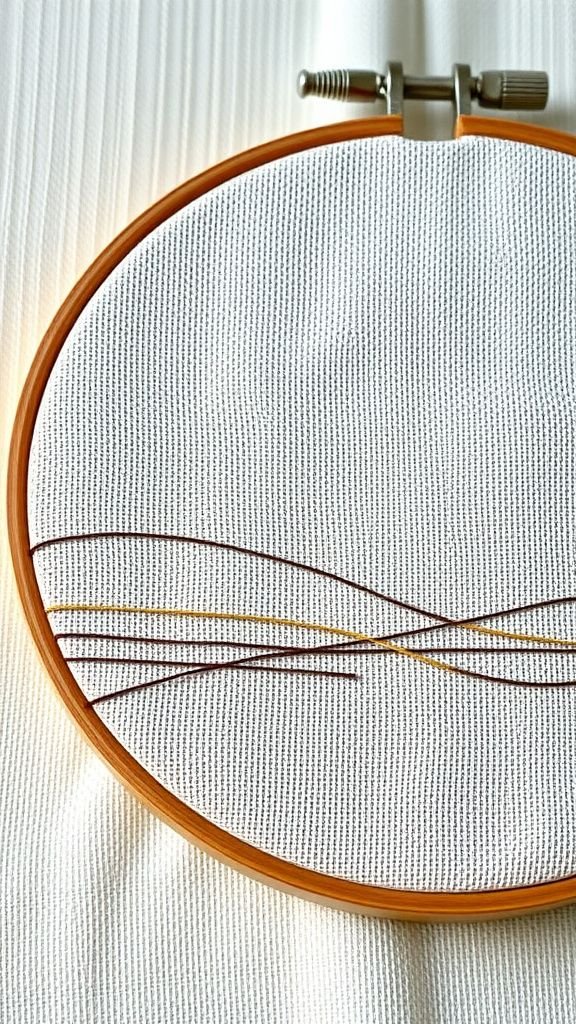
There is a delicate honesty to loose, abstract lines stitched across raw linen. I often find myself tracing the path of a thread with my eyes, following where it dips and reappears.
The stitches can be dense in one spot and airy in another, creating a rhythm that feels almost musical. Thread color can sing against undyed fabric or hush into a tonal whisper.
Hung in a cluster of simple frames, these small abstractions create a quiet gallery atmosphere, each piece offering a different note in a gentle composition.
Steps
- Secure raw linen in the hoop and sketch loose, organic lines with a removable marker to guide the stitched composition.
- Work with single or paired threads using running, stem, and couching stitches to build varied texture along the drawn lines.
- Vary stitch spacing and tension to create areas of density and openness, enhancing the abstract rhythm of the piece.
- Tighten the hoop rim, trim excess fabric, and finish the back with a neat felt circle before hanging.
Hoop planter hanger with small succulents
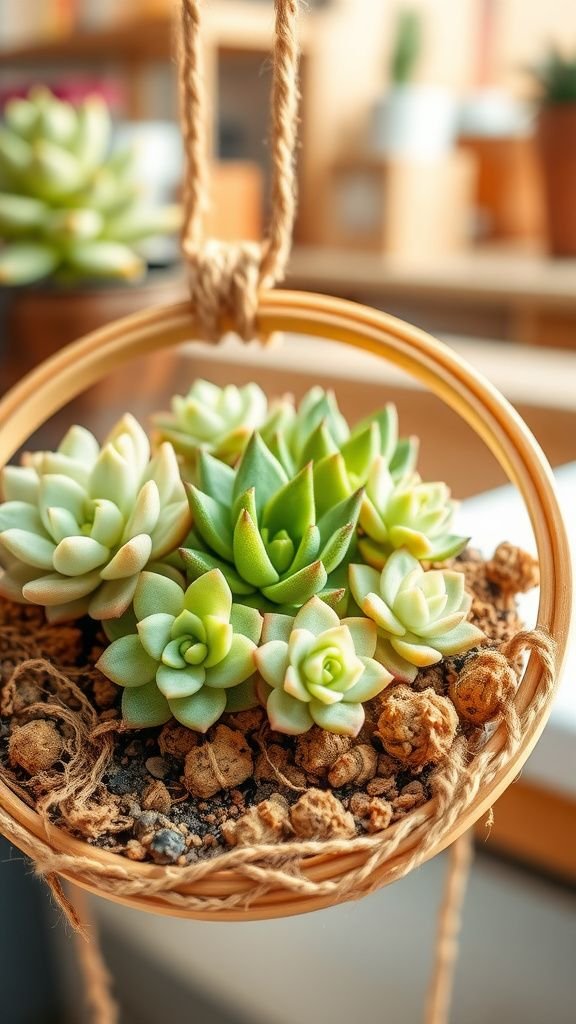
A hoop that cradles small succulents feels delightfully alive, a little living portrait that changes with new growth. I remember a cluster of rosettes and trailing little leaves that softened a blank kitchen wall.
The green tones against wood and natural twine make the piece feel organic and fresh, and water droplets on leaves catch light like tiny jewels after a gentle mist. This kind of hoop invites extra attention to plant health and growth patterns, and watching a succulent add a new offset becomes an unexpectedly satisfying ritual.
Steps
- Line the inner hoop area with a shallow wire mesh or coconut coir to create a small planting pocket that will hold succulents.
- Place a thin layer of well-draining soil in the pocket and nestle small succulents into position, firming soil gently around roots.
- Secure the planting pocket to the hoop rim with twine or wire to prevent shifting, leaving room for air circulation.
- Hang the hoop in bright indirect light and water sparingly, allowing soil to dry between light mists.
Sunburst hoop made with wooden dowels
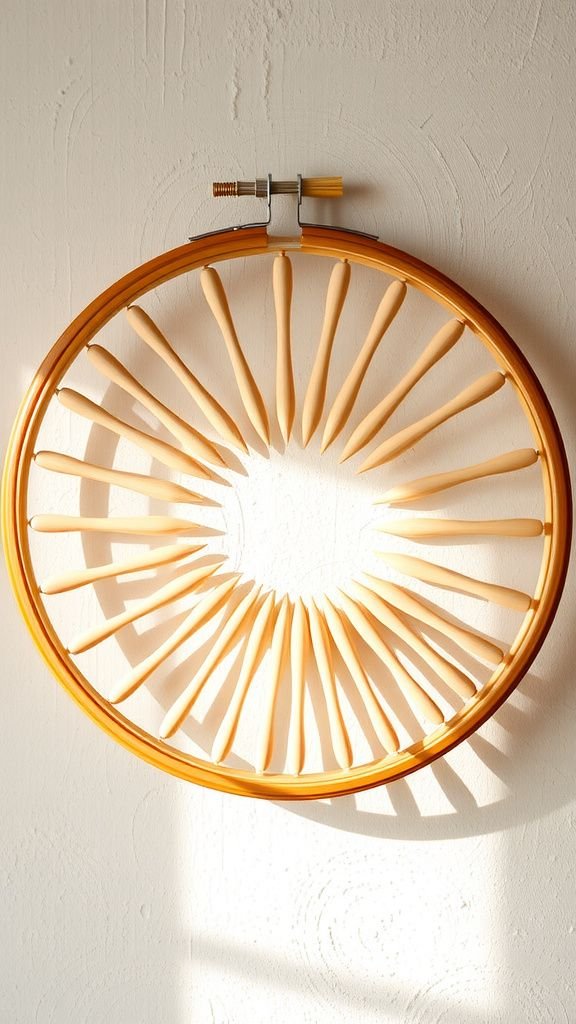
A hoop with thin wooden dowels radiating outward reads like a small sun on the wall. The natural grain of the dowels catches light differently than the smooth hoop rim, creating a pleasant contrast of linear elements.
I have one above a side table where morning rays pick out the dowel edges and make the whole piece glow. The geometry feels optimistic and architectural without being rigid, and a soft stain on the dowels brings warmth that complements mid-century furniture and layered textiles nearby.
Steps
- Cut thin wooden dowels to graduated lengths and sand ends smooth for safe handling and clean joins.
- Arrange dowels radially around the hoop rim and attach them securely with wood glue and small brads at evenly spaced intervals.
- Add a subtle stain or clear finish to the dowels for protection and to enhance the wood grain.
- Attach a hanging fixture at the top of the hoop and mount the sunburst on the wall at a focal point.
Hoop chandelier with cascading hoops and light
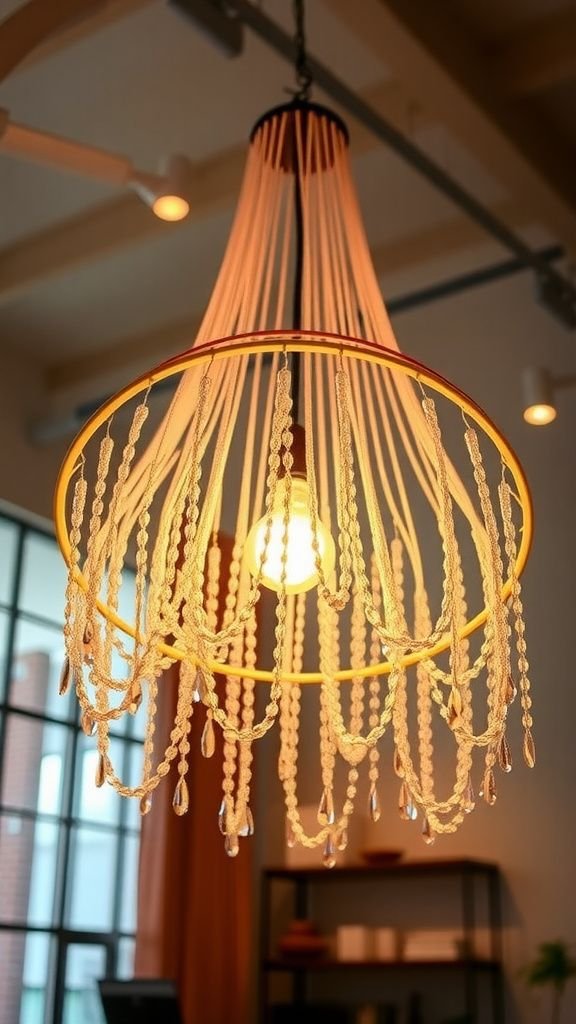
I once saw a soft chandelier made from nested hoops with delicate beads dangling between them; it turned a high ceiling into a gentle constellation. The hoops caught light from a single hanging bulb and scattered soft, dancing reflections below.
The feeling was both airy and intentional, like a mobile grown up and relaxed. When the fixture moved, the beads chimed faintly and the overlapping rings created a layered halo.
It reads as celebratory yet intimate, suitable for a dining nook or a corner that needs a little vertical interest.
Steps
- Assemble multiple hoops of varying sizes and suspend them from a central ring or canopy using clear fishing line or thin chain at staggered heights.
- Add decorative elements such as glass beads, small mirrors, or tassels between hoops, securing each with wire or knotting.
- Install a low-heat LED pendant or string lights within the topmost hoop, ensuring wiring is neatly concealed and safely secured.
- Hang the assembled chandelier from a ceiling hook rated for the combined weight and adjust hoop spacing until the cascade feels balanced.
Framed quote embroidery for a kitchen wall
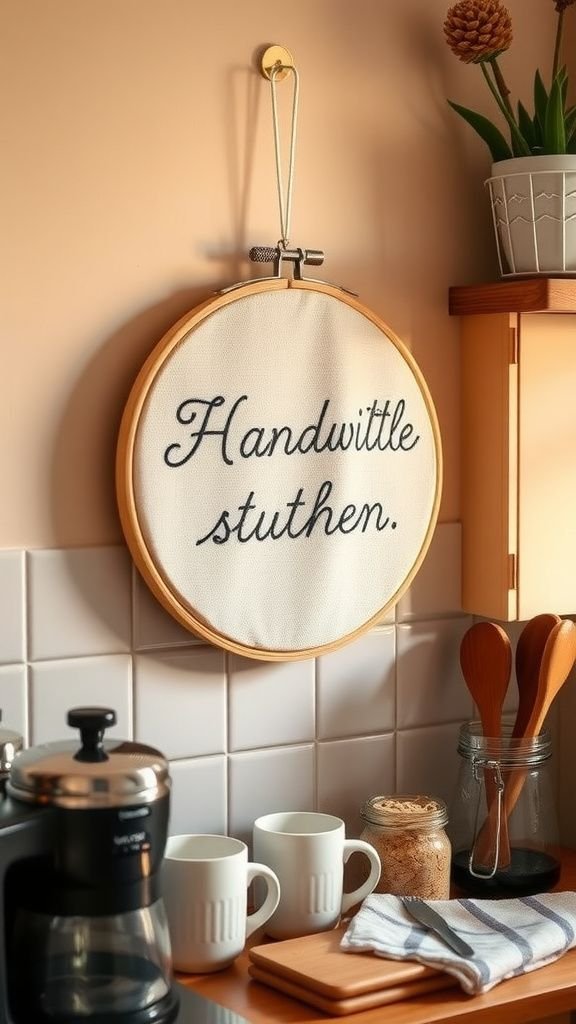
I stitched a tiny, hand-lettered phrase into a hoop and it became a small morning nudge above the coffee station. The curve of letters and the texture of thread make language feel tactile and lived-in.
When people visit they often smile at the casual script and ask where it came from. The choice of a modest phrase in calm tones offers a soft rhythm to the room, an unobtrusive reminder rather than a proclamation.
It blends with dishware and dried herbs, folding itself into daily domestic life.
Steps
- Transfer a chosen short phrase onto fabric within the hoop using a light transfer method or soluble pen, ensuring the lettering is centered.
- Stitch the letters with small satin or back stitches in thread colors that harmonize with the kitchen palette.
- Tighten the fabric in the hoop, trim excess backing, and finish the back with a neat felt circle for a clean look.
- Hang the embroidered quote near the coffee or prep area where it can be seen and enjoyed during daily routines.
Vintage map hoop for travel-themed rooms

A vintage map tucked into a hoop feels like a small window onto other places. I like the way old paper tones and faded inks add a worldly melancholy to a wall.
Cities, coastlines, and contour lines become decorative motifs that encourage curiosity and memory. The hoop edge reads as a frame that makes cartography feel friendly and domestic rather than academic.
Placed alongside photographs and ticket stubs the map becomes part of a personal story, inviting quiet reflection on routes taken and those still imagined.
Steps
- Select a vintage-style map section slightly larger than the hoop and mount it onto a backing fabric if needed for stability.
- Place the map within the inner hoop and lower the outer hoop, tightening the screw until the map sits taut and wrinkle-free.
- Trim any excess backing and secure the map edges toward the back with archival tape if necessary.
- Add a small label or pin with a memorable location and hang the hoop among other travel keepsakes.
Plaid fabric hoop for cabin warmth
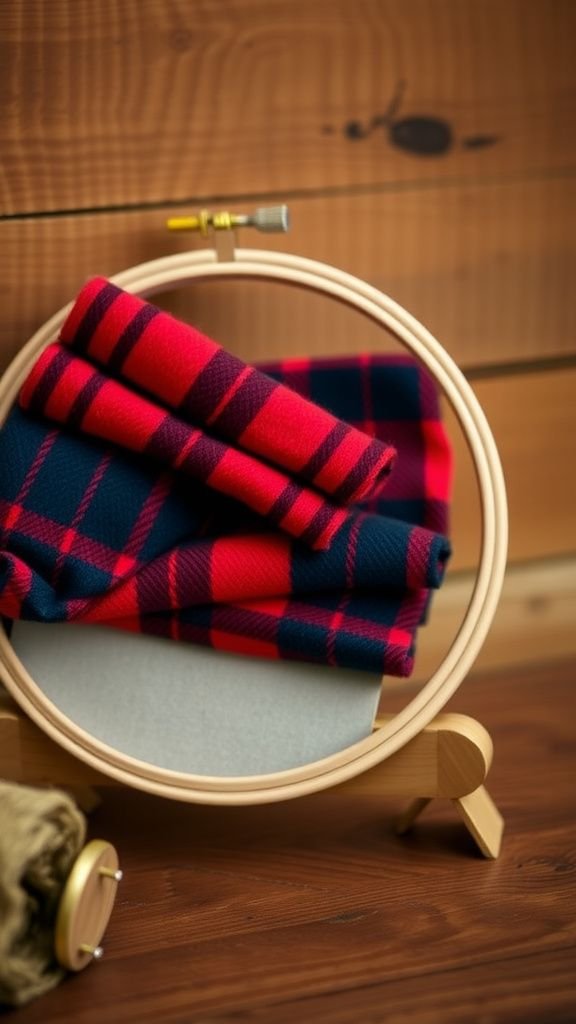
A hoop wrapped in a small square of plaid wool brings a cozy cabin note to any room. The intersecting lines and warm hues feel like a miniature blanket captured in a frame.
I remember the first time I hung one beside a wood-burning stove; the pattern seemed to echo the logs and flames. The wool has a soft, slightly raised nap that begs a gloved hand to brush it, and layered with dried bunches of grain it reads seasonally without fuss.
It brings a friendly weight to entryways and reading corners alike.
Steps
- Choose a scrap of plaid wool slightly larger than the hoop and smooth it flat before placing over the inner hoop.
- Lower the outer hoop, tighten the screw until the fabric is held with uniform tension and the plaid is centered.
- Trim excess fabric and tuck neat edges toward the hoop back; secure with small stitches or fabric glue if preferred.
- Finish with a simple hanger and place the hoop where its warm palette complements rustic decor.
Lace doily hoop for delicate layering
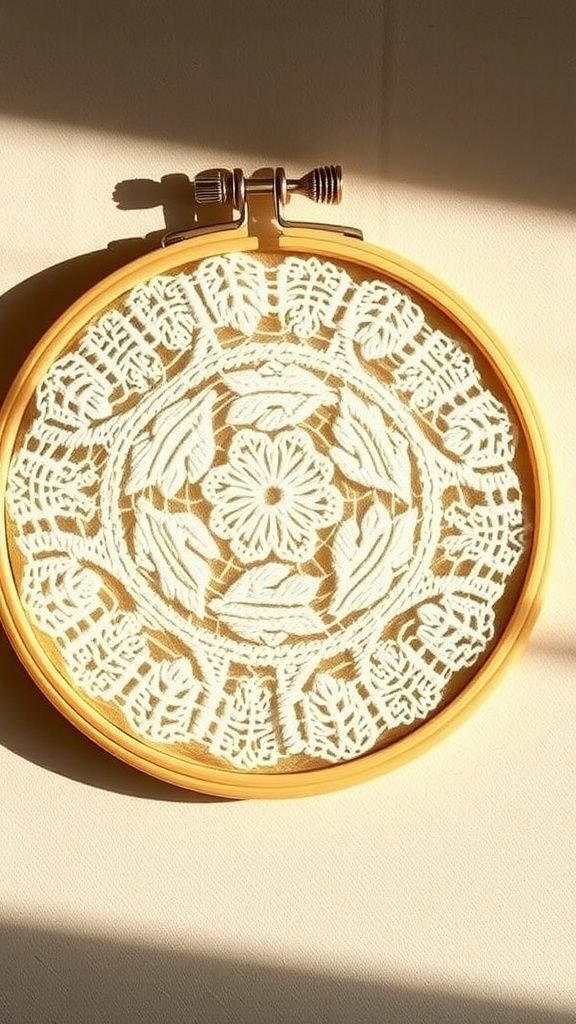
An old lace doily in a hoop feels like quiet jewelry for a plain wall. The doily’s tiny loops and floral motifs create an intricate surface that seems almost three-dimensional at arm’s length.
I often pair one with a painted hoop rim to provide a subtle frame that enhances the lace without overwhelming it. The light that filters through the tiny holes makes a soft mottled pattern across the wall, and from a distance the piece reads as a gentle halo.
It brings a refined, gentle note to soft-furnished rooms.
Steps
- Center a vintage lace doily on a neutral backing fabric and place it within the inner hoop, smoothing wrinkles gently.
- Lower the outer hoop and tighten the screw so the doily and backing sit flat and secure without distortion.
- Trim excess backing fabric and finish the hoop edge with paint or natural wood stain to complement the lace.
- Attach a discreet hanging loop and display the hoop in a softly lit area to enhance lace shadows.
Button mosaic hoop with glossy accents
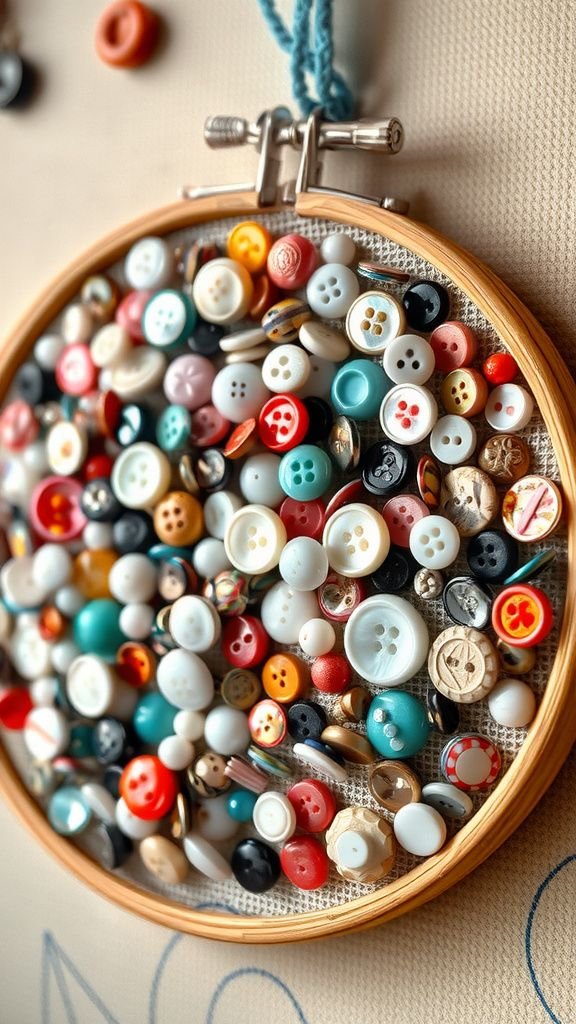
A densely buttoned hoop reads like a tiny mosaic, each button a little island of color and sheen. I once made one with mismatched buttons collected from jars and the result felt playful and nostalgic.
Light bounces differently off mother-of-pearl, glass, and matte plastic, creating a lively surface that changes as you move. The tactile relief invites fingertip exploration if permitted, though it also holds its own as a purely visual delight.
Hung near a sewing corner it seems to hum with memory and small domestic stories.
Steps
- Arrange an assortment of buttons on a backing fabric within the hoop, mixing sizes, shapes, and finishes to create visual interest.
- Sew each button securely onto the fabric, working from the center outward to maintain an even distribution and avoid gaps.
- Fill any remaining spaces with small beads or seed pearls for texture and additional shine.
- Trim the backing, finish the hoop edge for a neat presentation, and hang in a light-rich spot to catch reflections.