There is something warm about gathering friends and making little handmade pieces together. Galentine Party DIY Craft Projects always bring out laughter, colorful messes, and those tiny proud moments when a project finally feels right.
I remember a table strewn with beads, glitter, and mismatched ribbon while a playlist hummed in the background.
These Galentine Party DIY Craft Projects felt less like tasks and more like shared snapshots—soft textures, clinking glasses, and that bright thrill when everyone admires a finished piece.
Beaded wine glass charms with initials and color
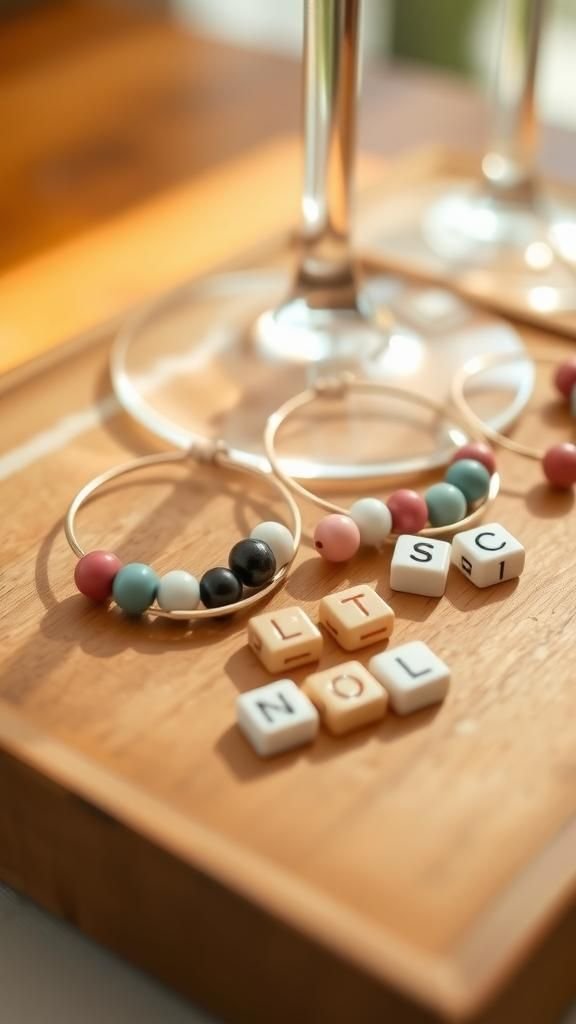
I love the soft clink of tiny beads lining a tray, each charm echoing a friend’s personality. The charms sat like little ornaments against translucent wine glasses, metallic rings catching afternoon light.
There was a pleasing contrast between matte stone beads and glossy glassy ones, warmth from copper wire, and the quiet satisfaction when an initial popped into view. Picking a color for someone felt like choosing a private joke.
The charms made the table feel curated and intimate, little identity markers that sparked conversation and smiles around the circle.
Steps
- Gather small beads, alphabet beads, thin wire hoops, and round-nose pliers.
- Thread the beads onto the wire in a pattern with an initial bead centered.
- Bend the wire ends and loop them into a secure ring with pliers.
- Trim excess wire and tuck ends smooth so no sharp edges remain.
Confetti-filled heart balloons for table centerpieces

There was a childlike thrill watching translucent hearts drift above the table, each filled with confetti that whispered when touched. The confetti shimmered with a mix of tissue and tiny foil shapes, settling into playful clusters.
The balloons bobbed gently, reflecting candlelight and creating soft shadows on the tablecloth. Holding one gave a slight resistance, and the scent of latex mingled faintly with floral arrangements.
These floating hearts brought a whimsical lift to the room, pairing well with prosecco fizz and warm conversation while adding a light, celebratory sparkle.
Steps
- Gather clear heart-shaped balloons, tissue or foil confetti, and a funnel.
- Load confetti into the balloon through the funnel and inflate the balloon gently.
- Tie the balloon securely and attach a decorative ribbon or weight.
- Arrange the balloons as centerpieces and adjust heights for a balanced display.
Mini floral crowns made for tabletop display

I remember the tiny crowns resting like treasures on a lace runner, each a miniature circle of blooms and greenery. The petals felt delicate beneath fingertips, pastel roses mixing with tiny sprigs of dried filler.
There was an herbal scent that threaded through the room, a hint of sweetness from dried petals and a crispness from fresh green leaves. Placed around votive candles, the crowns cast soft petal-shaped shadows.
They read less like accessories and more like thoughtful table ornaments, promising a gentle, garden-like atmosphere even indoors.
Steps
- Collect small fresh or dried flowers, flexible floral wire, and floral tape.
- Create a circumference with wire sized for tabletop crowns and wrap with tape.
- Secure small flower clusters along the wire with floral tape until the crown is filled.
- Tuck ends and adjust flowers so petals sit evenly around the crown.
Lavender-scented sachets with soft fabric textures
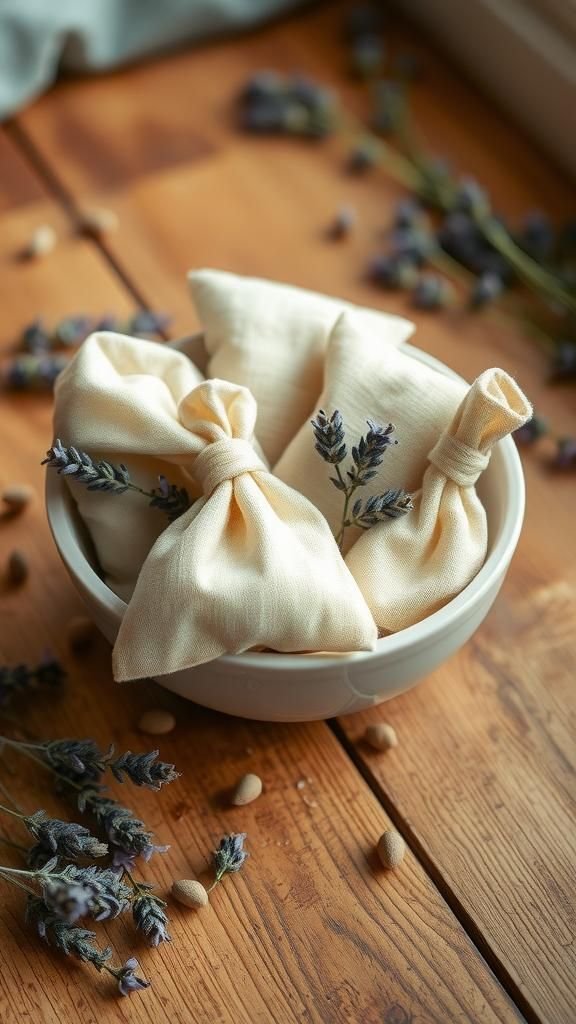
There was a calm hush when everyone inhaled the sachets, notes of dried lavender and a faint sweetness that settled in the chest. Little fabric pouches, textured linen and soft cotton, sat in a shallow bowl like tiny gifts.
The weight of dried buds gave a pleasant heft, and the stitching detail felt homespun and cozy. Each sachet carried a muted floral color palette that matched the table setting.
Placed in drawers or tucked into a bag, they promised a small, lingering reminder of the afternoon and a tiny scent-memory to keep.
Steps
- Measure and cut fabric squares, then fold to form a pouch.
- Spoon dried lavender buds into the pouch to a gentle fullness.
- Secure the pouch opening by sewing closed or tying with ribbon.
- Add a small decorative tag or ribbon loop for hanging or gifting.
Friendship bracelet station with colorful threads and charms

The table hummed with colored string, laughter, and woven patterns as bracelets accumulated like tiny stories. Threads felt soft against fingertips, bright neon and pastel choices laid out like a painter’s palette.
Tiny metallic charms added weight and a pleasant tinkling sound when bracelets were lined up. Watching a pattern emerge felt soothing, eyes tracking the crossing threads while conversation drifted between memories and plans.
The bracelets ended up as wristwarmers and keepsakes, each one slightly uneven in that charming handmade way, sparkling with personal touches and shared time.
Steps
- Set out assorted embroidery floss, scissors, and small metal charms.
- Cut multiple strands of floss to desired bracelet length and secure them together.
- Braid or knot the strands into chosen patterns, adding charms along the way.
- Finish by tying secure knots and trimming any excess thread.
Hand-painted terracotta succulent planters for guests
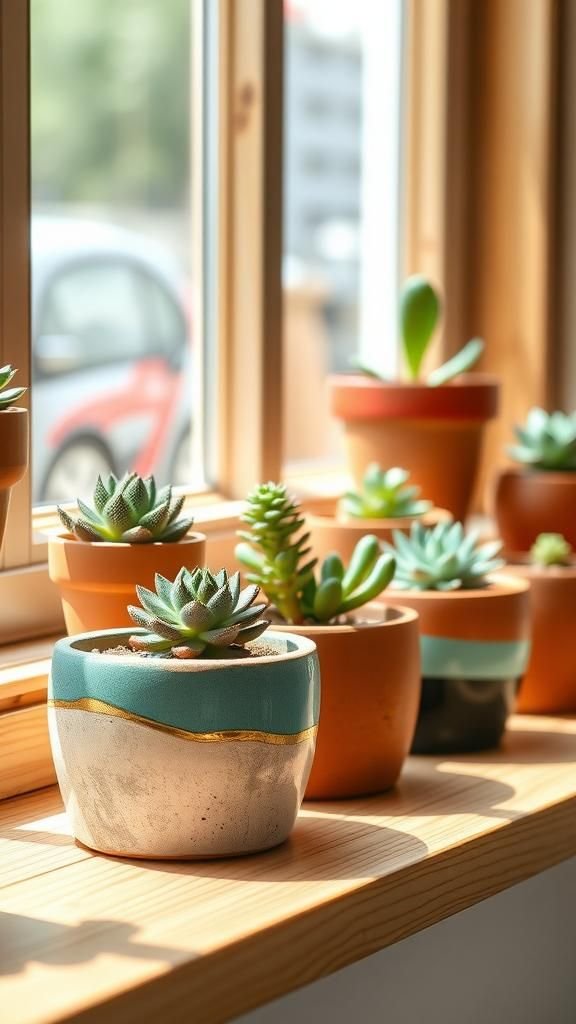
There was a satisfying earthiness to the little pots, warm terracotta tones warmed under fingertips. Each planter carried whimsical patterns and soft brushstrokes that hinted at the hand behind them.
Matte paint hugged the surface, sometimes catching a metallic glint under direct light. Tiny succulents added sculptural greens, their fleshy leaves a cool contrast against rough clay.
The planters sat clustered like a miniature desert scene, soil scent faint and grounding. They felt like small living trophies of the afternoon, cheerful on windowsills and offering steady, low-maintenance company.
Steps
- Gather small terracotta pots, acrylic paints, and fine-tip brushes.
- Paint base colors and add decorative patterns or accents once dry.
- Seal painted surfaces with a clear sealant for durability.
- Plant small succulents with a bit of soil and place them in the pots.
Custom cork coasters with pressed flower designs

The coasters felt pleasantly weighty, cork offering a dry, slightly porous touch beneath fingertips. Pressed flowers lay like botanical postcards beneath a glossy finish, veins faintly visible and colors softened to vintage tones.
Each coaster had an organic rhythm, petals arranged in gentle asymmetry. The scent of paper and floral glue lingered faintly nearby, while the table arrangement read like a tiny herbarium.
These small rounds brought a botanical calm to clinking cups and made for a tactile, bright addition that guests loved to examine closely.
Steps
- Prepare cork coaster bases and select pressed flowers and leaves.
- Arrange botanical pieces on the cork surface in an appealing pattern.
- Apply a clear resin or varnish layer to encapsulate and protect the flowers.
- Allow to cure fully before buffing edges and using the coasters.
Glittered votive holders that catch candlelight beautifully
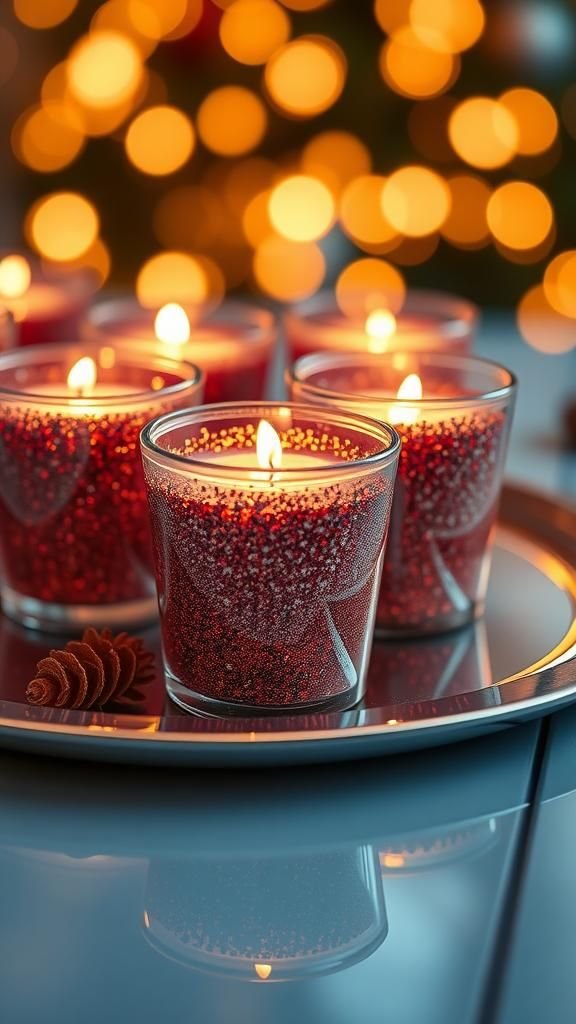
When candles flickered inside the holders, the glitter scattered warm pinpricks of light across the table. The exterior shimmered with a textured sparkle against smooth glass, and the inside reflected a softer glow.
Handling one felt slightly rough where glitter met glass, a tactile reminder of the craft. The holders added a playful yet elegant shimmer, echoing champagne bubbles and soft chatter.
Their small scale made them perfect to cluster, creating pools of warm light and tiny, moving reflections that made the room feel cozy and celebratory at once.
Steps
- Gather plain glass votive holders, adhesive medium, and fine glitter.
- Brush adhesive evenly onto the exterior surface of each holder.
- Roll or sprinkle glitter over the adhesive and tap off excess.
- Allow to dry fully and seal with a clear topcoat to prevent shedding.
Tiny matchbox favors with patterned paper and ribbons
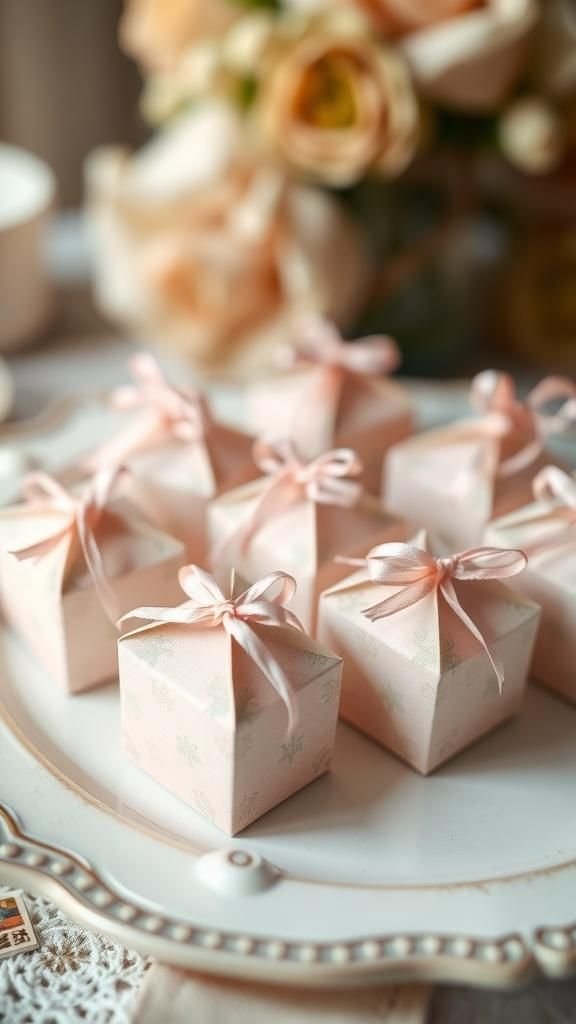
The little boxes felt like treasures, patterned paper folding into neat shells that smelled faintly of card and glue. Each drawer slid out smoothly, revealing a tiny surprise tucked inside.
Ribbons threaded through small holes added a playful loop, and delicate stamp marks gave an artisanal touch. The surface crinkled pleasantly when pressed, paper edges soft and slightly matte.
These favors had a nostalgic charm, like homemade stationery exchanged between friends, and they sat on plates awaiting discovery with a gentle satisfaction that made handing them over a sweet moment.
Steps
- Collect empty matchboxes, decorative paper, small ribbons, and adhesive.
- Cover the exterior of each box with decorative paper, smoothing edges.
- Add ribbon loops or small embellishments to the top or sides.
- Place a little treat or note inside the drawer and close the box.
Hand-lettered napkins with watercolor wash accents
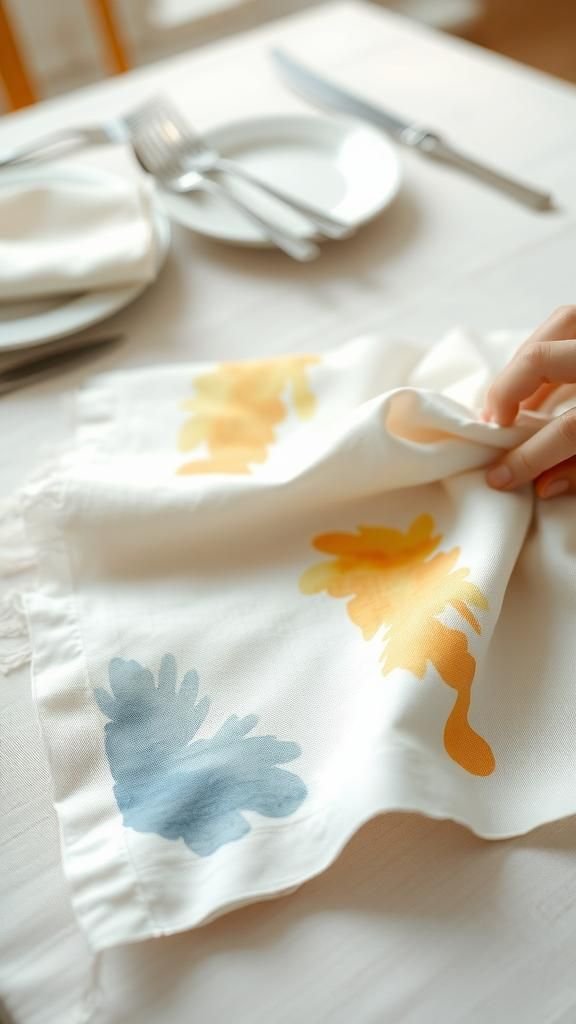
There was a gentle hush when a napkin flicked into place, the soft watercolor wash like a blush across fabric. Hand-lettered names curved with personality, ink strokes carrying tiny flourishes that felt intimate.
The napkins smelled faintly of textile and a whisper of paint, and the fabric offered a soft, tactile comfort. They turned place settings into little notes to be discovered between bites, pairing casual artistry with the meal.
Seeing handwriting against the wash made me think of postcards and slow afternoons, a tender detail that invited smiles.
Steps
- Select fabric napkins and textile-friendly watercolors or fabric markers.
- Lightly paint a soft watercolor wash on each napkin and let dry.
- Hand-letter names or short phrases over the dried wash with fabric ink.
- Allow ink to set and heat-set according to ink instructions for permanence.
Boho tassel garland banner in soft, warm tones

The garland draped like a casual curtain, tassels swinging gently with a light breeze. Yarn textures varied from fuzzy to smooth, and neutral tones mingled with a few sun-washed accents.
The tassels made a rhythmic whisper as they brushed together, and the cord felt sturdy yet pliant under hand. Hung above the table, the banner added vertical interest and a cozy, handcrafted backdrop.
It gave the space a relaxed, communal aura, like an invitation to linger, chat, and reach for another plate beneath its casual, textured presence.
Steps
- Choose several yarn colors and a sturdy cord as the base.
- Wrap yarn around a small card or tassel maker and bind near the top.
- Cut the bottom loops to form tassels and tie them along the cord at intervals.
- Trim tassel ends evenly for a finished look and hang the garland.
Pressed flower bookmarks with translucent lamination

Bookmarks lay like small botanical stories, slender rectangles that felt smooth and slightly cool. Pressed petals appeared suspended beneath glossy surfaces, each vein and color shift visible like a tiny map.
The bookmarks smelled faintly of paper and resin, and edges had a clean, crisp feel. Sliding one into a book felt like leaving a delicate page marker, a floral memory tucked between chapters.
They read as thoughtful little keepsakes, simple and quiet, often prompting a pause as someone turned one over to admire a dainty blossom trapped inside.
Steps
- Select pressed flowers and sturdy cardstock or bookmark shapes.
- Arrange blossoms on the card and place them between laminating sheets or use clear adhesive film.
- Seal edges and trim excess laminate for neat corners.
- Punch a hole and add a ribbon tassel if desired.
Mini memory jars with handwritten notes inside

The jars looked like tiny time capsules, lids gleaming while slips of paper curled softly within. Notes folded and layered sent hints of laughter and quiet confessions through glass.
The paper edges sometimes peeked out, ink smudges faint where hands had written quickly. A mix of bright patterned papers and plain stationery gave each jar its own voice.
Holding one felt like weighing a handful of memories, and the act of opening a jar later promised a burst of warmth. They made the party feel thoughtful, little containers of shared stories.
Steps
- Collect small glass jars, strips of paper, and pens for guests.
- Invite guests to write short notes, memories, or wishes and fold them.
- Place the folded notes into each jar and seal with a decorative lid.
- Label jars with names or dates for future opening moments.
Embroidered hoop art keepsakes with simple motifs

Tiny hoops held stitched flowers and looping lines that felt slow and deliberate. The fabric offered a smooth canvas, threads catching light at different angles.
My fingers remembered the rhythm as stitches lined up into a motif, and the finished piece read like a small portrait. Colors ranged from quiet neutrals to joyful pops, each hoop framed like a miniature artwork that could sit on a shelf.
The texture of clustered stitches added a tactile topography, inviting closer inspection and lingering admiration from friends who loved the handmade touch.
Steps
- Choose small embroidery hoops, fabric, embroidery floss, and a needle.
- Tighten fabric in the hoop and sketch a simple motif lightly.
- Stitch the design with basic embroidery stitches and secure thread ends.
- Trim excess fabric and finish the hoop edge for display.
Hot chocolate stirrers with chocolate and marshmallow accents

The stirrers looked like tiny dessert wands, sticks topped with glossy chocolate and plush little marshmallows. A faint cocoa scent threaded across the table as they waited for mugs.
The chocolate gleamed and picked up reflections from nearby candles, while marshmallow softness promised a melty thaw when dipped. Presentation mattered: a jar of stirrers made a cheerful centerpiece, and the clink of wood against ceramic felt comforting.
They offered a sweet pause in the evening, a cozy, edible detail that warmed hands and spirits in equal measure.
Steps
- Melt chocolate gently and prepare wooden sticks and mini marshmallows.
- Dip stick ends into melted chocolate and adhere a marshmallow on top.
- Allow chocolate to set and add decorative sprinkles or drizzle if desired.
- Stand stirrers upright in a jar for display and serving with hot drinks.
Paper fan panels for a whimsical photo backdrop

Large paper fans layered together created a playful, textured wall that brightened the corner of the room. The fans rustled faintly when the air moved, paper edges forming soft concentric patterns.
Colors blended from pale blush to vibrant coral, and metallic accents caught light like tiny stars. Standing back, the backdrop read like a handcrafted mural, offering depth and a cheerful focal point for snapshots.
Touching the fans felt papery and fragile, but they held their shape well, turning an ordinary wall into a festive, layered display.
Steps
- Select paper fans in coordinating colors and sizes.
- Arrange fans on a large backing board or directly on the wall to layer.
- Secure each fan with adhesive or tape at the center point.
- Add metallic or ribbon accents to fill gaps and enhance dimension.
Macramé keychains with soft cords and beads

Macramé knots formed tiny patterns that felt knobbly and rhythmic beneath the fingertips. The cords offered a pleasant resistance as they wove together, and beads threaded into the design added little pauses of shine.
The finished keychains had a bohemian wink, a tactile richness in miniature form. Hanging them on a bowl at the door, they created a small chorus of colors and textures.
Each one felt like a tiny tassel of memory, easy to slip into a bag and carry around as a subtle reminder of a warm afternoon shared with friends.
Steps
- Gather macramé cord, small wooden or metallic beads, and keyring hardware.
- Cut cord lengths and fold to attach to the keyring with a lark’s head knot.
- Create a pattern of square or spiral knots, adding beads as desired.
- Trim cord ends and finish with a neat binding or small tassel.
Personalized snack labels and charming table tags
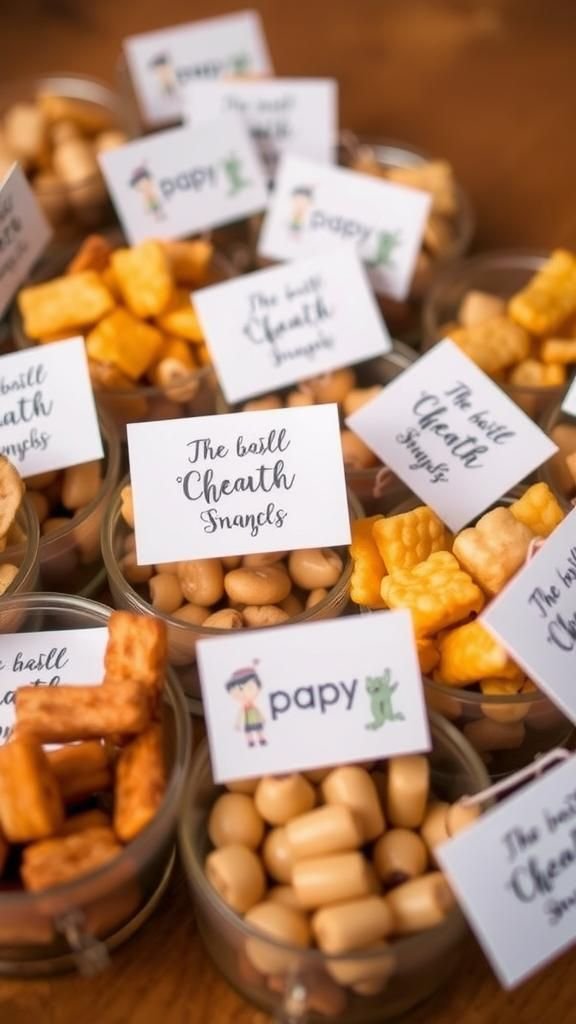
The labels gave the snack table a gentle identity, handwritten names curling across cardstock like tiny invitations. Soft pastels and small illustrations hinted at flavor and mood, while the paper edges felt crisp.
Setting them among bowls and platters made everything feel curated, as if each bite had a personal note attached. Guests paused to read the tags, smiling at cheeky descriptions or pet names.
The act of labeling turned a casual spread into a thoughtful vignette, bringing clarity and a lighthearted tone to the communal table.
Steps
- Choose cardstock or decorative paper and cut to desired tag sizes.
- Write or print snack names and short descriptions on each tag.
- Punch a hole and thread ribbon or tuck tags into small holders.
- Place tags next to corresponding snacks for clear presentation.
Small felt crowns as playful party keepsakes

The crowns felt soft and a little silly in the best way, felt layers stacked with tiny stitches along the edges. Bright thread and small bead accents caught the eye, and the plush material pressed into the palm pleasantly.
Placed on plates as a surprise, the crowns added a playful, celebratory note that made people grin. They had a whimsical, lightweight quality that suited the cheerful tone of the afternoon.
Even when not worn, they functioned as charming decor, tiny emblems of the shared laughter and cheerful camaraderie of the gathering.
Steps
- Trace a crown template onto felt and cut out matching shapes for front and back.
- Stitch the edges together with embroidery thread, adding small beads or accents.
- Leave an opening and add a soft backing for structure, then close the seam.
- Add elastic or ribbon if a wearable option is desired.
Washi tape party favor boxes with playful patterns
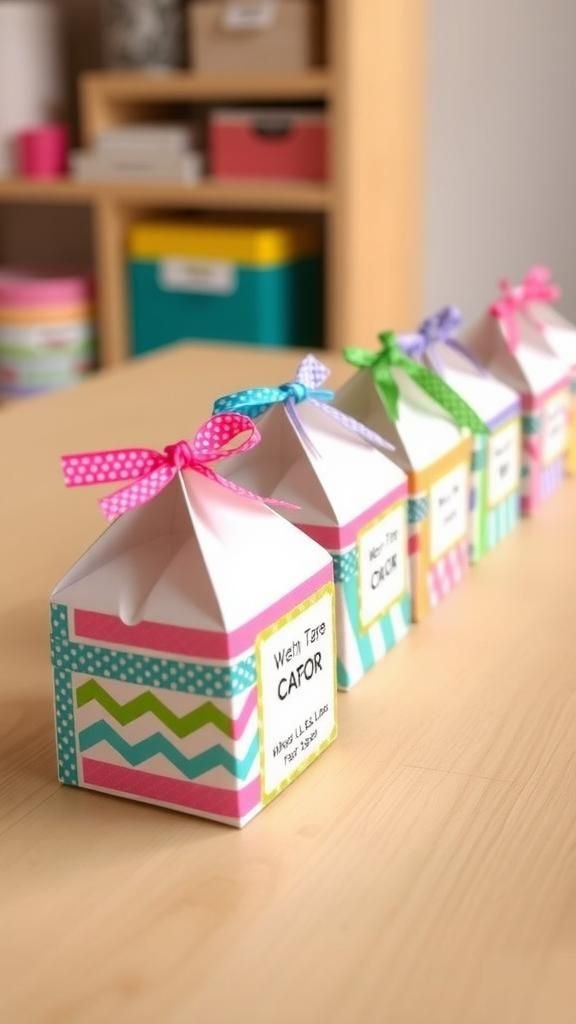
Little boxes wrapped in washi tape looked cheerful and bright, patterns overlapping in happy, slightly chaotic harmony. The tape edges carried a matte finish and peeled a hair when lifted, a sensory detail oddly satisfying.
Each box surface told a different visual story, stripes meeting florals, metallic thread peeking through. Placed in a neat row, the boxes created a colorful border along the table, promising a small surprise inside.
The tactile nature of paper and tape made opening one feel like unwrapping a tiny, thoughtfully constructed present.
Steps
- Assemble small favor boxes from cardstock or purchase plain boxes.
- Decorate each box by layering washi tape patterns across surfaces.
- Seal the boxes and add small tags or stickers for personalization.
- Fill boxes with treats or tiny keepsakes and arrange for guests.
Polaroid display string with tiny wooden clips

Polaroids clipped along a string felt like a casual timeline, glossy snapshots catching light at different angles. The wooden clips were tactile and slightly warm, each holding a frozen laugh or candid glance.
The string sagged gently under the weight, and the photo borders created a rhythmic repetition. Guests paused to scan images, pointing at details and trading behind-the-scene comments.
This display read like a living gallery of the afternoon, a friendly reminder of the gathering’s mood and faces, ready to be revisited long after the cups were cleared.
Steps
- String twine or thin rope across a wall or along a shelf.
- Print or gather Polaroid-style photos and space them along the string.
- Secure each photo with a small wooden clip or mini clothespin.
- Add small decorative lights or paper tags to enhance the display.