
Galentine’s Day Party Crafts bring the sweetest reason to gather with friends. I still remember arranging my first Galentine’s Day crafts night, where glitter trailed across the table and laughter kept the playlist skipping.
From heart garlands to candle favors, these party crafts turn a cozy get-together into a memory worth replaying every year.
This list highlights Galentine’s party crafts that mix pink palettes, playful textures, and pure joy. Whether the plan involves brunch, a movie, or karaoke, Galentine’s Day Party Crafts add charm to every corner, spark easy conversation, and send guests home with keepsakes that outlast the last slice of cake.
Rosy Heart Garland With Velvet Ribbon

A plush garland of felt hearts threaded on velvet ribbon brings a soft, romantic accent to any Galentine’s vignette. Blush, raspberry, and rose-gold tones create a cohesive palette that flatters candlelight and sparkling glassware.
Subtle additions like metallic eyelets or tiny pearls add glints of light without overshadowing the velvet’s sheen. The lightweight nature makes it friendly for apartment ceilings, bookshelves, and dessert carts.
Draped across a mirror or layered over a tulle backdrop, it frames photos beautifully. Wrapped around a bouquet or tucked inside a gift box, the garland doubles as a keepsake long after confetti is swept away.
Steps
- Cut felt into heart shapes in varied sizes and punch small holes near the top of each piece.
- Thread velvet ribbon through the hearts, spacing them evenly and adding small beads between hearts if desired.
- Knot loops on each end for hanging and secure any sliding hearts with discreet dabs of fabric glue.
- Steam the ribbon lightly to relax creases and hang the garland across a mantel, mirror, or backdrop.
Conversation Heart Resin Coasters With Pastel Sprinkles
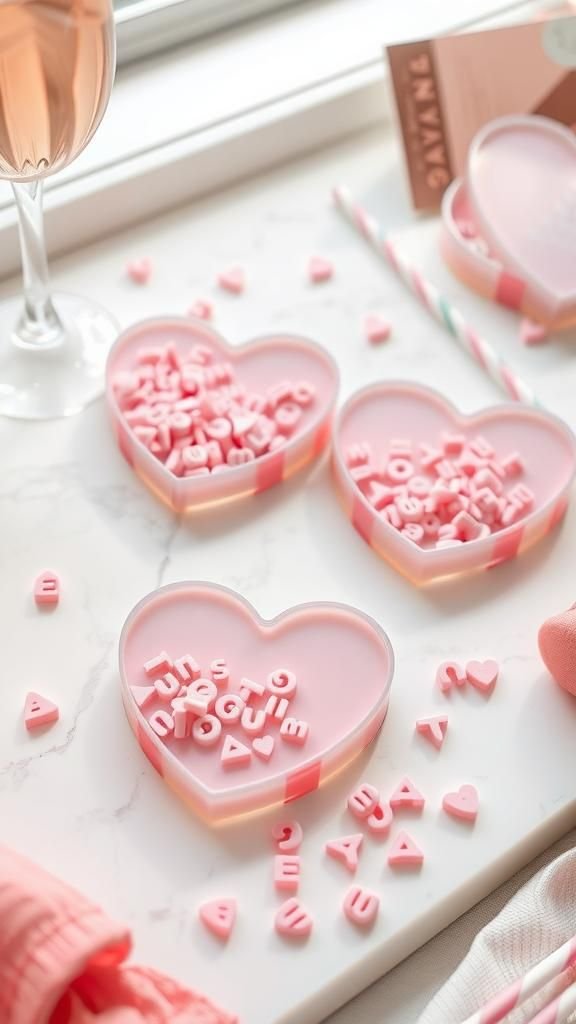
These conversation heart coasters give the candy-jar look a practical twist. Clear resin encases pastel confetti, tiny alphabet beads, and shimmering mica for a glossy finish that echoes hard candy shine.
Shades of cotton candy pink, lilac, mint, and buttercream layer beautifully on a coffee table or bar cart. The smooth surface highlights sparkling stemware and colored straws.
Packaged as a set with a ribbon-tied stack, the coasters become a charming hostess gift. Displayed under tiny bud vases or votives, they play double duty as compact pedestals that brighten small surfaces and add whimsy to any brunch spread.
Steps
- Mix resin and hardener according to instructions, tint portions with pastel mica powders.
- Pour a thin layer into heart-shaped silicone molds and sprinkle in confetti and alphabet beads.
- Top with clear resin to fully encase inclusions and remove bubbles with a heat gun.
- Cure completely, demold, and sand edges lightly; finish with a food-safe resin polish.
Galentine’s Glitter Champagne Flutes With Heart Decals

Sparkly flutes elevate toasts with a playful, celebratory shine. Clear glass stems accented with fine glitter and vinyl heart decals create a chic balance of shimmer and simplicity.
Rose-gold, blush, and iridescent finishes pair well with rosé or sparkling mocktails, while satin ribbons around the stems mark each guest’s glass. Arranged in a row on a mirrored tray, the flutes reflect candlelight and party lights beautifully.
Wrapped in tissue and tied with tags, a set becomes a thoughtful gift. Coordinated decals on pitchers and ice buckets carry the theme through the beverage station with cohesive charm.
Steps
- Clean glass flutes with alcohol and apply heart-shaped vinyl decals to bowls or stems.
- Brush a thin layer of dishwasher-safe glitter glue on selected areas and sprinkle fine glitter.
- Tap off excess glitter, let dry, and seal with a clear topcoat recommended for glass.
- Cure fully per product directions before filling glasses for the celebration.
Pink Ombré Balloon Cloud With Tassels
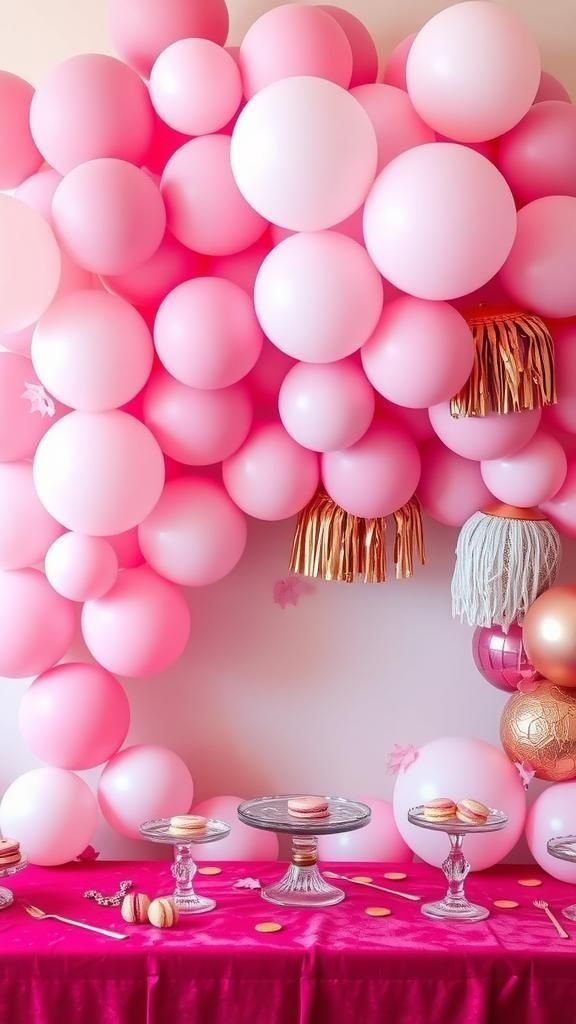
A sculptural balloon cloud drifts above the party, blending pale blush through hot pink for a dreamy ombré. Matte, pearl, and confetti-filled balloons bring texture, while tissue tassels and metallic fringe twinkle among the curves.
The floating shape frames a dessert table or photo corner and partners beautifully with velvet table runners, acrylic risers, and glass cake domes. Soft gradient hues flatter every backdrop, whether crisp white walls or floral wallpaper.
When the gathering winds down, mini balloon bundles with tassel tails make sweet favors that echo the larger display and keep the mood floating.
Steps
- Inflate balloons in assorted sizes and colors across a pink ombré palette.
- Build clusters with balloon tape or glue dots, forming an airy cloud shape.
- Add tissue tassels, metallic fringe, and a few confetti balloons for sparkle.
- Secure to a backdrop stand or wall with removable hooks and adjust fullness.
Love Letter Banner With Wax Seals
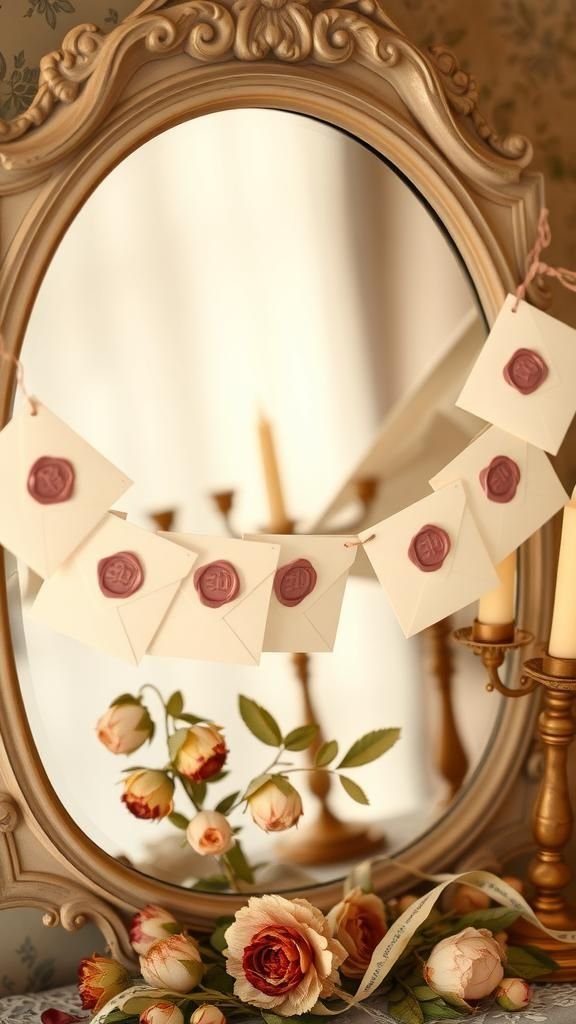
Vintage romance meets modern party style in a love letter banner composed of mini envelopes and script cards. Creamy cardstock, deckled edges, and blush ink create a stationery boutique vibe.
Each envelope carries a wax seal stamped with hearts or initials, lending heirloom charm. The banner drapes elegantly across a bar cart or bookshelf and pairs with brass candleholders, lace trims, and pressed flowers.
Cards can feature compliments or friendship quotes that guests enjoy reading throughout the evening. Packaged in a keepsake tin after the party, the set transforms into a memory box ready for future gatherings.
Steps
- Cut cardstock into mini cards and write short friendship notes in blush ink.
- Fold envelopes, insert cards, and melt sealing wax to stamp each flap.
- Punch holes at the envelope corners and string onto twine or silk cord.
- Space evenly and secure knots at the ends for hanging.
Floral Ice Bucket With Edible Petals

A floral ice bucket turns the drink station into a garden moment. Clear ice embedded with edible petals, citrus slices, and tiny herb sprigs creates a frozen bouquet around a chilled bottle of rosé.
The translucent textures catch light, making the bar sparkle. Color options range from fuchsia rose petals and pansies to pale marigold and mint, coordinating with napkins or straw toppers.
Rested on a marble platter, it complements crystal glassware and a mirrored tray. When the bottle emerges, the melting floral sculpture becomes a photogenic centerpiece that draws guests in with fragrant hints of citrus and blooms.
Steps
- Nest a smaller container inside a larger one and weight it to create a gap.
- Layer edible petals, thin citrus slices, and herbs in the gap; fill with water.
- Freeze in stages to suspend florals evenly; top up water as needed.
- Remove containers under cool water to release the floral ice bucket.
Friendship Bracelet Favor Station In Candy Colors

A bracelet bar brings nostalgia to the table with bright cords, alphabet beads, and glass seed beads in candy shades. Trays of color-sorted beads create a boutique display, while velvet ring cones and ceramic dishes elevate the presentation.
The palette can skew pastel or neon, matching balloons and napkins for a cohesive scene. Finished bracelets tie onto mini heart cards for gifting, and extras slip into organza bags for an easy takeaway.
The station sits nicely near a photo booth, encouraging mingling and playful stylistic choices that reflect each friend’s vibe and inside jokes.
Steps
- Arrange cords, alphabet beads, and seed beads in small dishes or trays.
- Measure wrist sizes and cut cord lengths with wiggle room for knots.
- String beads to create names, initials, or heart patterns, adding spacers for balance.
- Knot securely, dab a drop of clear-drying glue, and slide knots under a bead.
Heart-Shaped Waffle Bar Signage And Labels
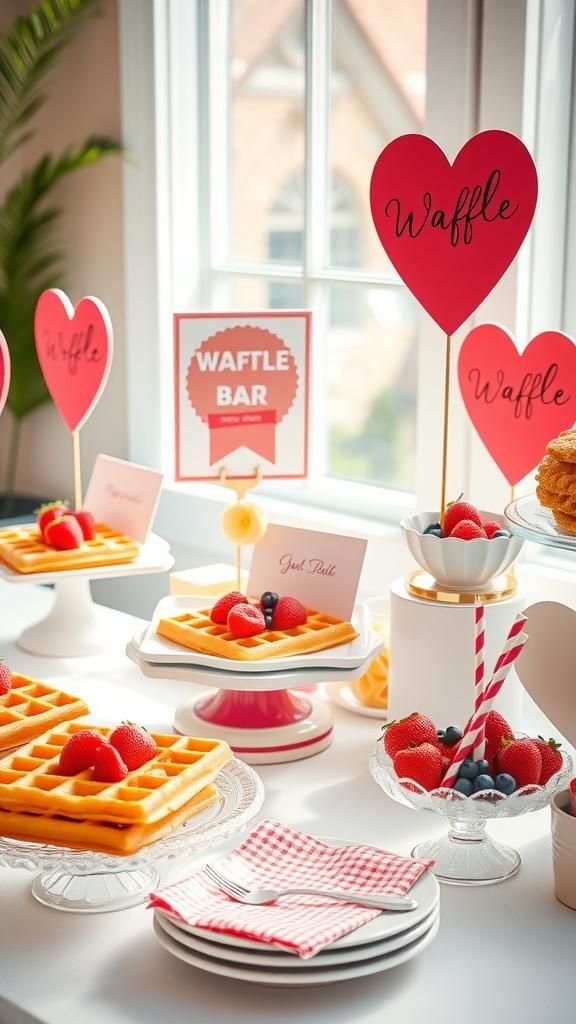
A breakfast-for-dinner spread gains polish with coordinated signage. Heart-shaped toppers, tent cards, and a menu board in strawberry pink and buttercream hues guide guests through toppings like berries, whipped cream, and syrup infusions.
Cardstock with subtle linen texture and gold-foil accents introduces a diner-meets-parlor flair. Displayed in acrylic stands, the set complements ceramic platters and checkered napkins.
Labels travel from the waffle bar to the mimosa station, tying the look together with striped straws and gingham ribbons. Packaged afterward in a slim envelope, the signage becomes a reusable kit for future brunch moments.
Steps
- Design simple heart icons and text in a cohesive font pair and color palette.
- Print on heavyweight textured cardstock and trim cleanly with a craft knife.
- Add gold-foil stickers or washi tape borders for subtle shine.
- Place cards in acrylic holders and mount the menu board on an easel.
Scented Soy Candle Teacup Favors With Roses

Vintage teacups filled with soy wax turn the favor table into a fragrant tea party. Floral china patterns, gold rims, and pastel saucers mingle with scents like rosewater, vanilla, and citrus blossom.
The creamy wax surface looks elegant with dried rosebuds or mica sparkle, while ribbon-tied safety matches complete the set. Arranged in a tiered tray or shadow box, the collection becomes a focal point near the guest book.
Wrapped in tissue and nestled in boxes, each teacup favor brings the memory home and serves as a charming accent on vanities and desks.
Steps
- Wick clean teacups using adhesive tabs and center with wick holders.
- Melt soy wax to recommended temperature and stir in fragrance oil.
- Pour carefully into cups, add a few dried petals on top, and let set.
- Trim wicks, attach warning labels, and pair with ribbon-tied matchbooks.
Lip Print Napkin Rings From Clay
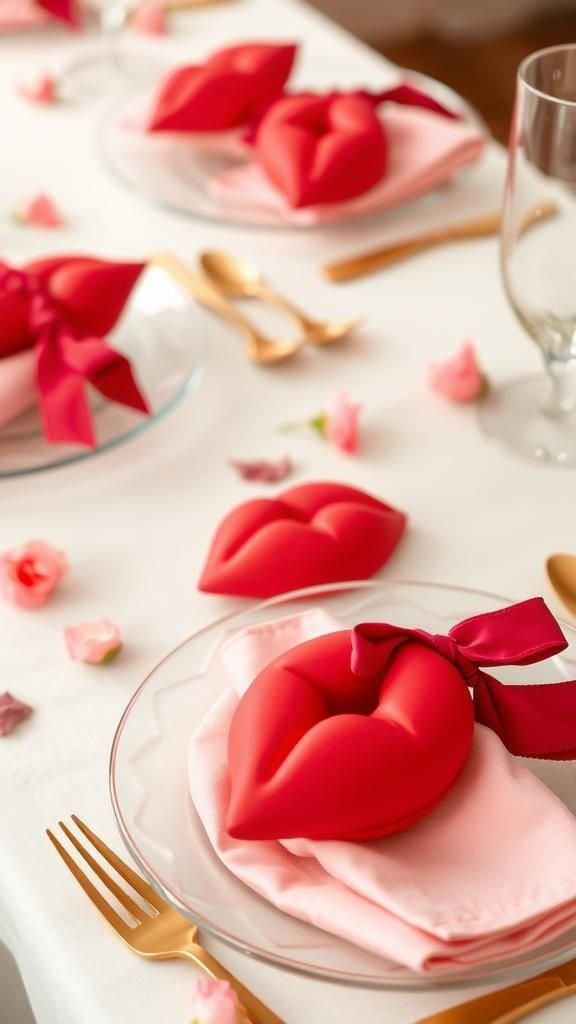
Whimsical napkin rings shaped like kissy lips add a flirty accent to place settings. Air-dry clay forms smooth, sculptural shapes that echo pop-art motifs, while shades of cherry, fuchsia, and coral bring punchy color.
A satin or velvet ribbon threaded through creates a comfortable wrap around linen napkins. The bold silhouette pairs with clear glass chargers, gold flatware, and heart-dotted plates.
Grouped in a small dish, the rings also serve as playful photo props. After the party, they store neatly in a keepsake pouch, ready to reappear for anniversaries or movie nights with the same cheeky charm.
Steps
- Condition air-dry clay and cut into lip shapes; pierce a ribbon channel.
- Smooth edges with water, texture lightly with a sculpting tool, and let dry fully.
- Prime and paint in lipstick-inspired shades; add a gloss sealer.
- Thread ribbon through each ring and tie around folded napkins.
Blush And Gold Table Runner With Metallic Accents
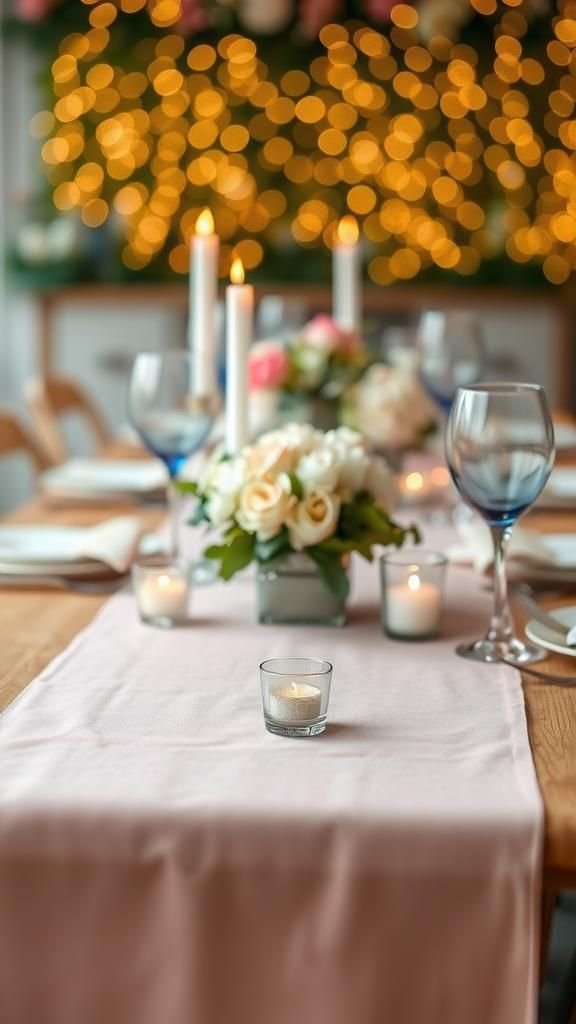
A soft blush runner with metallic moments anchors the tablescape with gentle glamour. Linen or cotton fabric presents a tactile base, while gold flecks, stitched stars, or foil-speckled tulle overlay introduces sparkle that catches candle flames.
The muted pink tone complements white plates and colored glass goblets, with scalloped edges adding a romantic note. Styled across wood, marble, or lacquered tabletops, the runner frames mini arrangements of peonies, carnations, and baby’s breath.
Rolled and tied with satin ribbon, it becomes a thoughtful gift for the host, ready to reappear at brunches and book clubs alike.
Steps
- Cut a length of blush linen to desired size and hem the edges.
- Layer a strip of foil-speckled tulle down the center and pin in place.
- Stitch or fabric-glue the overlay at intervals, leaving airy movement.
- Press lightly with a warm iron and style with candles and florals.
Photo Booth Prop Set In Candy Colors
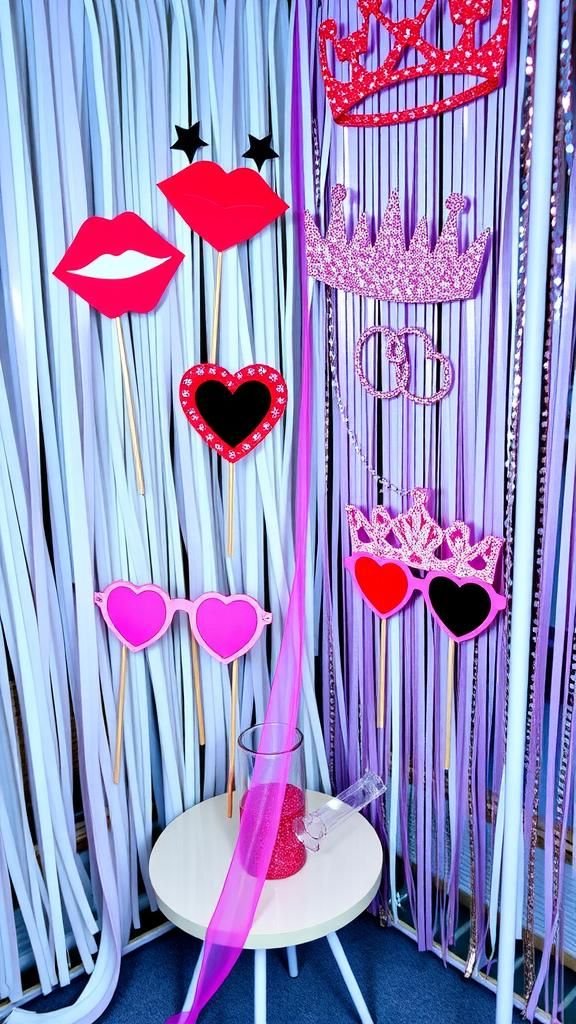
A prop kit brims with oversized lips, heart sunglasses, glitter crowns, and playful slogans that spark easy snapshots. Cardstock in sherbet hues and iridescent glitter board creates a vibrant palette that pops against neutral backdrops.
Clear acrylic sticks keep the look clean for photos, while a hatbox or acrylic organizer transforms storage into décor. Coordinated backdrops like sequin curtains, paper fans, or fringe match the props for a put-together corner.
After the party, the set packs into a labeled box as a reusable photo kit that travels to birthdays and showers without losing its festive flair.
Steps
- Print or trace prop shapes onto heavyweight cardstock and glitter board.
- Cut cleanly with a craft knife and reinforce edges with laminating sheets.
- Attach clear acrylic sticks or wooden dowels with strong adhesive.
- Arrange props in a decorative holder beside the photo backdrop.
Rosé Gummy Bear Skewer Centerpieces In Glass

Playful yet chic, rosé gummy bears threaded on cocktail picks stack into petite towers inside coupe glasses. The translucent candies gleam like jewels, catching light across shades of petal pink and peach.
Grouped in trios on mirrored trays, the skewers become edible décor for sweets tables and bar carts. Accents such as edible glitter and citrus twists layer extra sparkle and fragrance.
With ribbon-tied tags, each glass doubles as a small gift for guests to take home. The presentation pairs nicely with macarons, meringues, and white ceramic stands for a confectioner’s boutique vibe.
Steps
- Slide rosé gummy bears onto cocktail picks or short skewers.
- Fill coupe glasses with a few loose gummies and stand skewers upright.
- Sprinkle a touch of edible glitter and tuck in tiny citrus twists.
- Arrange glasses on a mirrored tray alongside macarons and flowers.
Sparkly Heart Piñata Mini Favors With Fringe

Mini heart piñatas deliver burst-of-confetti fun at table settings. Cardboard forms, layered tissue fringe, and a touch of metallic foil create a lively texture that photographs wonderfully.
The color story can run from cotton-candy gradients to ruby and magenta, matching balloons and napkins. Each heart hides tiny treats like wrapped candies, stickers, or friendship notes.
Lined up on a mantle or stacked in a clear apothecary jar, they become a captivating display until party time. With name tags tied to the loops, the piñatas double as place cards and parting gifts that keep spirits high.
Steps
- Cut heart shapes from lightweight cardboard and create a shallow box form.
- Tape edges together and add a small flap for filling.
- Layer tissue fringe strips around the form, alternating colors for depth.
- Fill with confetti and treats, close the flap, and add a hanging loop.
Lace-Edged Paper Envelope Pockets For Treats
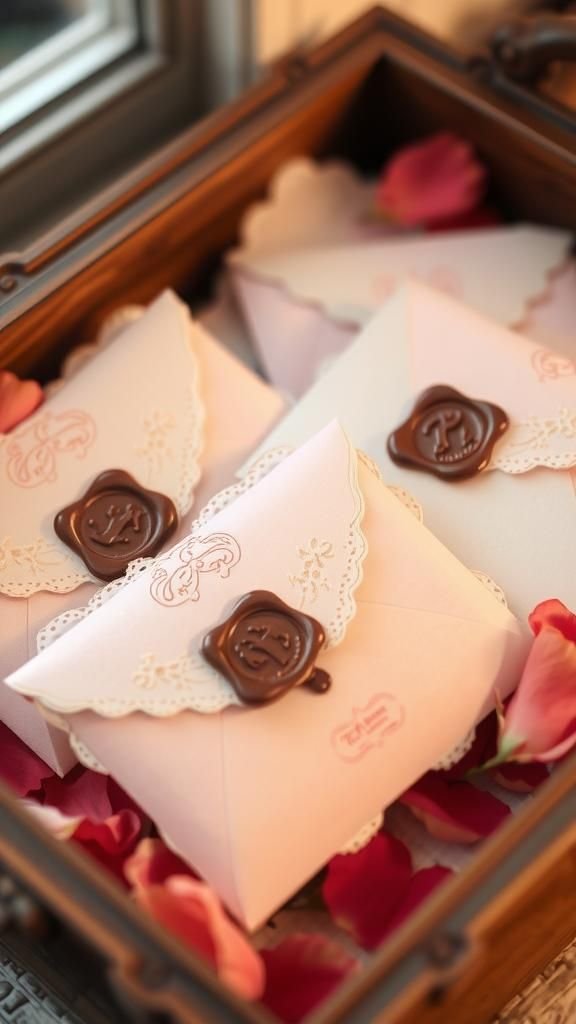
Delicate paper envelopes with lace-trimmed edges cradle tea sachets, chocolates, or tiny notes. Textured cardstock, doilies, and vellum windows create layers that feel romantic and light.
Soft palettes of ivory, blush, and dusty rose pair with wax seals or tiny bow stickers for a finishing flourish. Set in a wooden tray or vintage letter sorter, the pockets invite guests to browse and pick a surprise.
They complement floral centerpieces and candlelit tables, and store flat for easy keepsakes. Tucked into purses or placed on pillows, the envelopes extend the celebration beyond the last toast.
Steps
- Cut cardstock into envelope templates and score fold lines.
- Layer paper doilies or lace trims along the flap and edges.
- Adhere sides with double-sided tape, leaving room for a vellum window if desired.
- Seal filled envelopes with a wax seal or sticker and label with a tiny tag.
Pressed Flower Place Cards On Watercolor Wash

Place cards become miniature artworks with a dreamy watercolor base and pressed flowers sealed on top. Soft washes in petal pink, lilac, and coral set a gentle tone, while tiny blossoms like violas and baby’s breath add botanical charm.
Deckled edges and calligraphy elevate the look for a refined yet playful table. Paired with linen napkins and gold-rimmed plates, each card anchors a seat while doubling as a bookmark favor afterward.
Displayed upright in small wood holders or tucked into napkin folds, the cards bring an artisan touch that feels personal and photo-ready.
Steps
- Brush watercolor washes on heavy cardstock and let dry completely.
- Tear edges for a deckled effect and write names in flowing ink.
- Arrange pressed flowers and seal with matte decoupage or clear-drying glue.
- Clamp under a heavy book for a few hours to ensure a flat finish.
Heart Confetti Popper Bottles With Ribbons

Mini popper bottles stuffed with heart confetti deliver a burst of sparkle at party peaks. Clear plastic containers show off a mix of tissue, mylar, and iridescent shapes in shades of pink and rose-gold.
Satin ribbons and printed labels personalize each piece, turning them into favors and photo-worthy accents on plates. Arranged in a vintage soda crate or acrylic riser, they make a cheerful focal point near the entrance.
After the celebration, empty bottles become tiny storage for beads or notes, extending their life beyond a single evening and keeping memories close.
Steps
- Punch heart confetti from tissue and mylar, mixing sizes and finishes.
- Fill clear popper bottles and cap securely, leaving space for pressure.
- Tie satin ribbons around the neck and add printed labels or names.
- Stage on a tray for guests to grab during toasts or countdown moments.
Velvet Scrunchie Gift Bar With Tags
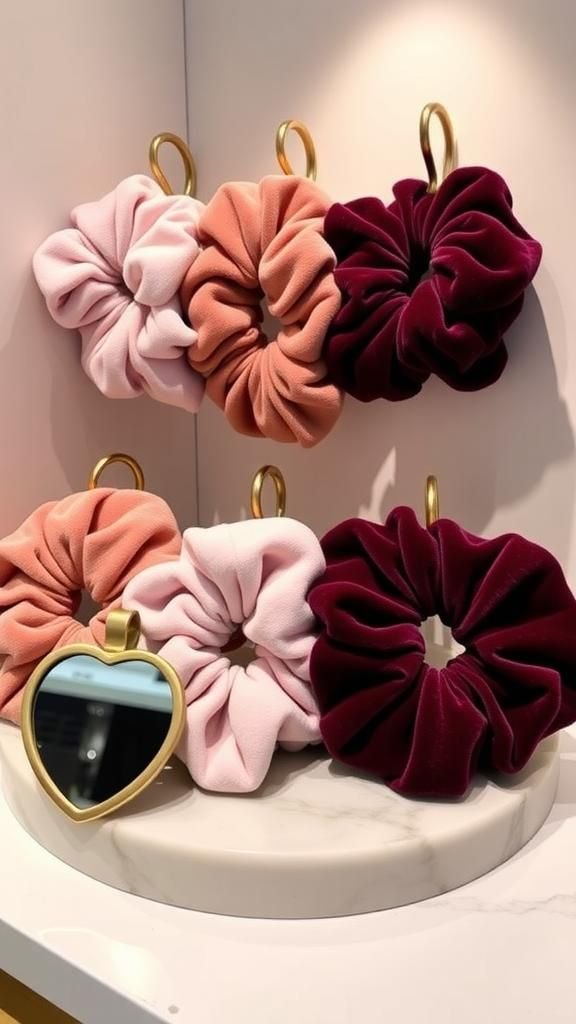
A velvet scrunchie bar offers cozy texture in jewel and pastel tones. Displayed on brass hooks, ceramic hands, or a marble tray, the scrunchies look like candies in a boutique window.
Shades of rose, mauve, and burgundy pair with metallic thread highlights or tiny charms for a luxe feel. Heart-shaped tags with playful sayings personalize each pick, and a small mirror nearby invites quick styling checks.
Packed in little fabric pouches, the scrunchies become a wearable favor that reappears on gym days and coffee runs, extending the party’s warmth into everyday routines.
Steps
- Sew velvet strips into tubes, thread elastic through, and knot securely.
- Close openings with invisible ladder stitches and fluff gathers evenly.
- Create heart-shaped tags and tie them on with narrow satin ribbon.
- Arrange scrunchies by color on a tray or hanging rack for selection.
Cupid’s Arrow Straw Toppers In Glitter Card
![]()
Playful arrow toppers slip onto paper straws to mark drinks with a wink. Glitter cardstock in rose-gold, hot pink, and iridescent tones transforms simple straws into instant party accents.
Heart-shaped arrowheads and feathered tails carry a retro-Valentine vibe that photographs beautifully in glassware. Organized in a small caddy by color, they complement matching drink charms and stir sticks.
Afterward, the toppers tuck into memory boxes or get repurposed as gift tags. Mixed with striped and polka-dot straws, the set ties the beverage station together in a cohesive, lighthearted way.
Steps
- Cut arrowheads and tails from glitter cardstock and punch a small center slit.
- Slide pieces onto paper straws to sandwich the straw between shapes.
- Secure with a tiny dot of clear glue and let dry fully.
- Arrange in a straw holder near the drink station for easy pick-up.
Mini Macaron Tower Display Stand With Hearts
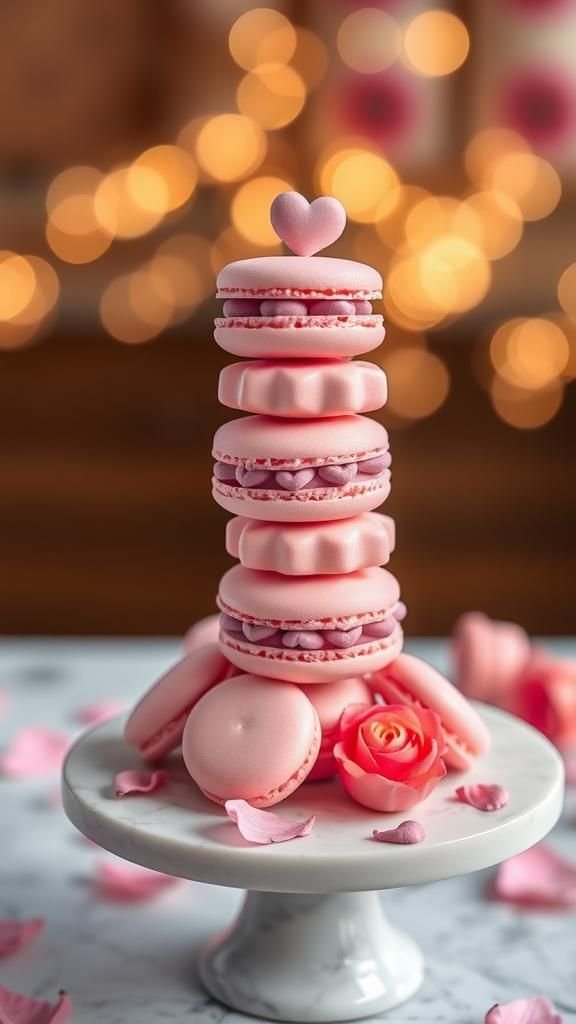
A petite tower tiered with macarons becomes a confectionary sculpture at the sweets table. White or blush styrofoam cones dressed in ribbon, lace, or edible gold leaf set a refined tone.
Macarons in strawberry, raspberry, and vanilla hues create a delightful gradient, with tiny sugar hearts tucked between rows. Displayed on a mirrored pedestal or marble cake stand, the tower invites photos and gentle swoons.
Coordinating favor boxes nearby carry a few macarons home. After the last bite, the stand cleans up and stores easily, ready to showcase truffles or cookies at future gatherings.
Steps
- Cover a styrofoam cone with satin ribbon or lace, securing ends neatly.
- Attach macaron shells with small dabs of royal icing in staggered rows.
- Press tiny sugar hearts between gaps and dust with edible shimmer.
- Set the tower on a pedestal stand and surround with rose petals.
Rosewater Sugar Scrub Jar Gifts With Labels
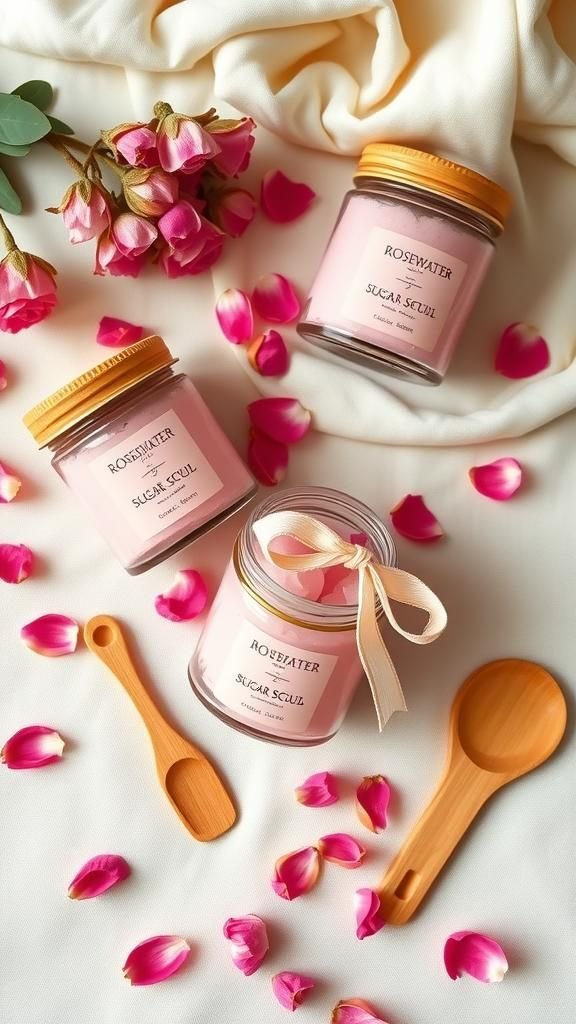
Spa-worthy sugar scrub jars bring self-care energy to the favor table. A blend of fine sugar, sweet almond oil, and rosewater creates a soft, fragrant texture that feels indulgent without heaviness.
Dried petals and a whisper of mica add visual romance, while glass jars with bamboo lids and blush labels look chic on vanities. Arranged in a wooden crate or wire basket with a satin bow, the set reads boutique-ready.
Coordinated spoons and hang tags finish the look. After the party, the jars continue the celebration during unwind moments at home.
Steps
- Combine granulated sugar with lightweight oil and rosewater until scoopable.
- Stir in a few dried rose petals and cosmetic-grade mica if desired.
- Spoon into clean glass jars, wipe rims, and twist on lids tightly.
- Apply blush labels, tie mini spoons with ribbon, and display in a crate.