
I always look forward to the quiet ritual of making Hanukkah Paper Craft Decorations with family. There’s a small joy in the crinkle of cardstock, the shimmer of metallic paper, and the way blue and white catch the light across the table.
Memories of my grandmother’s tiny paper stars still make me smile.
This collection of Hanukkah Paper Craft Decorations grew out of those evenings. Each idea feels like a little celebration: tactile, bright, and easy to share around the table while the menorah casts a warm glow.
Folded Star of David garland for cozy corners
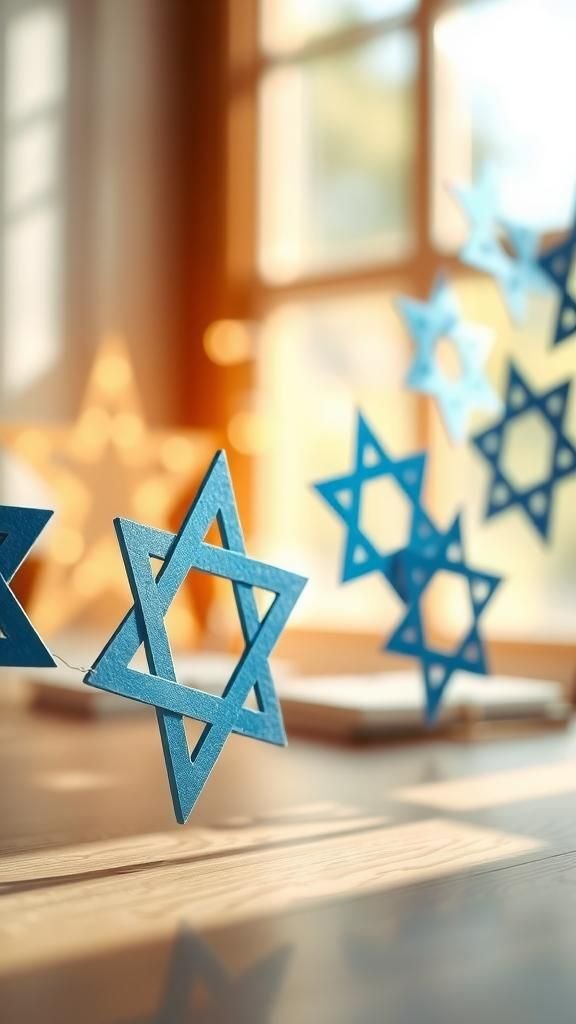
I have a soft spot for the folded Star of David garland that hung in my childhood kitchen. The stars sit crisp against each other, the paper edges catching light in a way that feels both delicate and lively.
I remember the tiny rustle when a breeze from an open window nudged one, and the mix of glossy blue and matte white gave every star a slightly different personality. It felt comforting to see the line of stars from the doorway, like a quiet promise of celebration.
Steps
- Select two contrasting sheets of lightweight cardstock and trace a six-point star template onto each.
- Snip along the outline and crease each star along its central axes to create gentle dimensional lines.
- Layer paired stars with their centers offset and adhere their middles so edges flare outward.
- Thread a slim ribbon through small punched holes along the top points to form a hanging chain.
Paper dreidel mobile that quietly spins
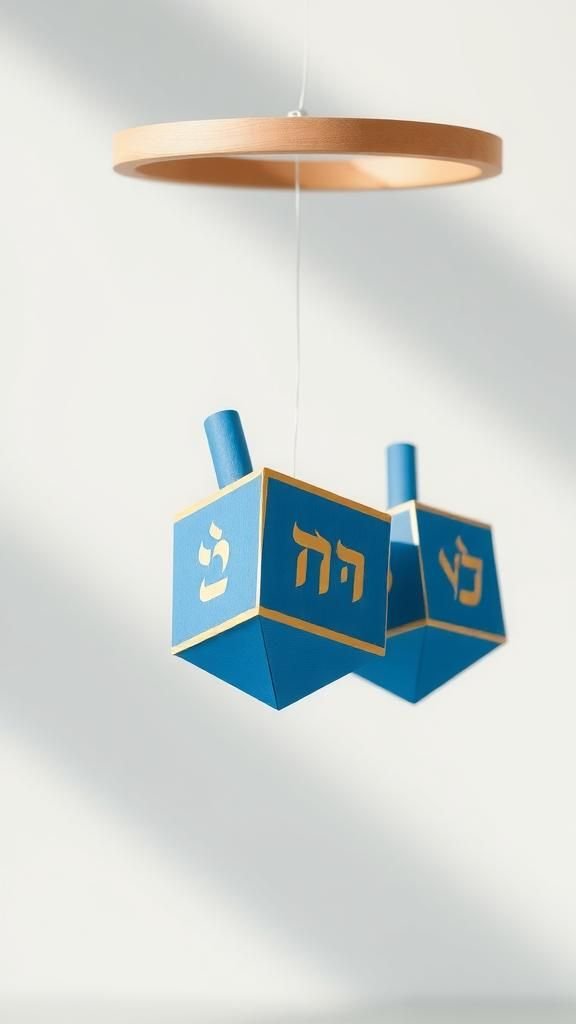
A floating dreidel mobile brings a bit of wonder when it drifts above the dining table. The paper dreidels hang at slightly different heights, catching the air and turning lazily, creating tiny flashes of cobalt and gold.
I remember watching one spin and pause when the heater hummed; the motion felt meditative. The little symbols printed on each face peek out as they rotate, lending a playful rhythm to the room and inviting a smile from anyone passing underneath.
Steps
- Prepare cardstock squares and score gentle diagonals to form four-faced dreidel shapes.
- Cut and create tabs that allow each face to meet at the top while preserving a hollow center.
- Print or draw traditional dreidel letters on each panel before closing the top seam.
- Suspend dreidels from varied lengths of thread and balance them on a circular hoop to craft a mobile.
Layered paper menorah centerpiece for the table
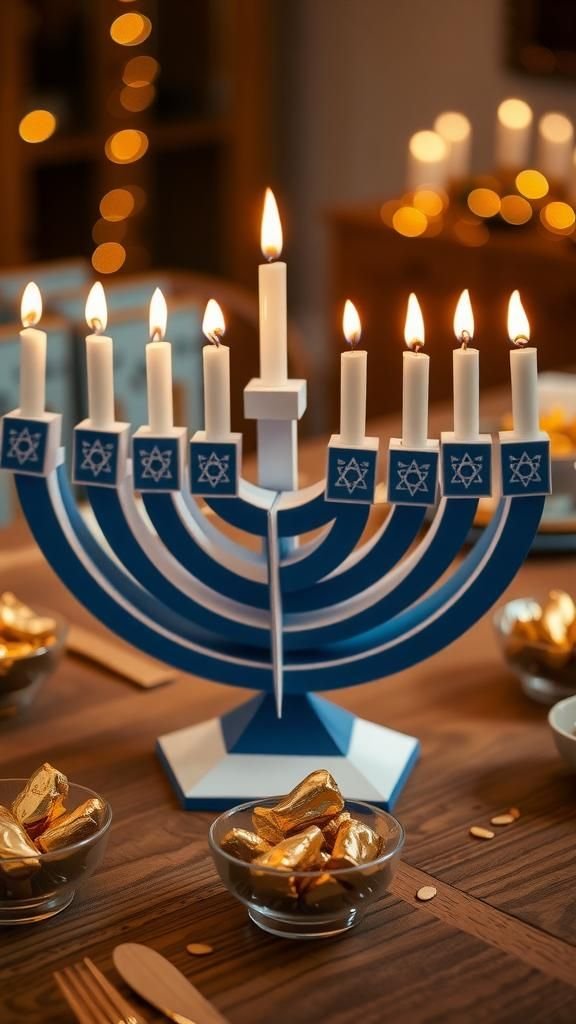
The layered paper menorah centerpiece I made felt unexpectedly ceremonial despite its simple materials. Each candle layer lifts subtly off the base, so the menorah reads like a low relief sculpture when lit by nearby candles.
The paper flame edges have a warm translucence that plays with the real candlelight. Sitting it among clay bowls of gelt and a small vase made the whole arrangement feel both handmade and intentional, and guests kept leaning in for a closer look at the layered details.
Steps
- Trace a menorah silhouette onto heavy cardstock and cut multiple identical pieces for depth.
- Create narrow spacers from folded strips and join them between silhouette layers to build relief.
- Add thin translucent paper flames atop each candle shaft to catch nearby light.
- Place the finished piece on a low tray with small votives and seasonal accents to complete the centerpiece.
Paper luminary lanterns glowing on a windowsill
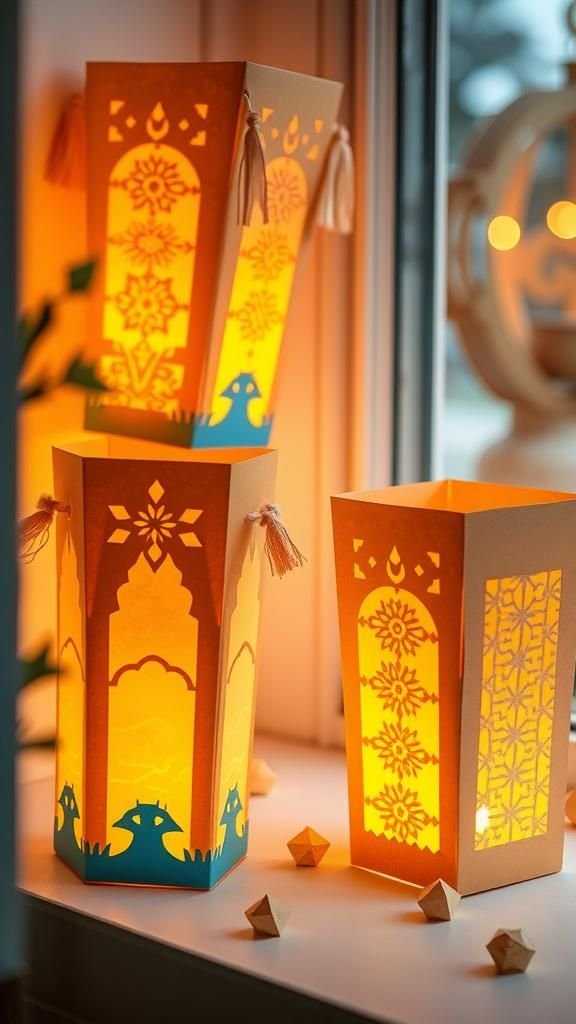
Paper luminary lanterns create a warm border along a windowsill that feels both festive and intimate. The lanterns cast patterned light through cutouts, and I love how the shadows trace across the sill when evening falls.
There’s a tactile pleasure in the tiny tabs and gentle ridges along the paper, and the glow through vellum feels cozy without overpowering the room. I used metallic paper sparingly so the light would shimmer rather than glare, making the display calming to look at after a busy day.
Steps
- Cut rectangular panels of cardstock and add decorative cutouts using a craft blade for patterned light.
- Back each panel with translucent vellum to diffuse candle glow and secure side seams to form lantern tubes.
- Create a stable base for each tube from folded cardstock to allow placing flameless candles inside.
- Arrange the lanterns along a windowsill with even spacing for a soft woven glow after dusk.
Tassel garland in blue and white, playful texture
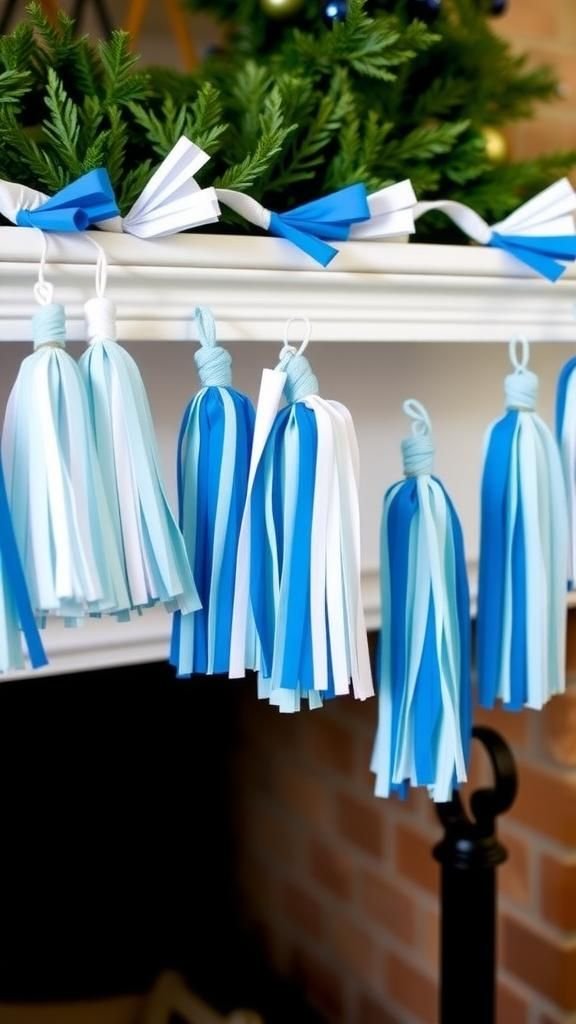
There’s something lively about a tassel garland where every fringe moves softly with the air. The blue and white tassels create a rhythm across the mantle, and their paper fibers have a slightly papery rustle when someone walks by.
I remember laughing as a curious cat batted at one and the little cascade of fringes fanned out like a tiny waterfall. The combination of crinkled tissue and stiffer cardstock knots gave the garland a mix of structure and bounce that felt festive without being fussy.
Steps
- Stack thin sheets of tissue paper in alternating blues and whites and snip narrow vertical fringes across the width.
- Roll the stacked fringed sheets lengthwise and form a tight loop at one end to create each tassel head.
- Secure the looped end with thin twine and gently pull fringes apart for volume.
- Slide tassels along a thicker cord at even intervals to craft a flowing garland.
Dreidel-themed gift tags with playful flair

I enjoy how small paper gift tags with dreidel motifs instantly lift a wrapped package. They sit lightly on top, fluttering when a ribbon is tied underneath, and the textures of embossed paper catch light differently from flat prints.
One year I tucked a tiny vellum window in each tag, and the little shimmer from inside felt like a hidden wink. Friends told me they saved those tags as little keepsakes, which made me love the idea of small handmade extras even more.
Steps
- Cut tag shapes from sturdy cardstock and punch a hole near the top edge for threading.
- Stamp or print tiny dreidel motifs and enhance them with metallic ink or foil accents.
- Layer a translucent vellum rectangle over the design for a soft glow effect.
- Thread thin ribbon through the tags and tuck them beneath package bows for a final touch.
Menorah candle sleeves made from patterned paper
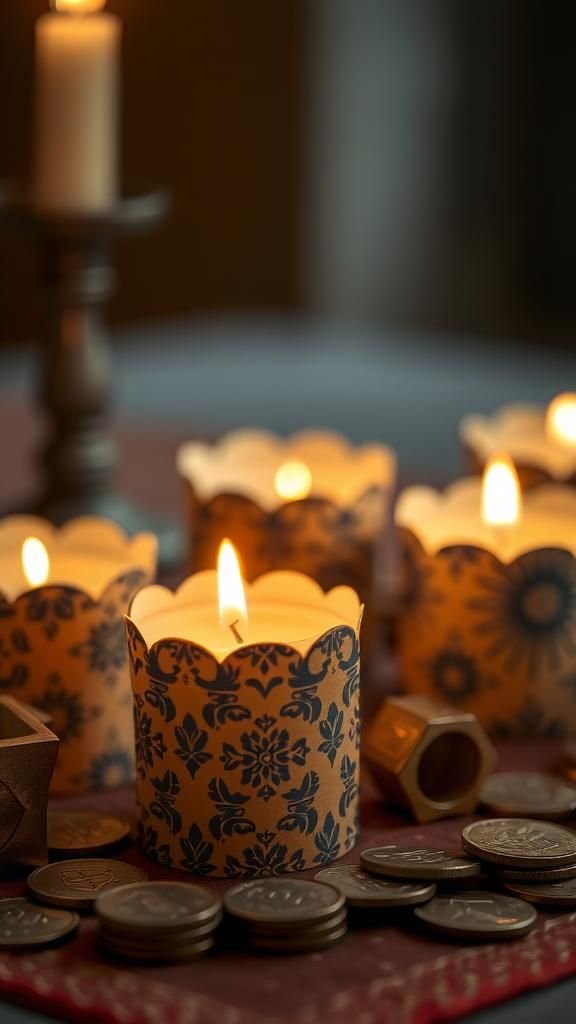
Paper candle sleeves slipped around the base of candles created a cozy, coordinated look across my dinner table. The patterned papers introduced tiny stories — one had repeated menorah silhouettes, another soft geometric blues — and together they felt like a miniature fabric festival.
When the candlelight touched the sleeves, the patterns softened and the colors warmed, giving the whole arrangement a gentle glow. Guests commented on the small, handcrafted detail, and I liked that the sleeves felt decorative without competing with the real flames.
Steps
- Measure the circumference of each candle and cut a matching paper rectangle with matching height.
- Add delicate pattern elements or small cutouts to the paper before joining the short edges.
- Overlap the paper ends slightly and bond them so each sleeve forms a neat cylinder that wraps the candle base.
- Slide sleeves onto candles and arrange on low holders to highlight the patterned glow.
Window silhouettes casting gentle holiday shadows
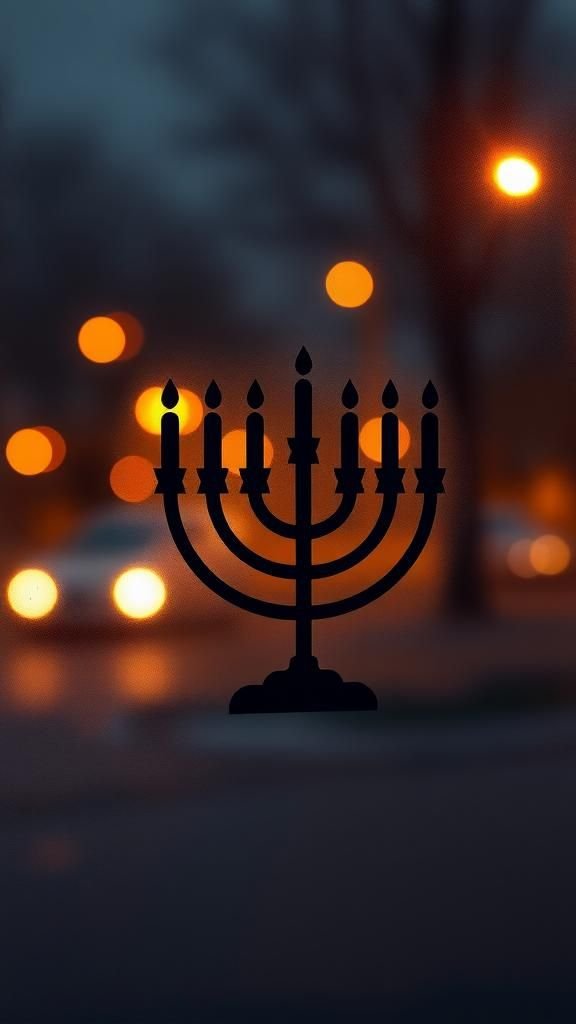
Paper window silhouettes felt like tiny theater pieces against the glass, casting delicate shadows across the room when streetlights came on. I loved how the Star of David and menorah shapes simplified into elegant cutouts, and the contrast of dark silhouettes against evening light felt quietly dramatic.
The crispness of the edges and the slight halo of reflected light around each shape made the window feel dressed without clutter. On cold nights, seeing those silhouettes from the street felt like a small beacon of warmth.
Steps
- Choose heavyweight black paper and trace minimalist silhouettes of holiday motifs onto it.
- Carefully snip along the outlines to produce clean, sharp shapes for the window.
- Position each silhouette against the glass and secure with small dots of removable adhesive at the corners.
- Step back in low light to enjoy the soft shadow play and subtle halo around each cutout.
Confetti dreidels for a playful tabletop scatter
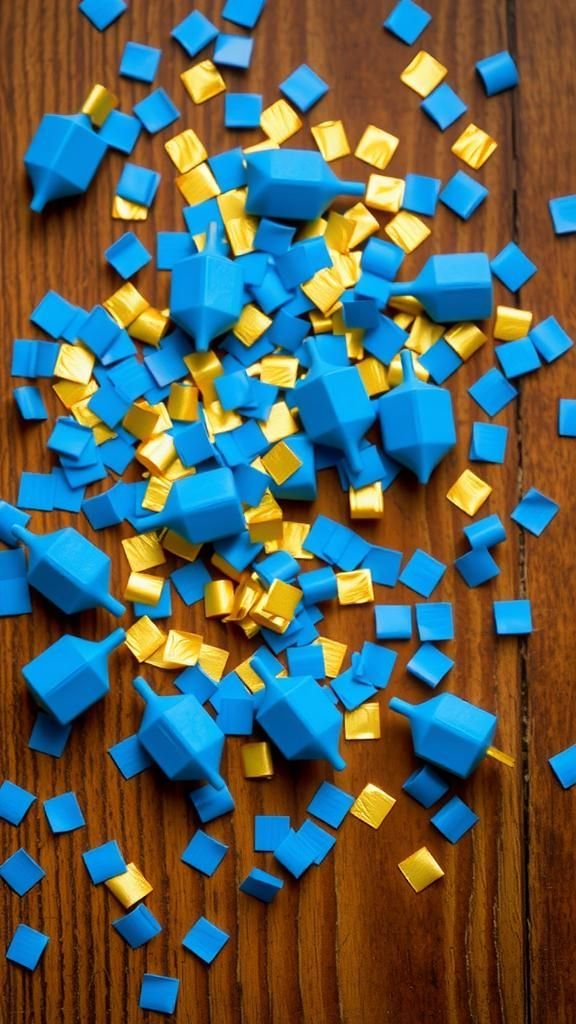
Tiny dreidel confetti scattered across a table feels unexpectedly joyous, like a mini celebration in miniature. The small pieces catch the light at different angles, and their crisp surfaces add a lively sparkle when guests reach for plates.
I recall the tiny metallic blue chips slipping between napkin folds and the way they moved when someone leaned forward. It was a small detail, but it made the table feel instantly festive and a bit mischievous, inviting laughter when a handful went drifting to the floor.
Steps
- Prepare a mix of thin metallic and matte paper in holiday colors and punch out small dreidel shapes.
- Collect confetti in a shallow bowl or sprinkle lightly along the center of the table surface.
- Mix in small foil circles for extra shimmer and scatter evenly for a playful spread.
- Keep a small brush nearby to corral stray pieces after the celebration.
Pop-up Star of David cards that feel personal
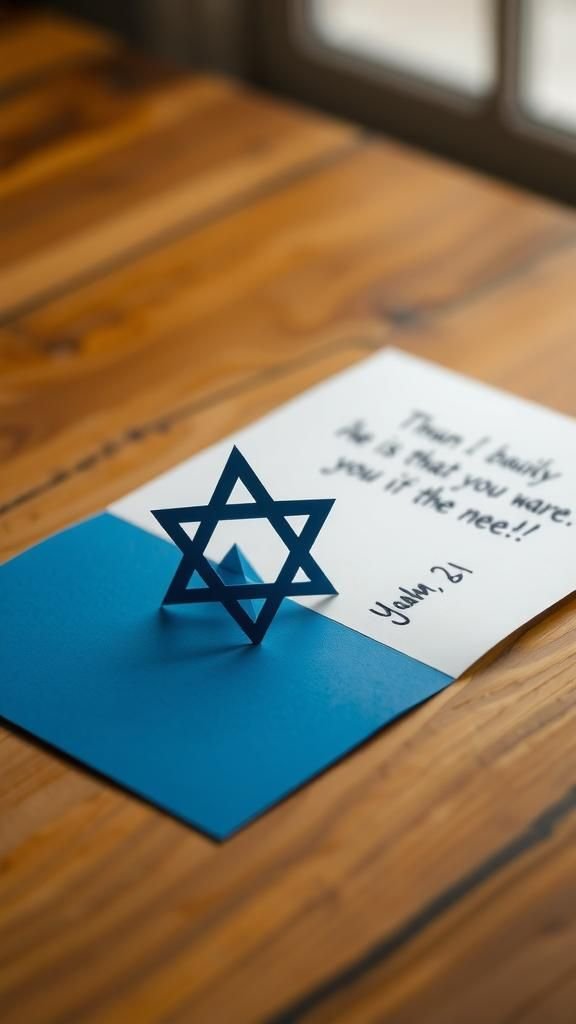
A pop-up Star of David card always felt like a little surprise waiting to be opened. The first time I made one, the way the star sprang upright gave an odd, warm thrill — like a miniature stage curtain lifting.
The paper edges created crisp shadows inside the card, and I liked the way a matte blue star sat inside a glossy white frame. Handwritten notes fit naturally into the negative space, and I remember gifting a stack of these to family who kept them on mantles for years.
Steps
- Fold a greeting card base and prepare an internal pop-up mechanism with parallel slits and a bridge tab.
- Cut a symmetrical Star of David shape and score its center fold so it can sit upright on the bridge.
- Insert the star into the pop-up tab and secure the tabs to the card interior for stability.
- Add a personal message and exterior embellishments to match the inner surprise.
Paper rosettes with subtle Hanukkah color palette
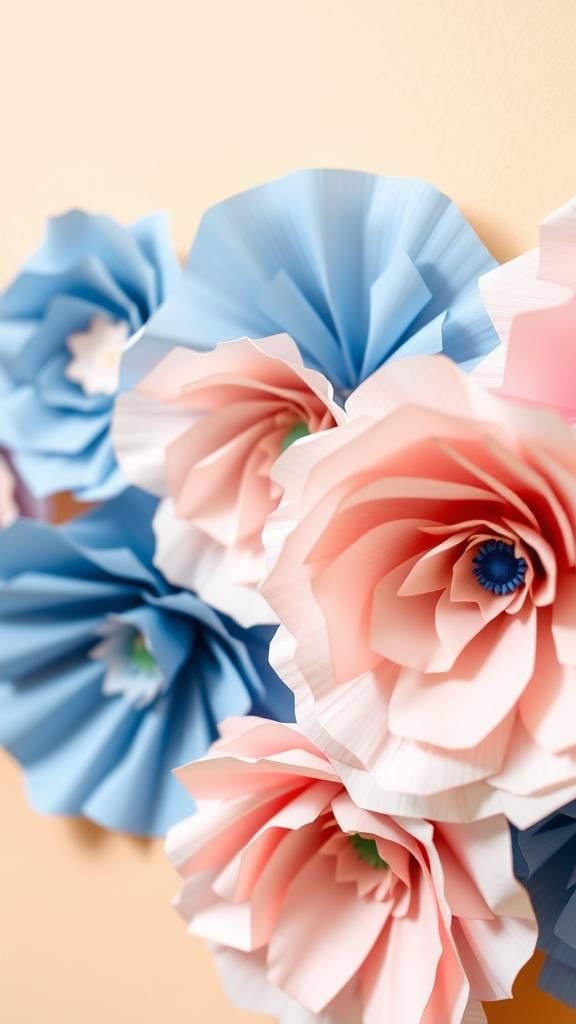
Paper rosettes folded in alternating blue and white layers brought a vintage fairground charm to my decorations. Their scalloped edges created a rhythmic shadow play on the wall, and the slight stiffness of the paper kept each rosette proudly open.
I remember pressing them to the wall in asymmetrical clusters and liking how they formed a playful backdrop for the menorah. The mix of matte and pearlescent paper added depth, and the glow from nearby lamps made each rosette reveal new tones as the evening wore on.
Steps
- Take long strips of patterned or solid paper and accordion-pleat them across the full length.
- Join the ends of each pleated strip to form a tube, then pinch to reveal a circular rosette.
- Layer rosettes of differing diameters for visual interest and join centers for stability.
- Arrange clusters on a wall or mantle to create a textured festive display.
Chain of interlocking Stars for a simple arch
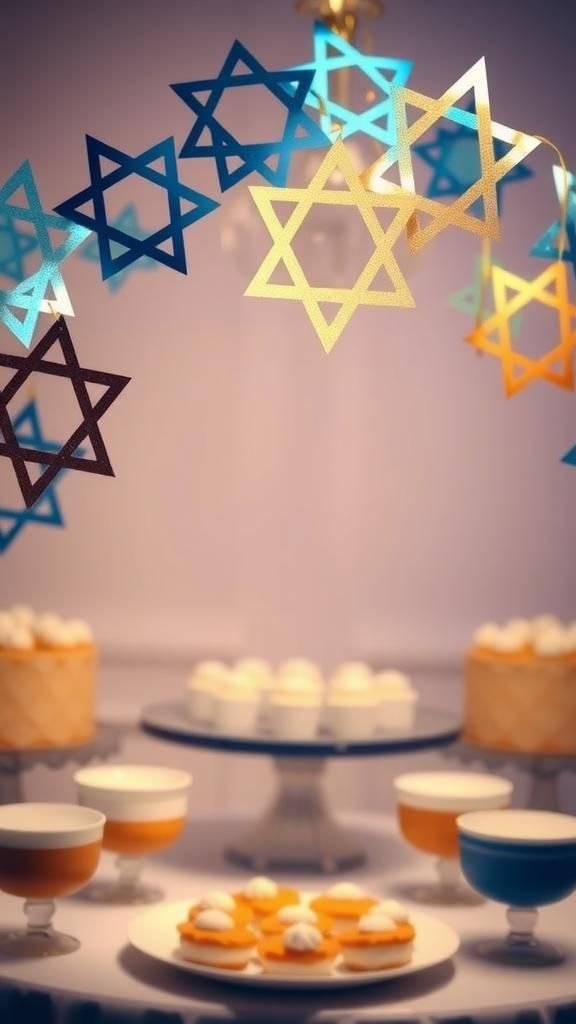
An interlocking chain of paper Stars of David became a simple arch over our dessert table one year, and it felt like a doorway into the celebration. The way each star slipped into the next created a gentle rhythm, and the chain had an almost textile quality despite being entirely paper.
I enjoyed how the metallic accents glinted when someone walked beneath it. It was light enough to sway with the air, which gave the arch a sense of movement without being fussy or heavy.
Steps
- Cut identical star shapes from both cardstock and lightweight metallic paper for contrast.
- Create slits on opposing points of each star to allow one to slide into the next.
- Interlock stars one after another until the chain reaches the desired length.
- Drape the chain over a low arch or fastening points to form a gentle curve above the table.
Mini gelt envelopes tucked into napkins
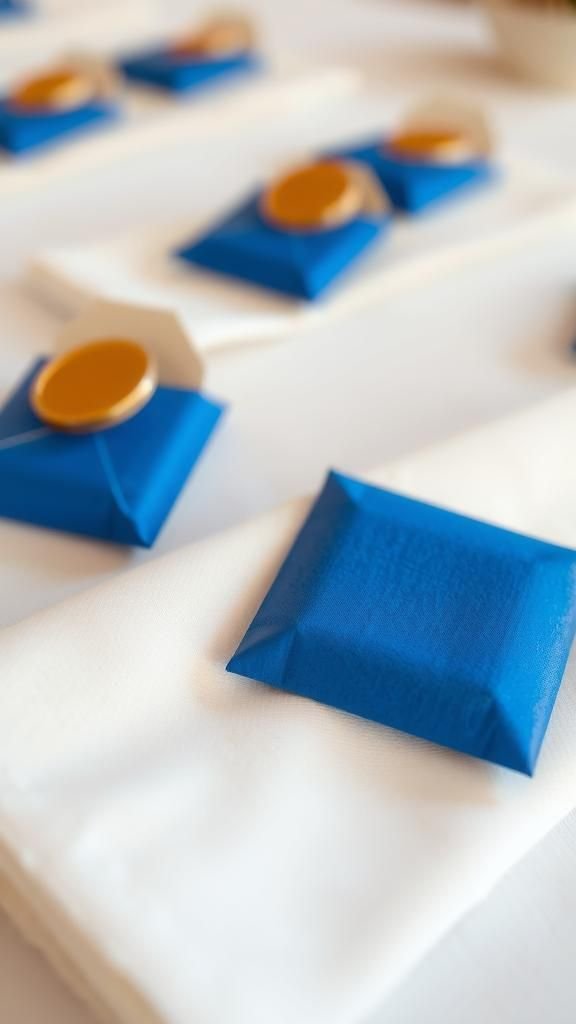
Tiny envelopes holding chocolate gelt make little discoveries at each place setting. The crispness of the paper envelope contrasts with the soft napkin folds, and I remember the tiny surprise faces when guests found their own coin tucked inside.
The envelopes felt like small secrets that added a playful pause before the meal. A light dusting of glitter on the flap made each envelope peek like a jewel without overwhelming the table, and the quiet ritual of unwrapping that tiny coin became an amusing moment of connection.
Steps
- Cut small rectangles of decorative paper and fold into compact envelope shapes with neat edges.
- Create a tiny flap and secure it with a small adhesive dot to keep the pocket closed.
- Slip a single chocolate coin into each envelope and close gently to hide the treat.
- Tuck envelopes into napkin folds at every place setting for a playful reveal.
Three-dimensional paper menorah with layered arms
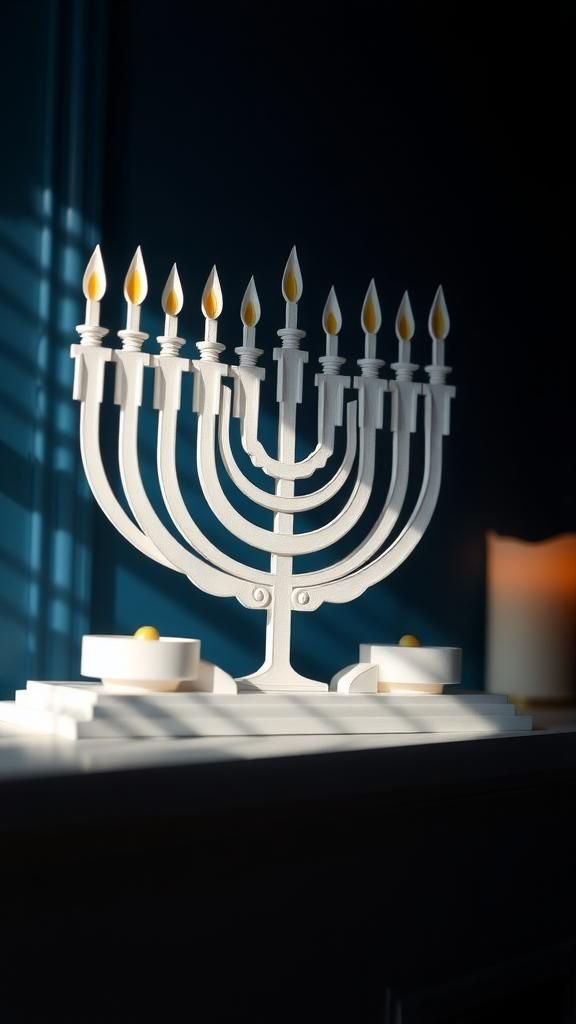
Building a three-dimensional paper menorah felt a bit like sculpting with paper; its layered arms created subtle depth that read as sculptural on the mantel. The interplay of shadow between layers made the piece feel more substantial than its weight suggested.
I particularly loved the way the center arm rose slightly higher, giving the whole object a sense of ceremony. It seemed to hold its own among other decorations, quiet but confident, and the clean edges made it feel modern while nodding to tradition.
Steps
- Draft a symmetrical menorah profile on heavy cardstock and replicate the silhouette multiple times for stacking.
- Cut thin spacer strips from matching paper and place them between silhouette layers to build volume.
- Secure layers at consistent intervals to maintain uniform depth along the arms.
- Add small paper flame accents to crown each arm and set the piece on a low base.
Spinning paper dreidel for a tactile centerpiece

A tiny spinning paper dreidel centerpiece captured my kids’ attention more than any other toy that night. It had a satisfying wobble and a smooth, paper-on-paper hum when it twirled on its axis.
The surfaces were decorated with tiny hand-drawn letters, and the contrast of metallic highlights against matte panels made spins look like quick bursts of light. Watching it rotate felt oddly calming, like a little kinetic sculpture that fit perfectly on a holiday table.
Steps
- Craft a balanced dreidel shape from sturdy paper, ensuring symmetry to promote smooth spinning.
- Create a short tapered stem to serve as the axis and center it within the dreidel body.
- Decorate each face with traditional letters for visual interest while in motion.
- Place the dreidel on a low pedestal or smooth surface to enjoy its rotation.
Hanukkah paper wreath with layered motifs

A paper wreath layered with tiny Hanukkah motifs felt like a small festival on the door. The rhythmic repetition of stars, dreidels, and candles created a dense, friendly texture that made the entrance feel welcoming.
I liked how different papers — glossy, matte, speckled — played against each other and how the wreath caught the breeze from the hallway. It never felt overly formal, more like a handcrafted halo that hinted at the warmth waiting inside.
Steps
- Cut a sturdy circular base from heavy cardstock to serve as the wreath foundation.
- Prepare numerous small motif cutouts in a mix of paper finishes for visual variety.
- Layer and overlap motifs around the base, building outward toward the wreath edge.
- Add a loop at the back for hanging and place the wreath on the door at a welcoming height.
Accordion menorah that fans open on the table
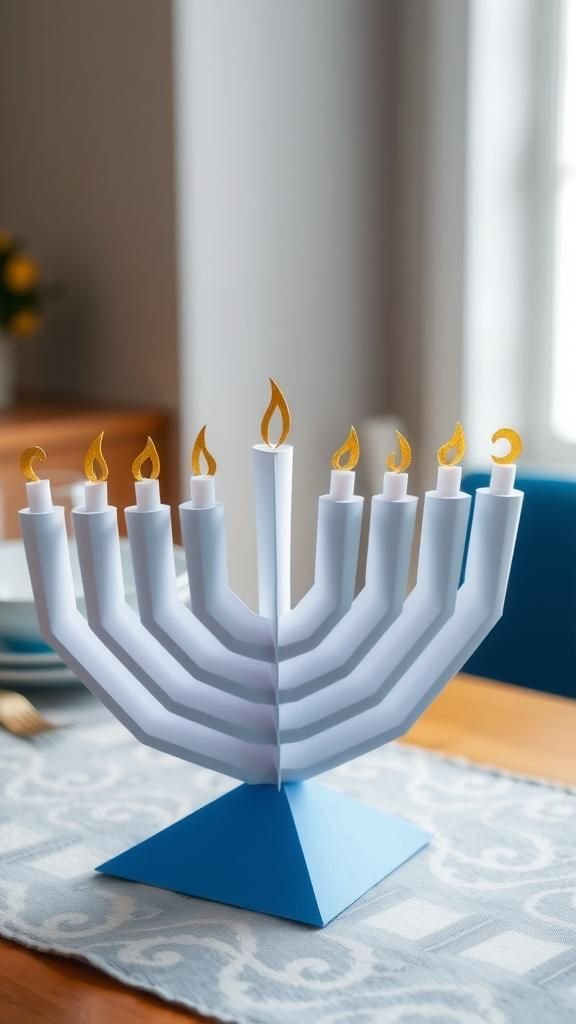
An accordion-style paper menorah that fans open felt playful and compact for small spaces. When expanded the row of candles read like a delicate paper skyline, and when closed it slipped easily into a drawer.
The paper creases formed neat ridges that caught light across the tabletop, and I liked the tactile sound as the folds flattened and opened. It made lighting time feel a bit theatrical, with a simple flourish of the hand revealing the line of paper flames.
Steps
- Prepare a long strip of sturdy paper and score parallel creases at even intervals to create the accordion base.
- Cut candle silhouettes along the top edge so they appear when the accordion is expanded.
- Add small translucent flame pieces to each silhouette for a warm visual effect.
- Open the accordion on the table to display the stretched menorah and close for neat storage.
Delicate vellum candle shades for a soft glow

Vellum candle shades created a soft veil of light that made the table feel calm and luminous. The semi-translucent material softened every flicker into a warm halo, and the edges had a faint translucent rim that I found soothing.
Paired with crisp paper bases, the shades introduced a gentle contrast between hard lines and soft light. I remember how the room slowed down when the shades were in place, and conversations gathered around the warm pools of glow they cast.
Steps
- Cut cylinders of vellum to match the height of small votive holders and decorate lightly if desired.
- Join the vellum edges with a thin strip so the cylinder keeps its form while allowing light to pass.
- Place the shade over flameless candles to observe the softened glow and subtle halo.
- Arrange multiple shades at staggered heights for layered pools of warm light.
Paper mosaic menorah with tiny colored tiles
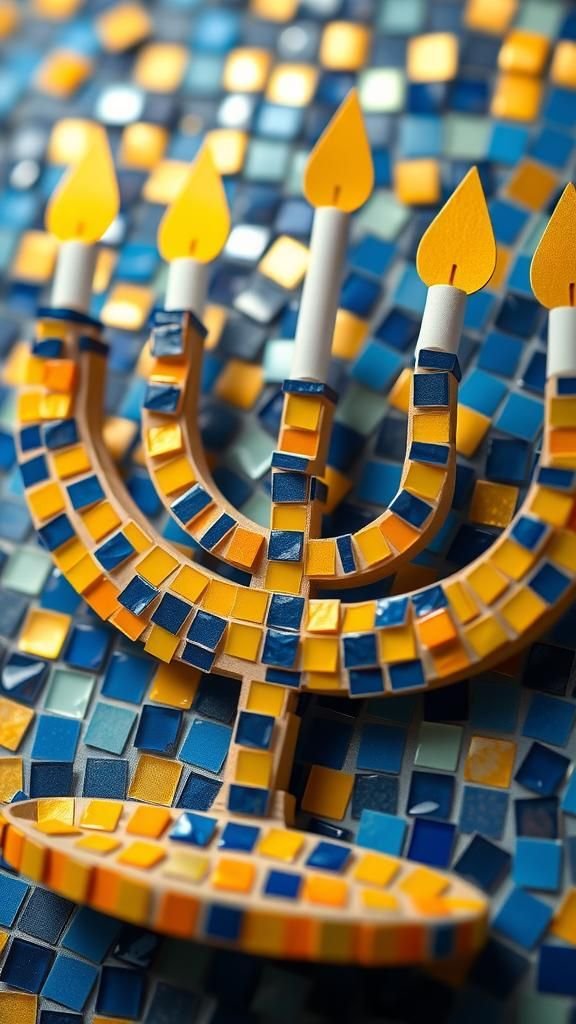
Creating a paper mosaic menorah from many tiny colored tiles felt like painting with paper. Each little square added a jewel-like facet, and stepping back revealed a cohesive menorah image formed from the collage.
The tactile surface had a satisfying irregularity, where some tiles lifted at the corners and caught light differently. I enjoyed the slow rhythm of placing each piece and how the finished mosaic looked like a handcrafted stained-glass memory, glowing quietly even without direct light.
Steps
- Cut numerous small squares of colored paper in a controlled palette to form mosaic tiles.
- Lay out a menorah silhouette on a backing sheet and begin placing tiles from the center outward.
- Slightly overlap tiles for texture and maintain a consistent spacing to keep the image readable.
- Fill the entire silhouette, add a narrow frame, and gently smooth the surface for display.
Countdown pocket calendar for nightly surprises

A pocket calendar with nightly envelopes added a playful rhythm to the season for my family. Each little pocket held a note or tiny coin, and the tactile act of slipping a hand inside felt like a small private ritual.
The pockets lined up in a neat grid, their colors moving from deep night blues to sparkling pale hues. I liked the hush that fell when someone reached for the next pocket — it made each evening feel intentionally marked and quietly special.
Steps
- Create a grid backing from heavy paper and cut small matching pockets to form individual compartments.
- Decorate each pocket with numbers and miniature motifs to hint at the night’s theme.
- Place a small treat or note into each pocket and secure them to the grid in order.
- Hang the calendar in a common space where evenings become a moment of small discovery.
Origami Stars for delicate tree-like ornaments
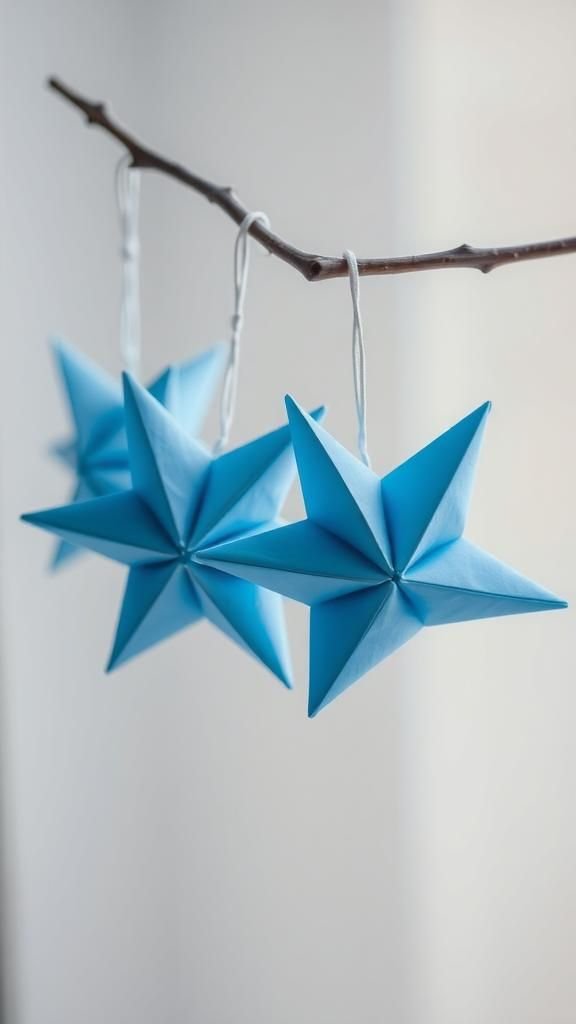
Origami stars folded from blue patterned paper felt like tiny constellations when hung from a small tabletop branch. Their sharp folds caught light along crisp ridgelines, and the geometric symmetry was quietly satisfying.
I remember the hush as each tiny star swung slightly in the room breeze, offering tiny flashes of glossy paper. They made the branch look almost celestial and added a refined touch to the room without feeling overly ornate.
Steps
- Prepare square sheets of patterned paper and follow an origami star crease sequence to form the core shape.
- Tuck and compress the final tabs to secure the star’s geometry so it holds firm.
- Thread a slim cord or metallic thread through a small hole at the top for hanging.
- Suspend multiple stars at varied heights from a bare branch or small indoor tree for a celestial display.