
Air Dry Clay Crafts turn quiet afternoons into calming creativity, and these air dry clay creations shine with approachable charm. I love how air-dry clay crafts deliver ceramic vibes without a kiln, inviting color play, textured surfaces, and small sculptural moments that feel personal.
Air dry clay projects also suit quick gifting, with thoughtful pieces that look polished on a shelf or desk.
A rainy weekend sparked my first Air Dry Clay Crafts session, shaping a tiny dish for my grandmother’s rings. That small success led to more air-dry clay projects, from terrazzo coasters to moon phases.
Each air dry clay craft carried a memory and a new finish to explore.
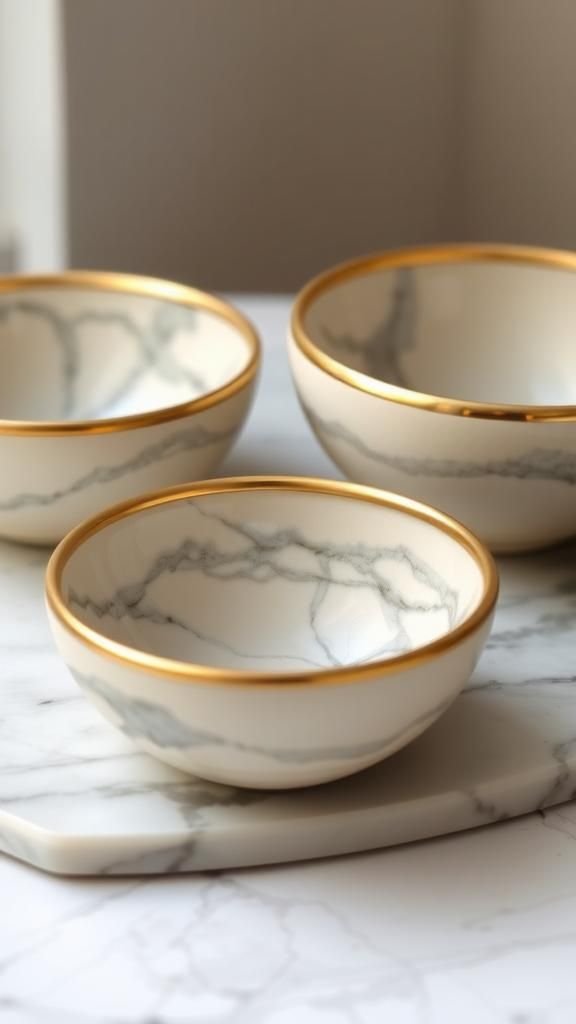
Minimalist Arch-Edged Trinket Dishes In Soft Neutrals
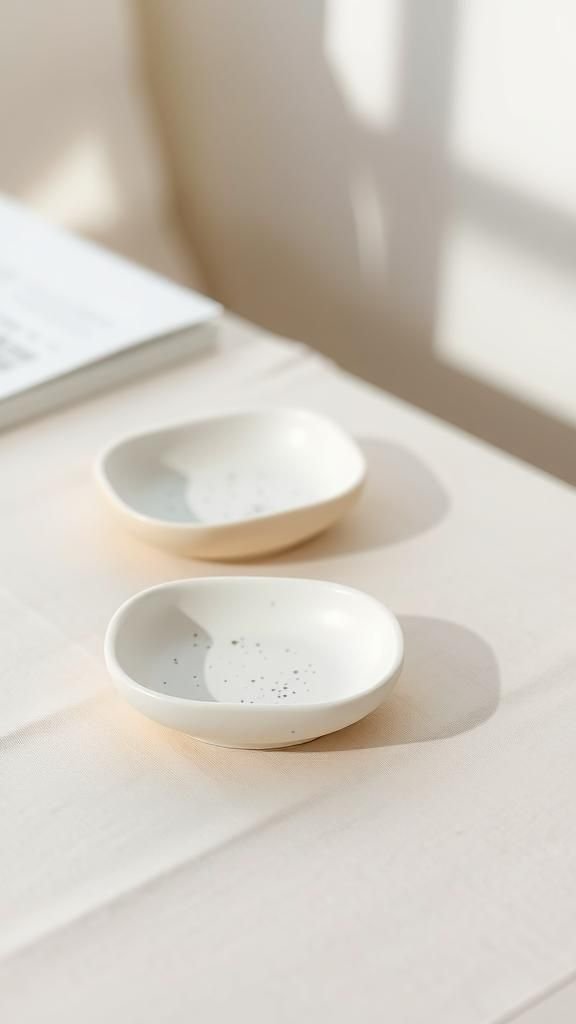
These arch-edged trinket dishes bring a calm, contemporary presence to dressers and desks. The palette leans toward warm whites, oatmeal, blush, and gentle sage, with subtle speckles or delicate metallic pinstripes for quiet contrast.
A satin or chalky matte finish echoes ceramic while keeping the look light. Low profiles and curved rims create a sculptural silhouette that holds rings, earbuds, or keys without visual clutter.
Grouped as a set, they form an understated vignette on an entry console. Wrapped in tissue with a linen ribbon, a single dish becomes a thoughtful host gift or dorm-warming surprise.
Steps
- Roll clay to a uniform sheet and cut arch-edged rounds or ovals.
- Mold on a round form to create a shallow dish and refine edges.
- Dry fully, smooth with fine sandpaper, and add color accents.
- Seal the surface for stain resistance and let cure before gifting.
Botanical Impressed Ring Cones With Garden Textures

Ring cones gain a nature-forward aesthetic through gentle botanical impressions. Leaves, ferns, and herb sprigs create delicate veining that wraps around the tapered silhouette, adding organic personality to a vanity tray.
Pale clay keeps the look airy, while moss, eucalyptus, or terracotta tones highlight the textures. A satin glaze effect or soft wax sheen enhances the embossed details without glare.
Displayed in a trio, they anchor a jewelry vignette beside a bud vase. Tucked into a small box with kraft shred and a dried sprig, a single cone becomes a charming bridesmaid or birthday keepsake.
Steps
- Form cone shapes, pressing real leaves gently around the surface.
- Trim bases flat, refine tips, and let the cones dry completely.
- Brush on diluted pigment to accent the impressions and wipe back.
- Seal for durability and attach felt to bases for surface protection.
Terrazzo Speckled Coasters With Modern Pastel Chips

A terrazzo look gives coasters playful character and modern polish. Confetti-like chips in blush, sky, mustard, and charcoal scatter across creamy bases, striking a balance between joyful color and clean lines.
The surface leans smooth with faint edge rounding for a tactile touch. Round or square silhouettes stack beautifully in a ribboned bundle, perfect for a housewarming.
Colorways swing from muted Scandinavian palettes to bold Memphis-inspired pairings. A satin seal enhances the speckles while protecting from light spills, and a cork backing helps them sit softly on wood surfaces and stone counters.
Steps
- Tint small clay portions, let dry slightly, and chop into chips.
- Mix chips into fresh clay, roll a sheet, and cut coaster shapes.
- Smooth edges, dry fully on a flat board to prevent warping.
- Sand lightly, add acrylic color accents, and seal with waterproof finish.
- Adhere cork backing circles and tie as a gift set.
Lunar Phase Wall Hanging With Subtle Textures
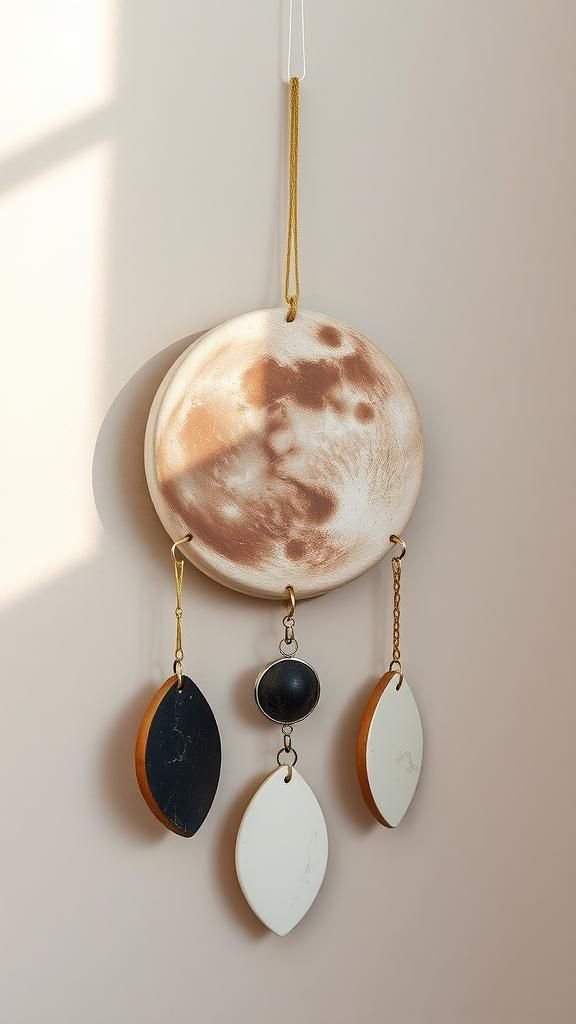
A lunar phase hanging brings celestial calm to a reading nook or bedroom wall. Crescent and gibbous shapes echo moonlight with chalky ivory, charcoal, and a touch of muted brass for glow.
Gentle pitting and soft brushed color create crater-like depth without heavy contrast. Strung vertically on twine, leather cord, or fine chain, the sequence creates soothing movement in a breeze.
Gift-ready packaging could include star-patterned tissue and a tiny astronomy card. The final piece pairs well with linen curtains, travertine accents, and pampas grass for a serene, sky-inspired vignette.
Steps
- Cut circles, crescents, and gibbous shapes from rolled clay.
- Texture surfaces with sponge dabs and tiny tool marks.
- Dry thoroughly, add charcoal washes and pearly highlights.
- Seal, punch top holes, and assemble on cord or chain.
Petite Bud Vases With Faux Ceramic Finish
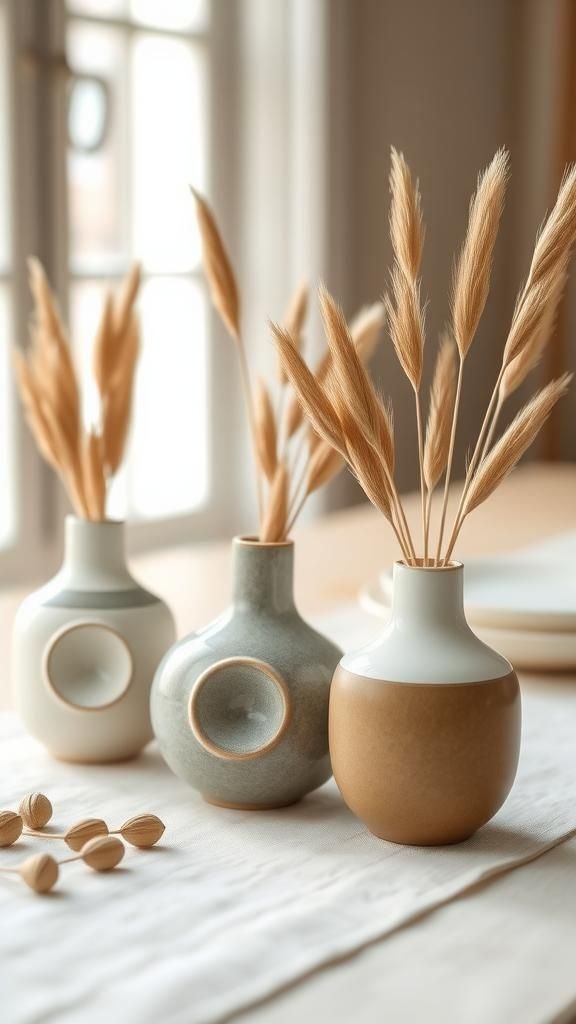
These petite vases invite a faux ceramic feel through smooth curves and muted color. They cradle tiny stems or dried grasses when paired with a glass insert, keeping the clay body pristine.
Tones range from porcelain white and dove gray to coastal blue and olive. A satin or eggshell sheen suggests kiln work while staying approachable.
Arranged in a cluster, the forms create a sculptural centerpiece on a console or windowsill. Wrapped with tissue, twine, and a single dried bloom, one vase becomes a heartfelt teacher or neighbor gift.
Steps
- Wrap clay around a small glass tube, blending seams smoothly.
- Refine the neck and base, ensuring a snug, stable shape.
- Dry slowly to prevent cracking and sand to a sleek profile.
- Add color coats, soft highlights, and a protective seal.
Color-Blocked Letter Magnets For Personalized Messages
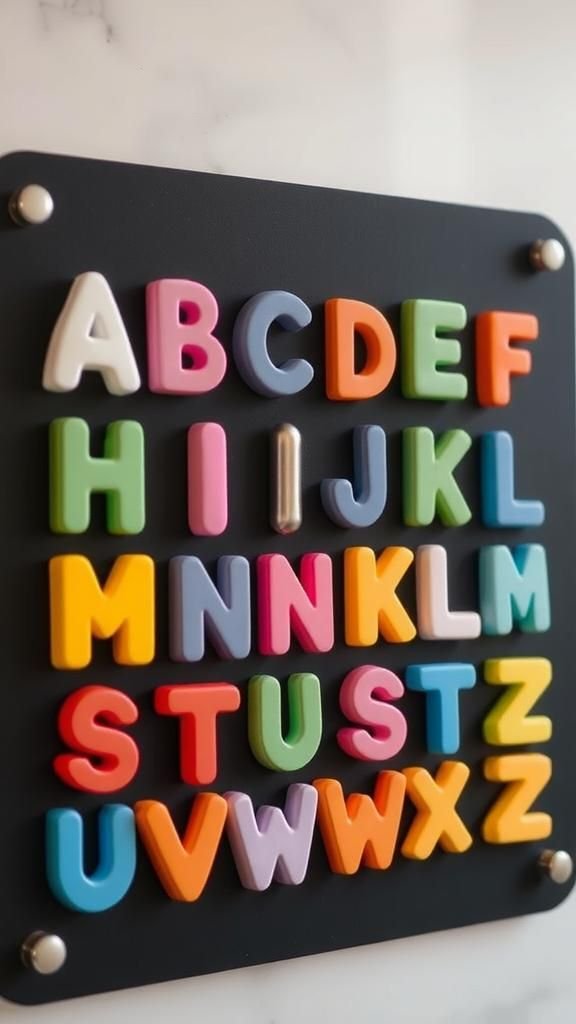
Alphabet magnets deliver cheerful personalization on fridges and metal boards. Chunky letter forms create bold silhouettes with fun color-blocking across top and bottom halves.
Palettes skew playful with coral, teal, marigold, and ivory, or refined with ink, stone, and brass leaf touches. A smooth matte finish keeps the look modern, while tiny speckles add artisan charm.
Presented in a kraft box with shredded paper, a custom name set becomes a sweet dorm send-off or nursery gift. On display, they bring warmth to kitchen notes and office pinboards alike.
Steps
- Cut chunky letter shapes from rolled clay and refine edges.
- Dry completely, sand flats, and mask off areas for color-blocking.
- Apply pigment coats, add metallic leaf accents, and seal.
- Glue strong magnets to backs and let cure fully.
Glossy Fruit Ornaments With Hand-Colored Details

Fruit forms carry a joyful, nostalgic charm for seasonal branches or kitchen hooks. Plump pears, lemons, and cherries read playful yet decorative, with saturated color layers and gloss for a glazed look.
Tiny leaf blades in sage or deep green bring contrast, while subtle speckles echo natural skin. Hung with velvet ribbon or baker’s twine, the ornaments brighten gift wrap and wreaths.
Packed in a small crate with tissue nests, they become a delightful hostess present. Grouped in a bowl, the set also creates a cheerful table centerpiece with a harvest mood.
Steps
- Model fruit shapes and add stem and leaf details.
- Insert hanging loops, smooth surfaces, and dry thoroughly.
- Layer color washes, add highlights, and finish with gloss seal.
- Tie ribbons through loops and arrange for gifting.
Marbled Jewelry Bowls With Veined Stone Aesthetic
Marbling creates an elegant stone-like effect that flatters small catchall bowls. Swirls of ivory, gray, and onyx move through the clay body, forming soft veining and a luxurious feel.
A rim kissed with metallic leaf elevates the silhouette, while a satin surface keeps reflections gentle. These bowls cradle rings, cufflinks, or keepsakes beside a vanity mirror or nightstand lamp.
Wrapped in a drawstring muslin bag with a card, one bowl feels ready for birthdays or thank-you moments. Paired with a scented candle, it anchors a spa-inspired gift set.
Steps
- Blend two or three tinted clays with minimal mixing for marbling.
- Roll and shape into shallow bowls using a curved form.
- Dry slowly to maintain shape, sand rim and interior smooth.
- Apply metallic leaf accents, add protective finish, and buff gently.
Crescent Incense Holders With Celestial Gold Accents
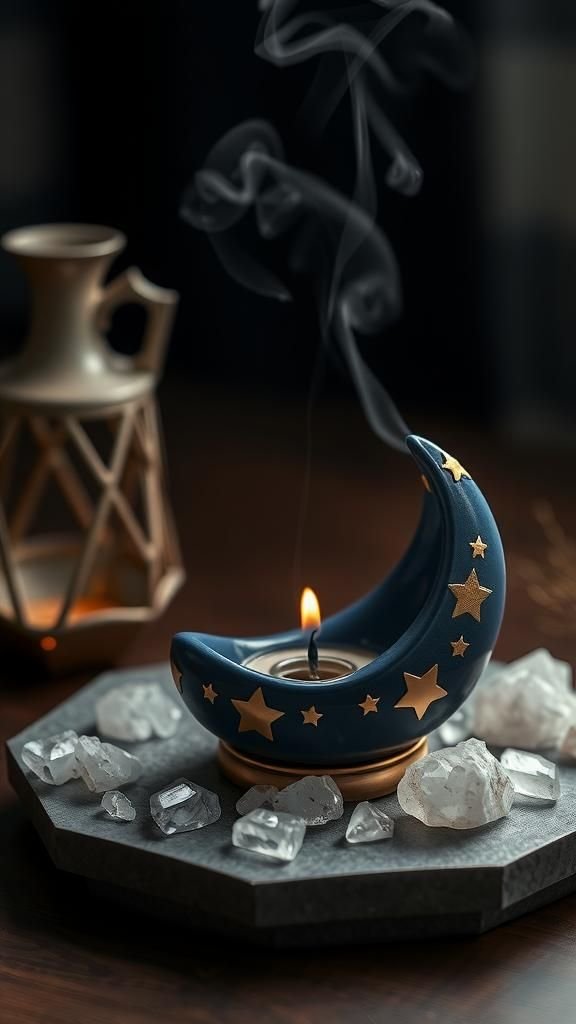
Crescent-shaped holders bring a dreamy celestial mood to aromatherapy corners. A gentle curve cradles ash while a small angled hole holds the stick securely.
Color stories favor midnight blue, periwinkle, and moonlit ivory, with tiny gold constellations dotted along the arc. Surface textures range from silky smooth to a fine sandy grain for tactile interest.
Styled beside a crystal cluster or a ceramic tray, the holder creates a calming ritual moment. Presented in a slim box with star tissue, it becomes a soothing wellness gift.
Steps
- Form a crescent base with a raised lip and angled stick hole.
- Refine edges and smooth the surface, allowing complete drying.
- Add layered color, starry speckles, and metallic highlights.
- Seal for ash resistance and pad the underside with felt.
Sculptural Taper Candle Holders With Organic Curves
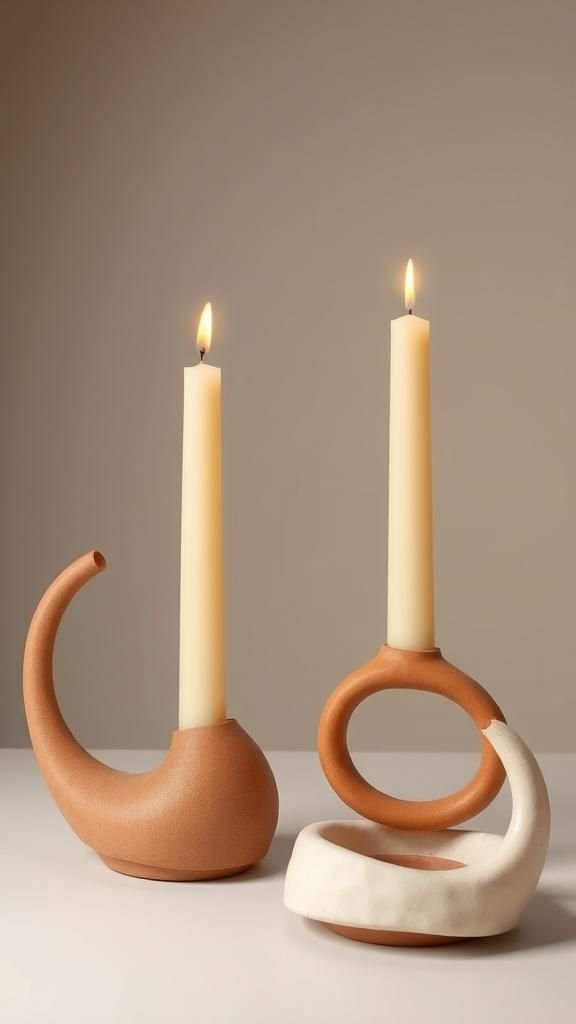
Organic curves and negative space lend gallery-like energy to taper holders. Stacked loops, knotted rings, or wave forms create dynamic silhouettes that catch light beautifully.
Neutral clay in bone or greige keeps the focus on shape, while muted terracotta adds warmth. A velvety matte finish pairs well with linen table runners and ceramic dinnerware.
Singles look striking on a bedside table, while a mismatched pair becomes a conversation piece on a mantle. Presented with a pair of beeswax tapers and a handwritten tag, the holder sets the tone for cozy evenings.
Steps
- Build a stable base and sculpt looped or knotted shapes around a taper mold.
- Check fit, refine curves, and let the form dry slowly and evenly.
- Smooth high points, add tonal washes or subtle speckles, and seal.
- Affix protective pads underneath to safeguard furniture surfaces.
Textured Cachepot Planter Sleeves For Indoor Greenery

Planter sleeves made from clay transform basic nursery pots into decor accents. Raised patterns, scalloped bands, or woven impressions bring tactile charm to windowsills and shelves.
Earthy palettes of sand, latte, and moss relate to foliage, while chalky white highlights texture under natural light. A soft seal adds a ceramic feel while keeping the surface breathable.
Sleeves slip over plastic pots, protecting the clay from standing water. Gifted alongside a pothos or herb plant, the sleeve creates an instant housewarming set and an easy styling upgrade for small apartments.
Steps
- Wrap clay around a pot form, leaving interior space for a plastic insert.
- Add textures with stamps, lace, or looped lines; refine the rim.
- Dry evenly, sand lightly, and brush on tonal color to catch texture.
- Seal the exterior and add felt feet to the base.
Keepsake Handprint Plaques For New Family Memories
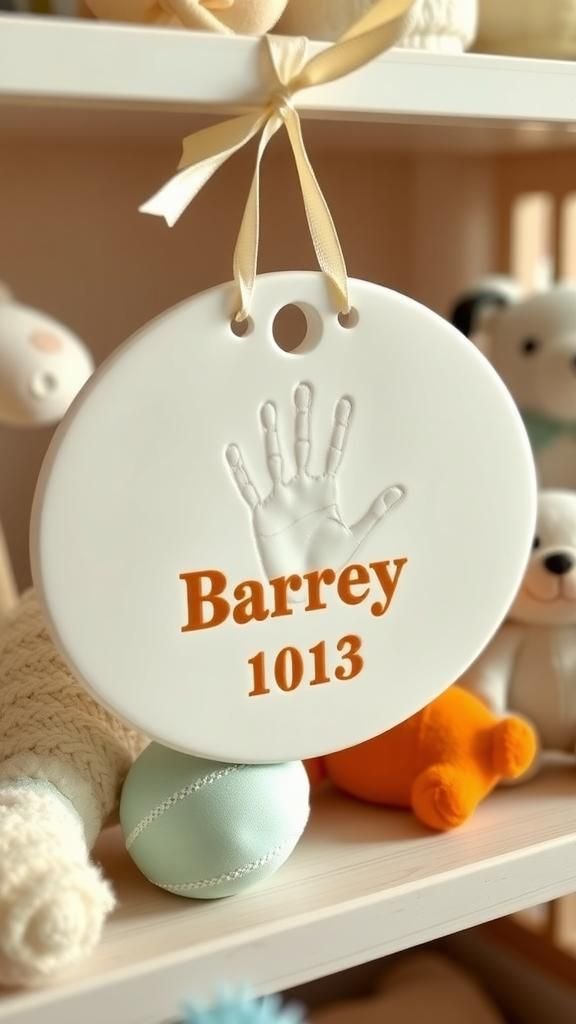
Handprint plaques capture a moment in time with sweet simplicity. A smooth round or heart shape frames the tiny imprint, while name, date, or a short phrase adds sentiment.
Soft ivory or pastels lend a nursery-friendly presence, and a satin finish keeps the surface touchable. Ribbon or leather cord through a top hole turns the plaque into wall decor, while a plate stand displays it on a shelf.
Wrapped in tissue with a photo card, it becomes a treasured grandparent gift and a gentle reminder of early days.
Steps
- Roll clay into an even slab and cut a clean round or heart.
- Press a small hand firmly, add name and date impressions.
- Pierce a hanging hole if desired and dry the piece completely.
- Sand edges smooth, apply gentle color washes, and seal.
Stamped Clay Gift Tags With Rustic Twine Charm

Clay gift tags elevate presents with artisanal texture and reusability. Rectangles, arches, or scalloped rounds carry stamped words, monograms, or tiny icons that feel personal.
Tones range from chalk white and pale blush to inky navy for dramatic wrapping paper contrast. Edges may show gentle distressing for a vintage mood, while a waxed finish adds a soft sheen.
Tied with twine or velvet ribbon, the tags double as ornaments after the wrapping paper is gone. Packed in a small envelope set, they make a thoughtful stationery-style present.
Steps
- Roll a slab and cut tag shapes with a clean hole at the top.
- Stamp letters or icons, refine edges, and let dry flat.
- Add color washes or metallic touches and seal lightly.
- String twine or ribbon and bundle as a reusable set.
Geometric Pendant Necklaces With Metallic Leaf Highlights

Graphic shapes turn clay pendants into wearable mini sculptures. Hexagons, arches, and stacked circles form bold arrangements that play nicely with turtlenecks and simple tees.
Color blocking in ink, sandstone, and blush pairs elegantly with gold or silver leaf accents. A silky-matte finish keeps the jewelry modern, while subtly textured edges add hand-touched character.
Displayed on cardstock with linen string, these pendants become market-ready pieces or birthday surprises. Styled with a clean blouse and blazer, the geometry delivers a refined pop of design.
Steps
- Cut geometric shapes, pierce hanging holes, and refine edges.
- Dry, sand, and apply color fields with crisp masking.
- Add metallic leaf highlights, seal, and buff for a soft sheen.
- Thread chains or cords with jump rings and package on cards.
Boho Bead Garlands For Mantels And Shelving
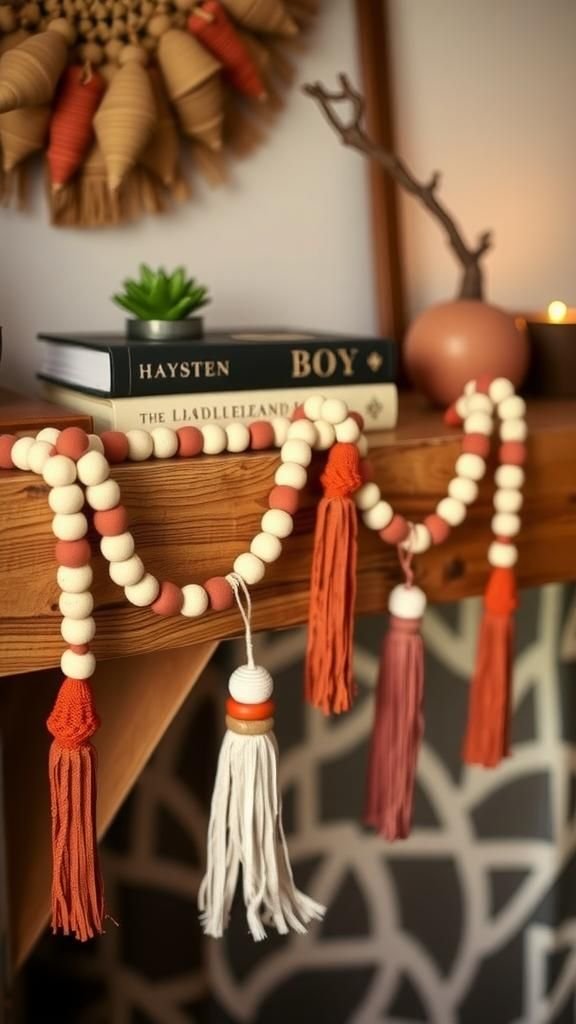
Oversized clay beads strung into garlands bring texture and warmth to mantels, bookshelves, and coffee tables. A mix of round, disc, and oblong forms creates rhythm, while micro speckles and tonal washes add depth.
Natural twine tassels lend a relaxed, bohemian mood. Palettes range from bone and sand to terracotta and charcoal, pairing easily with woven baskets and vintage books.
Coiled in a shallow tray, the garland frames candles and small plants. Wrapped around tissue in a long box, it turns into a housewarming treat with artisanal character.
Steps
- Form assorted beads with centered holes and vary their sizes.
- Dry thoroughly on skewers, sand any seams, and apply color washes.
- Seal beads, string onto cord, and knot tassels at the ends.
- Arrange on shelves or in trays as layered decor.
Lidded Trinket Boxes With Hidden Velvet Liners
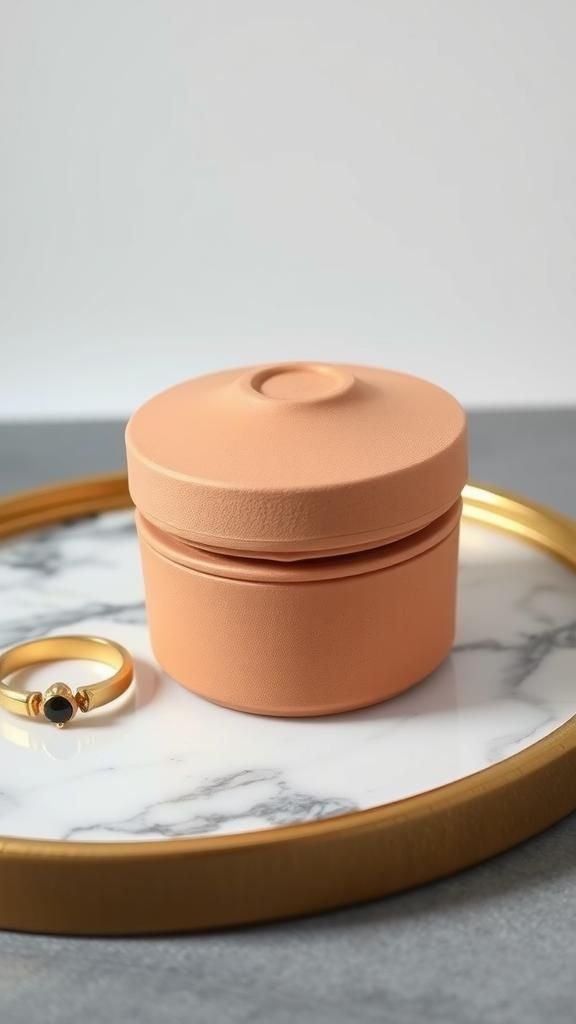
A petite lidded box turns keepsakes into a ceremony. Cylindrical or square shapes with softly rounded edges feel elegant in the hand.
Monochrome palettes in porcelain white, champagne, or inky blue create a refined base for thin metallic edging. Inside, a velvet liner cushions rings, cufflinks, or tiny notes.
Stacked on a vanity or tucked into a bookshelf, the box becomes a quiet design moment. Presented in a rigid gift box with tissue and a small card, it shines as a thoughtful bridesmaid or anniversary gesture.
Steps
- Form a base container and a fitted lid, checking alignment.
- Smooth edges, add a tiny knob or handle, and dry evenly.
- Sand mating surfaces, apply color and metallic accents, then seal.
- Glue a velvet circle inside the base and let cure.
Botanical Bookmark Slabs With Pressed Wildflower Inlays
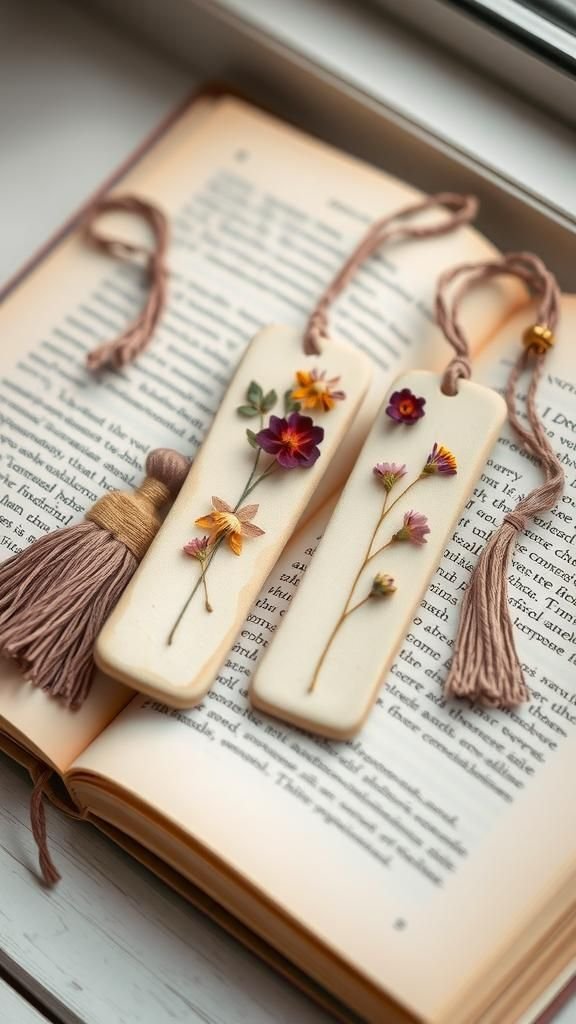
Slim clay bookmarks with pressed flora capture the romance of a garden walk. Wildflowers, tiny ferns, or delicate petals settle into the surface, held by gentle coatings that keep shape and color visible.
Ivory or tea-stained bases highlight the organic details, while a top tassel adds movement. Slipped into a favorite novel, the bookmark feels like a keepsake found between pages.
Bundled as a set with kraft sleeves and a ribbon, they make thoughtful teacher gifts and book-club surprises. A soft satin finish keeps the tactile charm intact.
Steps
- Roll thin slabs and cut bookmark rectangles with rounded corners.
- Arrange dried botanicals, press lightly, and let dry flat.
- Apply clear coats to lock petals, add a subtle tint if desired.
- Punch a hole and tie a tassel or leather lace.
Picture Frame Embellishments With Carved Baroque Flourishes
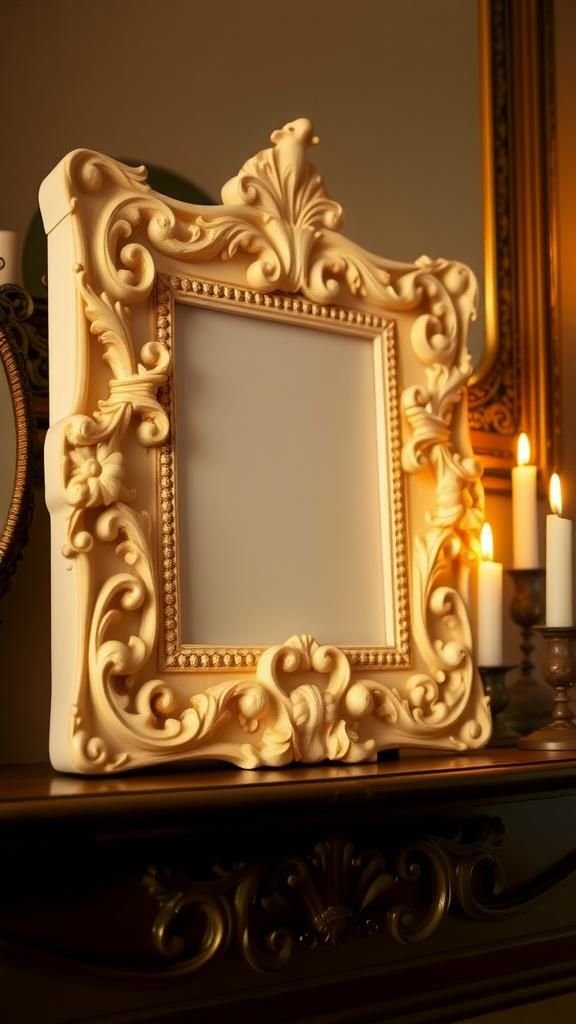
Ornate flourishes lend vintage glamour to simple frames. Curled leaves, scrolls, and shell motifs transform a plain rectangle into a statement piece for black-and-white photos.
Soft stone, ivory, or old-gold tones pair with subtle patina layers that settle into recesses. The result reads collected and storied, perfect for gallery walls or mantel displays.
A satin glow sets off the carving while keeping reflections gentle. Presented with a printed family snapshot, the embellished frame becomes a heartfelt holiday or anniversary gift.
Steps
- Sculpt scroll and leaf motifs and arrange along the frame edge.
- Blend seams, refine carving, and allow thorough drying.
- Brush on layered color, add antiquing glaze in recesses, and seal.
- Mount the embellishments securely to a wooden or acrylic frame.
House Number Tiles With Mosaic Micro Chips
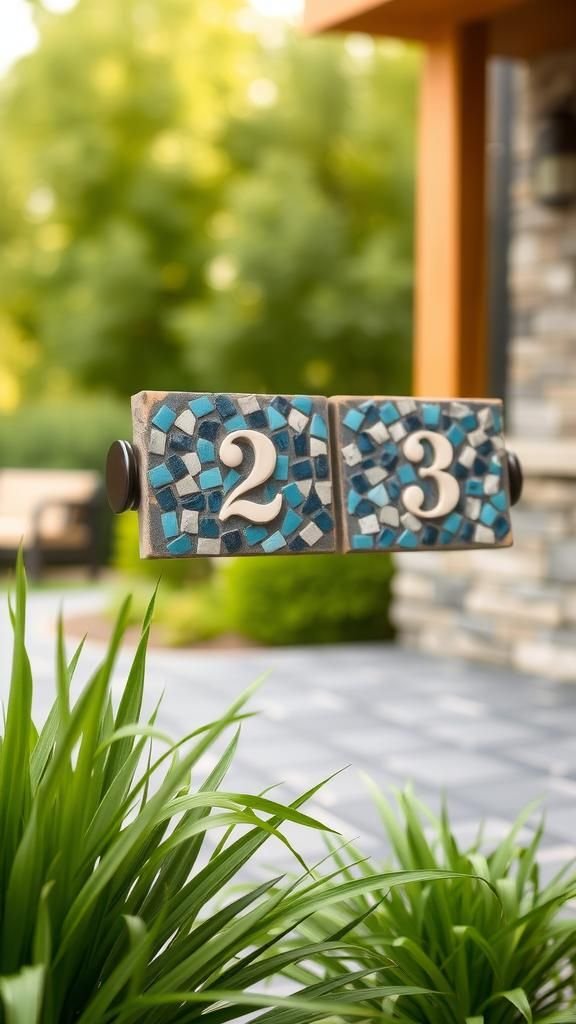
Clay number tiles introduce curb-friendly charm near an entry or mailbox. Clean numerals sit on smooth rectangles or arches, surrounded by tiny mosaic chips in coastal blues, smoky grays, or warm sand.
A satin finish resists dust while highlighting subtle texture. The design pairs well with black hardware, cedar slats, and potted rosemary.
As a gift, the set arrives wrapped in kraft with a simple map card showing placement ideas. Indoors, the tiles also shine on a gallery shelf or kitchen wall as a nod to home pride.
Steps
- Cut tile bases and raise the numerals with extra clay or inlay methods.
- Press micro chips around the edges and refine spacing.
- Dry flat, sand surfaces, and add color layers to numbers and chips.
- Seal thoroughly and adhere hanging hardware or mount to a board.
Seashell Imprint Soap Dishes With Coastal Patina
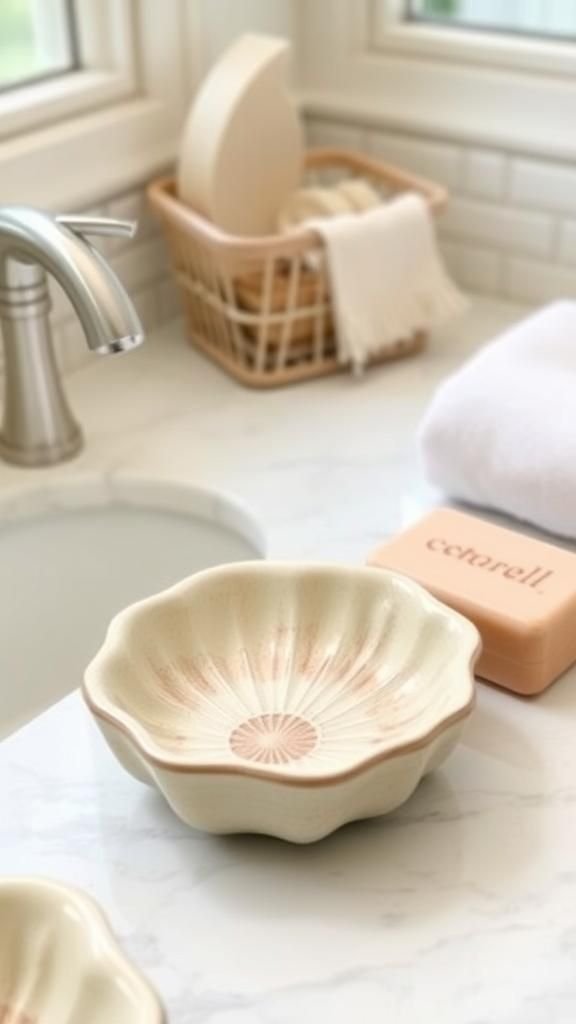
Seashell imprints bring coastal calm to bathroom counters. The shallow dish rests on tiny feet, keeping airflow under soap while displaying scallop textures and tidal lines.
Pale sand, seafoam, and shell pink tones echo shore finds, with a salt-kissed patina settling in grooves. The finish reads beachy yet refined beside crisp towels and woven baskets.
Wrapped with artisan soap and tied in jute, the dish becomes a breezy guest-bath treat. Grouped in a trio, they create an ocean-inspired spa corner on a marble tray.
Steps
- Press shells into rolled clay, forming a shallow dish shape with feet.
- Refine edges, add drainage grooves if desired, and dry fully.
- Layer sea-glass hues, wipe back highlights, and apply a water-resistant seal.
- Cure completely before pairing with soap in a gift bundle.
Miniature Food Charms For Playful Zipper Pulls
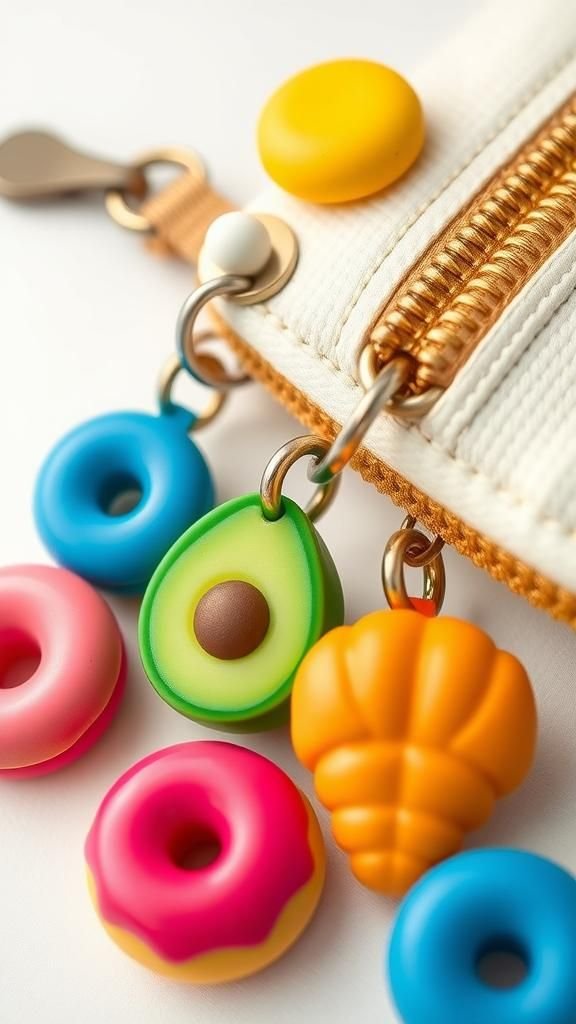
Tiny food charms bring whimsy to bags, jackets, and keyrings. Donuts with pastel icing, avocado halves with glossy pits, and little croissants carry a cheerful, illustrative feel.
High-saturation color and glossy highlights amplify the fun, while micro sprinkles and seeds add texture. Lightweight findings clip onto zippers or backpacks without weighing them down.
Packaged in a tin with shredded paper, a set becomes a delightful stocking stuffer or party favor. The charms also brighten planner bookmarks and pencil cases with personality.
Steps
- Sculpt mini foods with defined details and pierced hanging holes.
- Dry carefully, refine with a needle file, and apply vivid colors.
- Add glossy topcoats, attach jump rings and lobster clasps.
- Group into themed sets and tuck into small tins.